NHR-5 – Fixing Bone Roll
Free PreviewNow that we have defined our new shape, it’s important to fix the bone rolls. Bone rolls values are extremely important to let the rig work correctly during animation, avoiding tedious and sometimes almost impossible fixes. These values will determine which is the natural bending direction of each single bone in this rig. This is the reason for that long explanation about joint orientations, bvh standard and the in depth discussion of how to setup bone roll: it is what we have to comply with now.
One major aim of this course is also to give you knowledge at hand that allows you to understand what Avastar does under the hood. Thus we are looking behind the curtain instead of just telling you about magic buttons and cook book solutions. So be prepared to get into some details.
The course is separated into 7 lessons. This is lesson 5 (updated for Avstar-1.2)
Content of Lesson 5:
- The anterior Legs (front)
- X Mirror
- Anterior Legs chain
- Recalculate Bone Roll
- Quickfix for flipped X Axis
- Check the Deform Bones
- Adjust the Deform Bones
- More about Snap
- Check the Rest Pose
- Bone Display Style
- Snap Rig to Pose
Please ensure the following properties are set:
- Ensure your armature is set to Edit Mode
- Enable the bone roll axes display as described in section “Local Bone axes” of Lesson 2
- Enable X-Mirror from within the Tool Shelf
The anterior Legs (front)
As you can see, the Y axis is pointing down along the leg, as it should. But the other axes point to the wrong directions:
- The X-Axis points forward
- The Z-Axis points sidewards
Now since what was an arm in the original Skeleton is now used as anterior leg for the horse, so also the bone rolls of the anterior legs should comply with that.
Note: The bone’s local Axes are displayed at the Bone Tails and not at the Bone Heads!
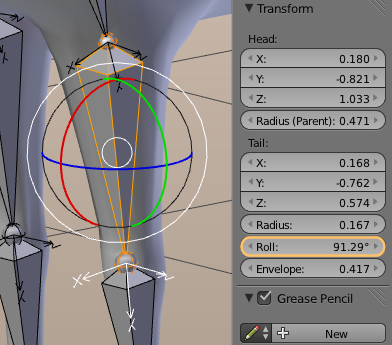 The X axis must point to the actual World’s +X (positive direction, where the manipulator handles in Global mode points at), while the Z axis is going to rotate along with it and point backwards in this case.
X Mirror
thanks to the X-Mirror feature we need to work only on one side. The opposite (mirrored) side will be adjusted automatically by Blender.
- Select a bone (in this case the front leg shin on our horse) and open the View Properties panel (N on the keyboard). In the Transform Panel you find a slider labeled “Roll”, which is currently set to ~90°.
- Lets modify that value such that the x axis now points sidewards (actually you will see the value is 0°) and see what happens..
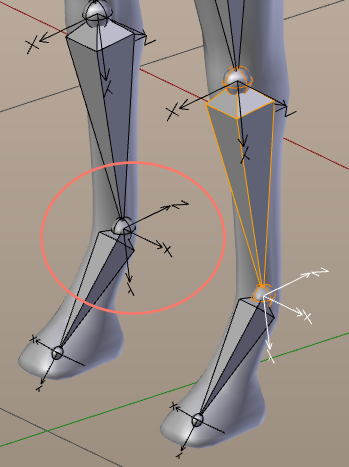
Now the bone roll is fine: The X axis is pointing where it’s supposed to. And the Z axis is rotated accordingly. We should also notice that this change was propagated to the other side too, so we’re cool about it as we only need to do half of the work, and Blender will handle the rest.
Anterior Leg chains
Now proceed and do what you have done for the front leg shin with every single bone we have in the front leg, paying attention to where the X axis is pointing.Then proceed with the anterior legs (on the backside) in the same way.
Finally take care of the spine and head of your horse, always take care to let the local X-axis point towards the characters left side (as seen from first person perspective).
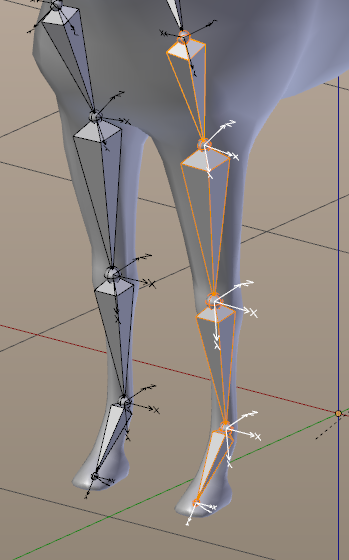
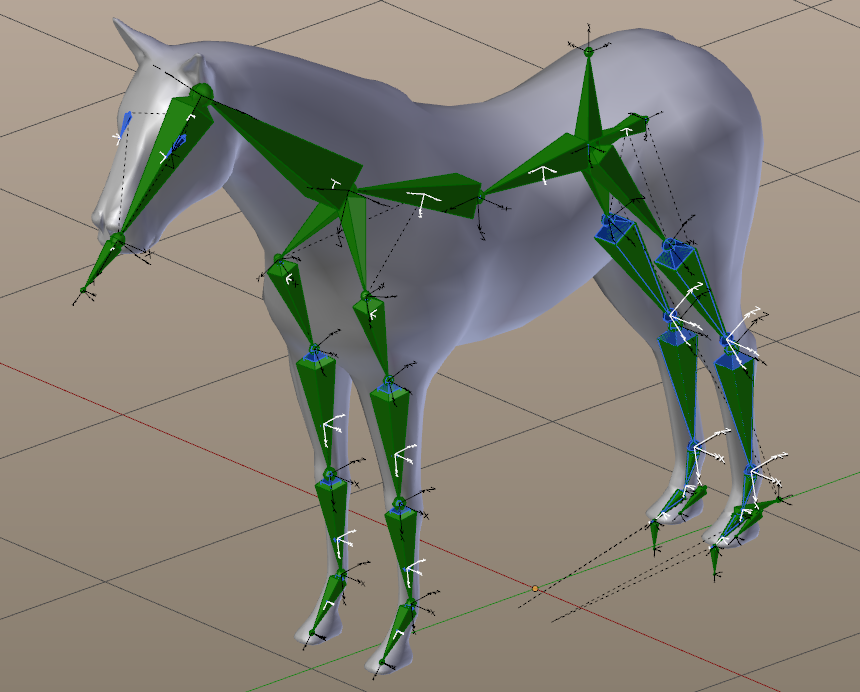
When we’re done, the anterior leg should look like in the image. This chain now complies with BVH standard as leg. And all other bones of the horse should also point in the same direction (towards left side).
You might need to set some roll values to something different than 0°, like for example on the foot bone (one of the “extra bones” we enabled at the beginning). Use the slider, left click and drag on it to see the bone roll axis on the 3D viewport updating in real time, and stop when the X axis is pointing flat to +X World axis.
Using Blender's Bone Roll operators
Recalculate Bone Roll
When your Armature is in Edit mode, then Blender offers you a function for automatically align the local Z-axis for all currently selected bones:
Press CTRL +N to open a popup menu. Now the Z-axis of all selected bones will be aligned to what you select from the popup menu.
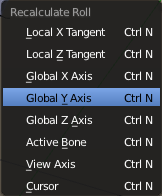
The Bone roll menu (varies with Blender version)
In our case we can simply select the entire Horse armature (in edit mode). Then press
CTRL +N -> Global Y Axis
This will align all local Z-axes to the global Y axis (thus pointing backwards). Unfortunately a few bones will have their X-Axis flipped to the wrong side. But there is another rescue for you:
Quickfix for flipped X Axis
Blender has also an interactive method for modifying bone rolls of an entire selection of bones. You can use this for example after you have Recalculated the Bone roll for all bones (as just described before). In this case you use this operator as follows:
- Ensure you are in Edit Mode
- Select all bones with flipped X Axis.
- Then press CTRL +R (the interactive roll setting)
- and enter 180 on the keyboard.
This will flip the X axes (rotate by 180° around the Y-Axis, thus pointing in the correct direction.
Check the Deform Bones
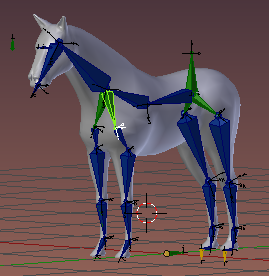
Until now we have only worked on the Control rig (the green bones). But Avastar also has a Deform Rig (Blue bones). And now its time to propagate our edits to the Deform Bones. So, lets examine the Deform Bones in more detail:
Adjust the Deform Bones (in Edit Mode)
The Avastar animation system assumes that the Deform Rig (blue) is exactly aligned to the Control rig (green). So we have to make sure that the Base Skeleton Bones of the SL Avatar are actually aligned to the control rig as they should. This means we have to align the Base Skeleton (blue) to the Rig Skeleton (green). We can do this manually if we like (and find the time to do so)
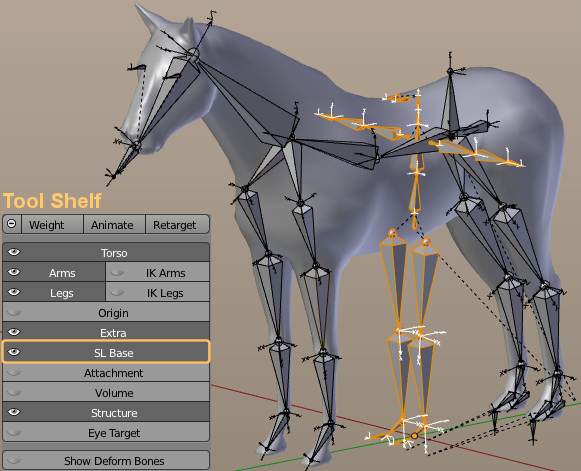
However Avastar has a feature for this: Snap Base to Rig. This function is located in the Tool Shelf. It is only available for Armatures in Edit mode. As soon as you click on this button, the entire Base Skeleton will be recalculated and automatically snapped to the corresponding control bones of the Control Rig.
Snap Base to Rig is only available when your Armature is in Edit Mode
Note: The Base skeleton seems to have disappeared right after you called this operator. Actually the deform bones have just been re-positioned to their corresponding control bone. Thus the control bones and the corresponding deform bones now occupy the same area in the 3D space and thus you can no longer see both at the same time.
Take care of the Operator Panel
If you are not familiar with the Concept of the Operator panel, you can quickly overlook the parameter panel for the Snap Base to Rig tool…
… Right after the Snap Base to Rig tool was called as described above, you will find the tool’s Operator Panel in the lower left corner of the Tool Shelf. There you find 2 snapping options: for the SL Base and for IK Bones
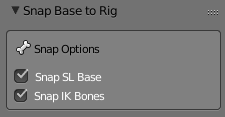
In most cases you will want to snap the IK Bones as well, although we not even have talked about IK bones at all until now. However if you prefer you can disable snapping the IK bones for now and snap the IK Bones at any time later.
You see this Snap function saves us a lot of tedious work (snapping the bones one by one manually) while we were editing the Armature shape.
More about Snap
By default Blender works on what is made visible on purpose. So, if there is something hidden in the scene then operators usually won’t do anything with these items. Avastar instead bypasses this rule. I.e. it will work on the deform bones even if they are hidden.
This might be confusing, but actually we have decided that for some operators it makes more sense to always apply to the entire skeleton.To avoid any mistake, malfunctioning of Blender or whatsoever could happen, you might prefer to make the SL skeleton visible again so that Blender won’t pick on that detail. It’s a “just in case” precaution that I like to take for myself; nothing mandatory.
It’s also a good excuse to see this Avastar tool in action when we hit the “Snap Deform Bones to Rig” button
Fantastic! We’re done now with the major part of our skeleton editing. However there are still a few cleaning up tasks to be done…
Check the Rest Pose
We need to ensure our rest pose is clean. This is necessary in order to have Blender export a correct Collada file with the new bones shape. We can check that out ourselves. Right now, the rest pose has not been applied yet.
Go to Object Data panel in the Properties window. There you find two buttons labelled Pose Position and Rest Position (see image)
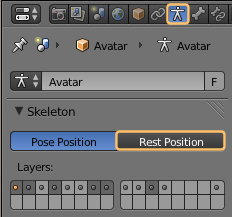
Clicking on the buttons labeled Pose Position and Rest Position might show slightly different poses. We will fix this in the last step of this lesson where we ensure to snap to the correct Rest Pose.
If you see no differences when you toggle between the Rest position and the Pose Position, then all is well already, so don’t worry. In any case you should see something like in the next image.
Bone display Style
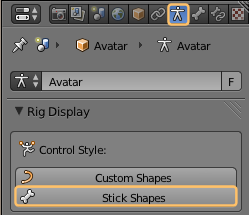
You might (optionally) want to replace the custom shaped green bones by sticks or octahedrals. You can do so from within the Object data Properties window:
Click to Zoom in
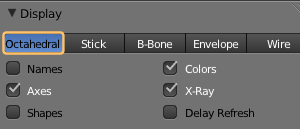
The bone type selector is further up in the properties window. I actually prefer the Stick shape. But you can safely switch to Octahedron shape if you want your skeleton look a bit more like bones.
Note: The Control style setting is fully equivalent to enabling/disabling “Shapes” in the Display panel.
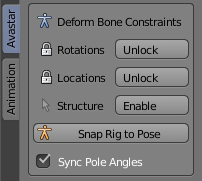
Snap Rig to Pose (in Pose Mode)
- Open the ToolShelf
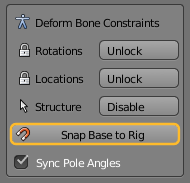
- Locate the Deform Bone Constraints section in the Avastar Vertical tab.
- Hit the Snap Rig to Pose button and all is fine!!
Now your current Pose has been propagated to the Edit Bones and thus it has been turned into the new Rest Pose. Now there should be no more differences when you toggle between Rest Position and Pose Position.
Thus we later can always get back to our defined Restpose by typing ALT +R and ALT +G and ALT +S.
A few things still need to be fixed (in a moment) before we can start weight painting, but definitely the main basis is in place.
Preview on next lesson
The last thing to fix is the IK target locations: The IK targets have been fitted to the Avastar human character. But after we changed the Skeleton to a Horse skeleton the IK bones no longer are where they should be. Actually they MUST be placed where the hoofs are, otherwise the animation process would be incomplete…
canada drug stores
https://ivermectinaccessusa.com/# ivermectin price