|
|
Weighting revealed (a bit of “theory”) |
|
|
To understand the distortion we first need to understand how the mesh moves with the bones in general. Please store your blend file now, because we will make a very radical experiment.
|
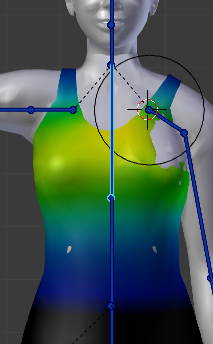
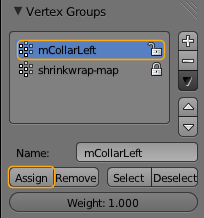
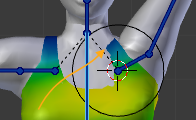
We have assigned weight=1.0 to all verts in the mCollarLeft Weight Group |
Only one weight on a vertex does not work
|
|
|
And now select the mChestBone and see what happens when you rotate it. Now you may ask: “But the chest bone is not weighted. How can it influence the mesh at all ? Shouldn’t the left collar bone be the only one that affects the mesh ?” Well, short answer: Yes, you are right! what we see here is something very different! We see that the bones them self are organized in bone chains, where child bones move along with their parents. In our case the bone chain is (from parent to child):
So when we rotate the chest bone, then all its children follow. And actually you can see the mCollarleft bone HAS moved and so does the mesh. And since we have assigned the weight of 1.0 to ALL vertices of the tank-top, it now rotates completely and in full synchronisation with the moves of the mChestBone. |
Take care how bone chains affect the mesh |
|
So, then lets select the mCollarleft and go to frame 35. Now the tank-top is slightly rotated overall. However it looks like the left strap is correct (more or less). So lets do this:
|

define how to glue the straps to the shoulder. |
|
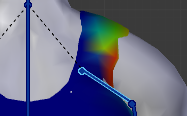
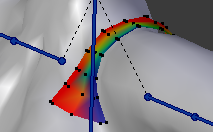
The result does not look too bad. Now the tank-top looks more like it should be. The strap is right and the rest looks reasonable well done so far. However, when we now go to the extreme and move to frame 60, then we see that we are not at all finished yet:
We see a very hard break between where the mesh is weighted to where it is not weighted. Even when we now go into vertex selection mode and try to adjust the single vertex weight, we see that any vertex either keeps unaffected at all, or gets maximum influence. |
optimized weight map with only one bone weighted |
|
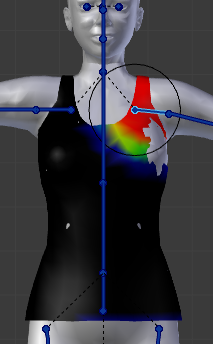
This is because when we have a vertex weighted only to one single bone, then the animation system only determines between weight==0 (vertex not affected) and weight != 0 (vertex fully affected) The reason why this is so: Internally the sum of all weighted vertices is always normalized to exactly avaluate to 1.0, hence when you give a vertex only a tiny little bit of weight, then it will internally be normalized to weight 1.0. And if a vertex has no weight (0) then it will be counted as not referenced. So… Lets add a secnd bone to the mix, the mChest. But now lets get a bit lazy. Blender does a good job on guessing the weights from the given skeleton:
And see now how much better the weighting works (the weights of the mCollarLeft have not been touched! But simply by having the secnd bone involved, we now have got a much better overall behaviour compared to before. |
Automatically assigned weights for the mChest bone |
|
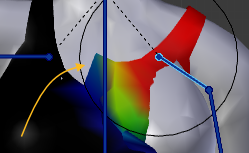
But now when we turn towards frame 0, we see that the strap now starts to sink into the character’s mesh. We do not want that either. So there is more to do here:
But we will now turn back to our original weighted Tank-Top (the one you have hopefully saved before) Well, we start to realise that the weights we got from the weight copy tool might not be optimal for our case (see image to the right). However, we have to take a much more detailed look on how weight Painting works in order to get this problem really solved. |
using weights from collar and chest only 
Results are not very convincing |
How one single Vertex moves |
|
|
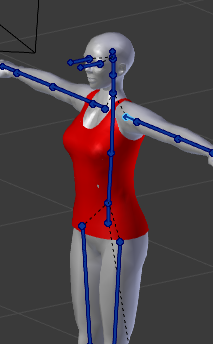
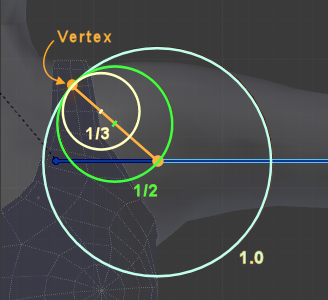
Let us take a look at one single vertex and how it moves with the bone rotations. As an example i have selected one vertex of the strap. In the image you can see how the vertex moves along with a full 360 degrees bone rotation of the shoulder bone. I have indicated the movement for weight values of 1/3, 1/2 and 1. We can make following observations:
Hint: If you want to redo this experiment then please ensure that none of the bone’s children (subsequent bones in the chain) are weighted. However you must add weight to at least one of the bone’s parents (collar, chest, …), for the reason see further above. |
Note: The weight values refer to normalized weights, that is: the sum of all weights for this vertex is 1.0 . And that means: When you want to give a weight < 1 to a bone, then you need at least one other bone where you can drop the remaining weight to get the weight sum of 1.0 Note: The vertex circle is always in the same plane as the bone rotation plane. But when looking in 3D, when you take all possible bone rotation planes of the shoulder bone into account, then actually the vertex moves on the surface of a sphere. |
|
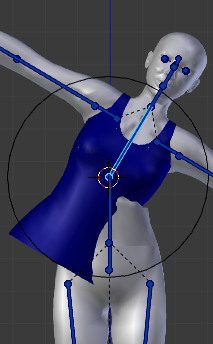
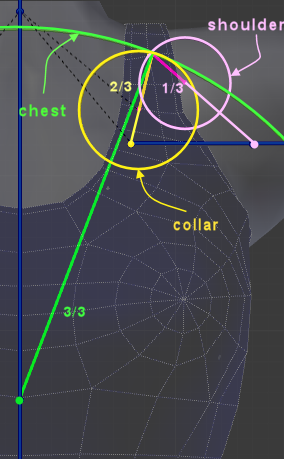
Now let us take the parent bones of the shoulder into account as well. In the next example i have weighted the vertex to: mShoulderLeft = 1/3 Now lets rotate each bone separately by 360 degrees and watch how the vertex moves. Shoulder bone (pink circle): I see exactly what i reported in the previous chapter: the circle center is at 1/3 of the distance between the vertex and the shoulder bone tip (compare to previous image) CollarBone (yellow circle): The circle enter is now at 2/3 on the line between the vertex and the CollarBone Tip. Remind, the weight is 1/3 similar to the shoulder bone, so we might have expected the circle center to be only 1/3 of the distance between the vertex and the collar bone. Chest bone (green): now the circle (green) is centered right at the bone tip of the chest bone, so rorating the chest bone lets the vertex move as if it where weighted with a weight of 1.0. Remind, the weight is also just 1/3 similar to the shoulder bone! So the weights are actually additive! |
The movement of one single vertex can become extremely complicated when more than 2 bones are involved. Trying to understand the movements on this level of detail (bone by bone, vertex by vertex) is not easy. So lets get a bit of practice. |
Weighting by numbers (a lot of practice) |
|
|
So i assume you have been working through the previous pages, so you now have:
I continue using the Tank-top as my working example and i use the initial weights given from the Avastar weight copy tool. Hint: This part of the tutorial uses some improvements to the Weight Editor which will only be available with Blender 2.68 or from the daily builds (available from Blender.org ) Take care to use Blender revision 57541 or newer. |
Your mesh should now look similar to this image (mTorso selected) If you have to keep with an older version of Blender then many of the tricks will not yet work for you. But i found it more useful to directly introduce the new editor. |
Some more Preparations |
|
|
We will separate the weighting of the Top in two parts, the straps, and the body part. We will start with the straps. And so we hide all parts of the mesh except one strap. When we now move to frame 60 (arm down) then we see how the mesh distorts. |
 |
|
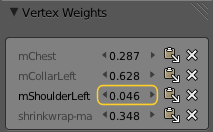
But actually we want the mesh to follow the yellow lines in the image. So we have to modify the weights a bit for this. However, we can expect that the weights along the yellow lines will most probably be very similar. So lets start by selecting the right most edge loop. Take care to select the most correct vertex last. that makes it the active vertex (it is displayed in a brighter color) Then open the Vertex Weights Editor and play with the numbers until the vertex is located on the desired position.
|
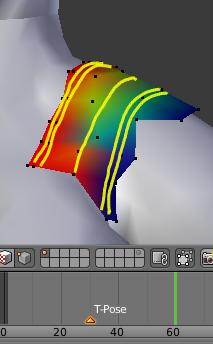
The weights of all verts of an edge are very similar, when the edge flows perpendicular to the animation (arm movement) Hint: The Vertex Weights editor is located in the Propwreties sidebar of the 3D View (press “n” to open/close it) |