Inspect the Tank-Top Object |
|
|
Right after parenting a few things have happened to the mesh and we are stepping through all interesting locations now. |
|
|
Outliner: Locate the Outliner Window (in the upper right corner of the Blender Screen). Here you notice that the Tank-top is now a child of the Avastar Armature. thus when you move the Armature around, the Tank-Top will move along with it. While this is practical, there is not much more to say about this. |
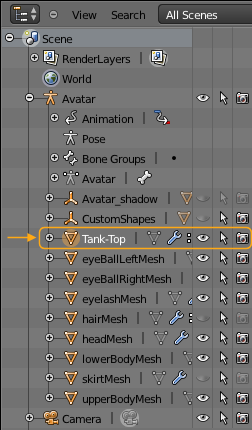
Tank-Top is now a child of the Armature |
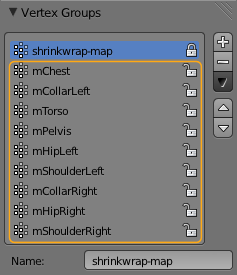
Vertex Groups List:Now let check the Vertex Groups list. Remember you find this list in the Object Data properties of the Tank-Top. We see that 9 new Vertex Groups have been created. Each of the new vertex Groups is associated to a different Bone of the Armature and from now on we will call them “bone weight groups”. Note that not all (26) bones of the used Skeleton actually have weight maps. That is because Avastar does not create empty Weight groups during parenting. So you can be sure that only the 9 created weight groups actually contain weight data. we will get back to the weight groups in a moment. |
 |
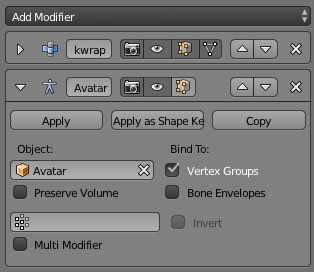
Modifier Stack:Now open the Modifier Stack of the Tank-Top. You see a new Modifier. This is the Armature modifier. And this modifier is responsible to connect the Bones and their movements to the mesh. The connection is done via weight maps. That’s why the option “Bind to” is set to “Vertex Groups” Important: When you disable Vertex Groups here and enable Bone envelopes instead, then your character and attachments still are animated, but that is no longer controlled by the vertex groups. Note: The option “Preserve Volume” is an option of the Blender animation system and it will (should) not affect the exported mesh or animations at all. It may be possible that your online world (OpenSim…) also uses the Preserve Volume feature, but that is completely out of our (and your) control. |
 |
Avastar tools for rigged meshes |
|
| For Workbench Users: You can safely skip this section.
for Avastar Users: As soon as a mesh is parented to an Avastar Armature, it gets a couple of extra Panels in the tool shelf. |
Note: i mention these tools here for completeness. They are not essential for working through this Demo. |
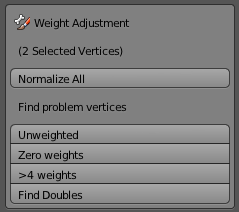
Vertex Weights |
|
|
This panel contains tools which search for Verts using different rules:
|
 |
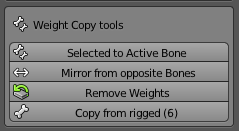
Weight Copy tools |
Only Visible in Weight Paint mode |
|
This panel adds some useful functions for Copy Vertex Groups to each other:
|
 |
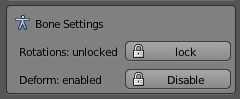
Bone Setting |
Only Visible in Weight Paint mode |
|
Rotations: The deforming bones (blue) are normally controlled by the Bone controllers (green) But the deforming Bones are also the only bones which normally need to be weighted. Hence we sometimes need to move the SL bones directly. Hence we can “unlock” the bone rotations here (and later lock them again)
Deform: Bones only contribute to animation when they are set as “Deform”. Especially the attachment Bones and the Collision Volume are normally not weighted. But if you wanted to weight them for any reason, then you also must enable Deform for them. |
Additional Notes: Rotations: The Lock/Unlock always operates on the entire set of SL Bones! All other bones (Collision Volumes, Attachment Bones) are always unlocked and can not be locked! Deform: You use this tool by selecting the bones which you want to enable/disable, then call the tool to operate on the selected bones… |
Show Bones |
Visible in Object Mode and Weight Paint mode |
|
This panel allows you to control which bones shall be seen while you are working with the animation system. We have also added 2 Presets for “Weighting” and for “Animating”. These presets already define reasonable defaults for these tasks. Note: In the Course of this Demo we will use the “Weight” Preset. By default the Armature Display is set to “Octahaedron”. However i prefer to set it to “Stick” (see image) |
 |