Inspect the Tank-Top Weight Maps |
|
| You can inspect Weight maps in several ways. We already have used the inspection tools in Demo I. So i keep brief. |
|
Weight Paint Mode |
|
|
If you have not yet done so, then:
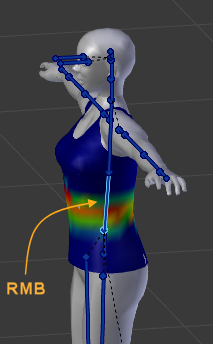
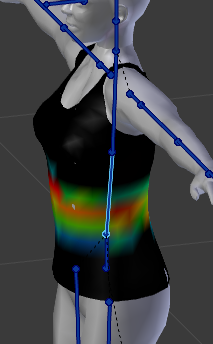
Now you can inspect the Bone Weight Groups by right Mouse Click on the Bones. You will keep in weight Paint mode and see the weights of the Weight Group associated to the clicked bone. Note: this works only when the Mesh is already rigged. Otherwise selecting a bone will make the armature the active object. |
 |
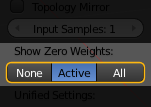
Display Zero weighted vertsIf your mesh has unweighted parts regarding the currently selected bone, these parts are displayed in blue. However sometimes you will want to see which areas of the mesh are completely unweighted (have weight value of zero). this is supported by blender: In the tool shelf locate the Options Panel. there you find a section named “Show Zero Weights”
The setting are:
|
Zero Weights for Active Group shown in Black Note: Currently there is no difference between “Weight value is zero” and “Vertex has no weight defined“. For both cases the vertices are displayed in Black! Hint: In the user preferences (theme settings) you can change the color from black to whatever you like. The attribute is named “Vertex Group Unreferenced” |
Inspect only part of mesh |
|
|
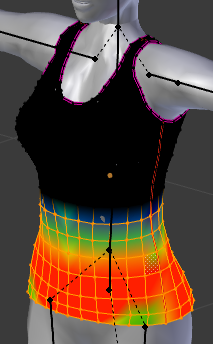
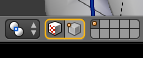
Sometimes, when your mesh is overly complex, you might want to only see parts of it in Weight Paint mode. Blender supports this as follows: In the footer menu of the 3D View you find 2 icons for:
These modes change the editor such that you now can select faces or vertices very similar to how you can do that in Edit Mode. Then you can hide the selection by pressing “h” on the keyboard, or you can unhide hidden parts by pressing ALT + h to get them visible again. Note: When you switch between Edit mode and Weight Paint mode, the selection and hide status of the mesh verts & faces is preserved. |
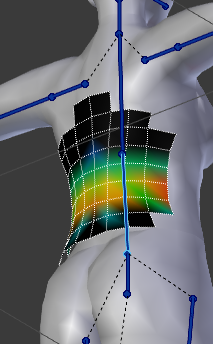
Use Face selection mode to hide parts of mesh Hint: In selection mode only the visible AND selected Vertices/Faces can be painted. All not selected elements are then protected from any change. |
Inspect in Edit Mode |
|
|
Blender allows you to inspect your weight maps in Edit mode:
|
Display Weights in Edit Mode
|
|
In Edit mode you can not select the Weight maps by clicking on the associated Bones. But you can directly select the Weightmaps in the Vertex Group List in the Object data properties. Furthermore you can assign or remove vertices from your weight maps directly from thVertex Groups panel (see bottom area o panel) Hint: When you click on the grey arrow down icon on the right side of the panel (below the “-” icon) then you get a set of additional useful functions which operate on your Weight Group(s). Hint: The selection of the active Weight Group also works in Weight Paint mode, hence you do not necessarily need to use the bones for selecting. |
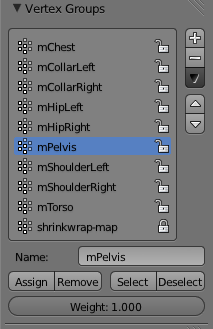
Vertex Groups to select the active group for display |
Show all Weights of one Vertex (Blender 2.68) |
|
|
Sometimes it is interesting to see the exact details of which weight is assigned to which bone. Blender provides a basic weightmap editor for this purpose. The Weightmap editor provides following features and functions (see markers in the image from left to right):
Furthermore the editor has 2 extra buttons:
|
Note: The Weightmap editor is located in the properties toolbar. In edit mode the active vertex is highlighted in a bright yellow. In weight paint mode the active vertex is highlighted in white. Note: The Weightmap Editor is enabled when:
|
Show all Weights of one Vertex (up to Blender 2.67) |
|
|
sometimes it is interesting to see the exact details of which weight is assigned to which bone. We have 2 ways to inspect weights of single vertices |
|
In Edit mode:
This panel only shows up when the “active vertex” is defined. Normally the last selected vertex becomes the “active vertex”. But when you select the vertices in weight Paint mode, then switch to Edit mode, then there is no active vertex, only selected vertices. And then the panel does not show up. In this case you just need to select one of the selected vertices again, and all is well. |
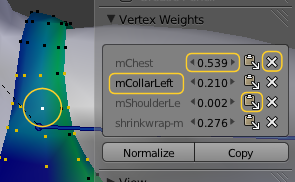
in Properties sidebar (“n”) In this example we see the weight for our shrinkwrap weightmap (from Demo I) and 2 weights for CollarRight and Chest (prepended with an “m” which in our case indicates “target world bone”) |
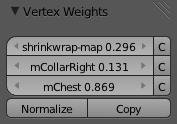
In Weight Paint modeThe Avastar Addon provides a separate Weight Editor which is only available in Weight Paint mode. You find it in the Tool shelf:
Note: This panel only shows up when exactly one vertex is selected. Note: The panel functionality has mostly been ported to Blender 2.68 You can see the same data as in edit mode here, but we have added 2 filters for “Bones” and “Other” which allow you to concentrate on whatever your current task is. |
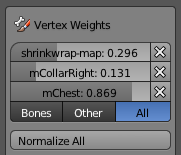
in Weight Paint tool Shelf (Avastar only) Note: Use the “Bones” filter when you are working on Bone weighting. Then all Weight groups which are used elsewhere will be hidden (like the shrinkwrap-map for example) |