Demo I: Optimize Shrinkwrap with a Weight Map |
|
|
This is our roadmap for demo I:
|
|
Load the model and add a Shrinkwrap modifier
|
|
|
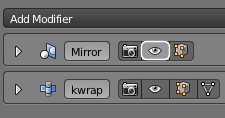
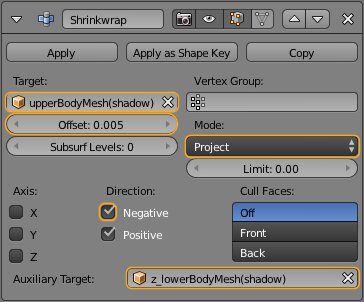
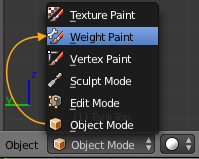
So let us add the shrinkwrap modifier as indicated here:
For Avastar users:
Note: Avastar-1.0 has an additional set of hidden “shadow” meshes. These meshes are linked copies of the Avastar meshes, but without an armature modifier. These shadow meshes should be used as targets for the Shrinkwrap modifier. This will have advantages when you later rig your attachment (For further explanation, see demo II) For Workbench users:
|
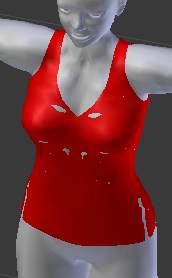
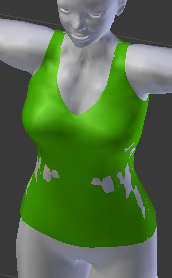
Shrinkwrap active, the mesh fits tight 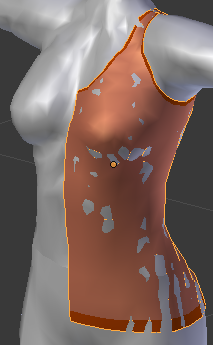
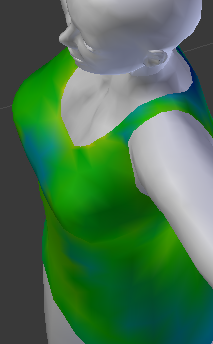
Shrinkwrap active 45 degree view
|
Add a Mirror ModifierAdd the modifier with “merge” and “clipping” enabled. And please move the Mirror modifier to the top of the Modifier stack. That ensures the resulting mesh keeps clean and does not get holes along the mirror plane. |
|
A detailed inspection |
|
|
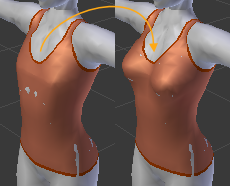
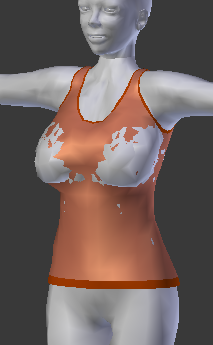
When we examine the mesh in detail, then we identify 4 issues caused by the shrinkwrap modifier:
Of course all of the above issues occur because the shrinkwrap modifier tries to wrap the shirt as tight as possible to the target meshes. So the easy solution would be to just forget the shrinkwrap and then adjust the vertices of the tank-top mesh by hand. That would be not much of additional work (see the undeformed mesh above) But i want to keep the Shrinkwrap modifier intact (for the reason see below). And fortunately there is a way to tell the shrinkwrap modifier to become less radical at certain parts of the mesh. this is done by using a Weight-Map. |
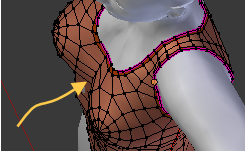
Cleavage sinks in too deep. 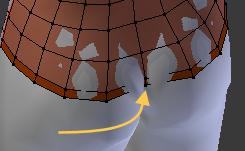
Back Bottom sinks in too deep. 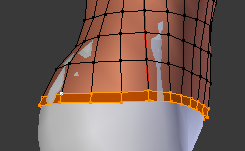
Bottom hem is too tight. |
So, What do i gain from the Shrinkwrap ? |
|
|
Due to its nature a shrinkwrapped mesh will always follow its target mesh(es) as precise as possible. So, when you modify the target mesh (the Avastar character in our case), then the shrinked mesh will follow the changes. Hence: The Avastar Shape sliders take effect on your mesh as long as the Shrinkwrap Modifier is active in the Modifier Stack. Note: As soon as the character shape differs significantly from the shrinkwrapped mesh, you might see distortions. Then you need to adjust the mesh again in edit mode. |
Shrinkwrapped Tank-Top reacts on Avastar sliders Note: This method does not work “out of the box” with bone length changing sliders . But you can get this to work as well in combination with “Custom shape Sliders“) |
The Shrinkwrap Weightmap |
|
|
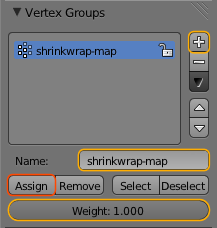
So what is that, a Shrinkwrap weight map ? The shrinkwrap weight map is actually a vertex group containing all vertices of the tank-top. Now, please remember that weights can have a value in the range [0,1]. And typically a value of 0 means “no influence” and a value of 1 means “full influence”. So, let’s create a weightmap which initially gives full influence to the modifier, thus we create the map with all weights set to 1.0.
Visually nothing has changed by now. But we will change that in a moment. |
Setting up the Weight Map 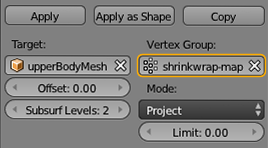
Attaching the map tp the Modifier
|
|
First let’s go to Weight Paint mode and see how the shrinkwrap map looks.
Please ensure that the shrinkwrap-map is still selected in the Vertex Group list, otherwise your mesh will be rendered fully in blue. But when the map is selected, then the mesh turns fully red. |
Initial shrinkwrap-map, all values set to 1.0 |
|
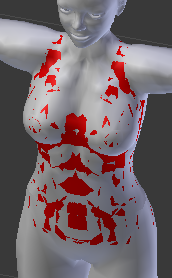
Now lets get rid of the offset value in the shrinkwrap modifier. However, as soon as we set the offset to 0.0 now, we will get a massive amount of poke through (see next image) But now we have the shrinkwrap map and actually we can use the map to define different offset values at different locations of the mesh. When the weight is 1.0 then the offset is zero. So lets reduce the overall weight of the map and then adjust it as needed.
|
|
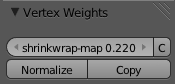
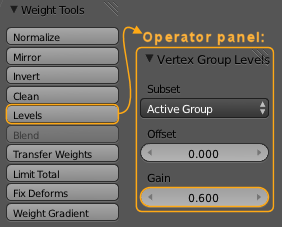
The levels tools allows us to add or subtract a value to/from the weightmap and it allows us to adjust the gain (strength) of the map. We will reduce the gain as follows:
|
The shirt is now deformed “halfway” between the undeformed Shirt shape and the target character (Avastar shape) Slide the gain between 0 and 1 to see what i mean exactly. |
Fixing the cleavage |
|
|
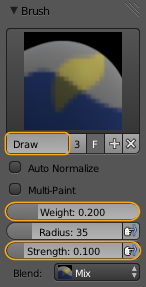
We will now adjust the weightmap around the cleavage to our taste. And we will use a weight paint brush from the Tool shelf (brushes are available in Weight Paint Mode) for this purpose: We use the Draw brush. Please set the Weight to something around 0.2, and the strength around 0.1 These settings allow us to modify the weightmap gradually. Each stroke on a specific area will now move the affected weight values gradually toward the set weight value (here 0.2) This allows us to add decent weight changes. Hint: Also try using the other brush types For example the Darken Brush would be a good alternative to using the Draw brush. Then only those vertices are affected which are too light (have too much weight). Or try the Subtract brush, which would remove weight until the value reaches 0 zero. Actually you should experiment with all brush types and see how you can make use of them. |
With the Draw brush i can set the “target” value and gradually approach my weights towards that value with each stroke. Actually it is more a matter of “taste and believe” what is the better approach in our case. |
|
My final weightmap looks like in the image on the right and the cleavage now looks more like it should be. some remarks:
|
 |
|
On the backside:
Hint: I also made use of the Blur brush. This brush is used to make smoother transitions between areas of different weighting. I used this brush especially to blur the weight of the lower hem towards the upper part of the shirt. |
 |
Fine adjustements |
|
|
By now we have allready a very good weightmap for our Shrinkwrap Modifier. But lets say we are not fully satisfied with the cleavage. So we now go and adjust the weights for each vertex separately. We can even display the weight colors in edit mode, but due to a current limitation in Blender we first have to disable the mirror modifier (disable the eye icon in the modifiers head line:
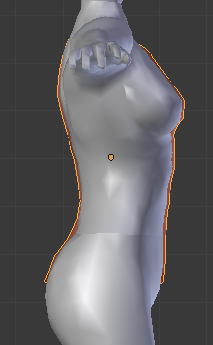
Note there is one vertex selected! Now lets go to side view (use CONTROL + 3) and move the vertex by dragging the weight slider, until the vertex shows up just above the silhouette. You can do this for all vertices in this region until the fabric stretches just like you want it to be and gets into exactly the form you want. you even could add folds if you wanted to do so. |
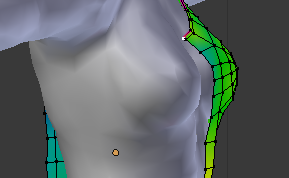
before adjustment, fabric sinks in a bit 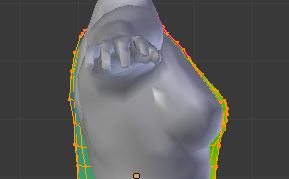
fine adjusted, garment stretches straight. Admitedly the adjustment can hardly be seen from the screenshots here. However, when you play a bit with it you will see quickly how adjusting single vertex weights can be very helpful to achieve the anticipated shrinkwrap effect. So we have demonstrated by now:
Now let us re enable the mirror modifier and see how our weighted Shrinkwrap Modifier behaves when we change the Avastar shape… |
The final test with Avastar shape sliders |
|
|
So lets try it out and move the Avastar Shape sliders. And indeed the shirt changes in a convenient way and stretches more or less as expected (well keeping aside that this particular shape may be not exactly realistic…) . However, technically we could not get rid of poke through here. This is what i meant before, when i mentioned that we get issues when the target mesh deviates too much from the shrinked mesh. Hence if we wanted to fix that as well, then we needed to modify the Shirt mesh directly. Or get it partially fixed by re adding the offset value to the Shrinkwrap modifier. But actually poke through is not such a big problem as it might look on first sight. In fact poke through can be removed more efficiently by using a mask modifier in Blender (and using an alpha mask in OpenSim). I made a tip top tool tip about how to do that. |
Poke Through when using extreme Avastar shapes |
|
So we are now at the end of Demo I. We have worked on a simple weight map. By “simple” i mean that it is very easy to see what happens when the weight changes, because the influence of the map on each vertex is clearly described as:
|
In Demo II we will see a much more complex situation where one vertex is influenced in different ways from different Weight maps and the entire thing will also be animated. So are you ready ? then let’s proceed… |