Avastar (Weight Paint Tool Shelf): |
We have added a couple of vertex selection functions based on different rules. You find these tools in the Toolshelf (Avastar Tools Panel).
When you have selected only one single Mesh and that mesh contains vertices reported by the functions, then those vertices are selected (highlighted in yellow).
When you have selected multiple Objects you will find a report in the Blender Console with one line per object indicating the number of unweighted vertices.
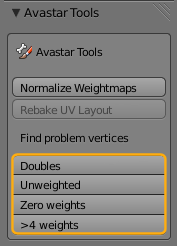
When you are in Edit Mode or in Weight Paint mode, and when the tools find problematic vertices, then these vertices get selected (see image)
Note for Weight Paint Mode: When you use the tools in Weight Paint mode and when the tools detect problematic vertices, then the Editor switches automatically into Vertex mask Selection mode. You can leave this mode by deselecting the corresponding icon in the 3D View footer:
![]()

The tools
Unweighted/Zero weighted Vertices
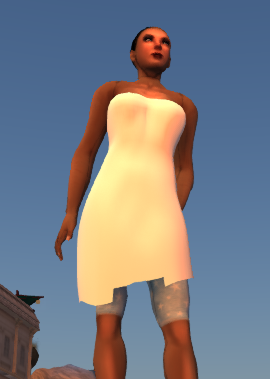
These vertices are not assigned to any of the Deforming Bones (unweighted) or assigned with a total weight of 0 to one or more Deforming groups (zero weighted). These vertices only move along with the movements of the mPelvis Bone.
When you pose any other bone in Blender then this appears like the unweighted vertices are simply “glued” to their RestPose Location (See image)

But nowadays the SL Importer will accept the mesh for import. However unweighted vertices will disappear when you wear the mesh, while zero-weighted vertices behave like in Blender
More than 4 weights per vertex
In Blender you can assign as may weights as you like to one single vertex. But in SL (and OpenSim as well) the maximum number of weights per vertex is limited to 4.
The Avastar Exporter will automatically reduce the number of weights per vertex. It simply removes the weights with the smallest weight values until the number of weights is 4 for the vertex.
Doubles (duplicate verts)
The Weight copy tool is used to copy the mesh weights from sibling meshes and from other bones within the mesh skeleton (rig). Actually we support Weight copy at 3 different places:
1.) While attaching a Mesh
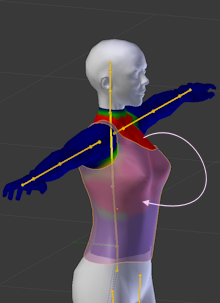
During parenting a mesh to an Avastar rig you can enable an initial Weight copy from all visible siblings to all bones of the parented mesh. In the image on the right you see the armature (yellow) and the shirt(semi transparent) selected. Initial weight copy will project the weights of the upper body into the weights of the shirt. For more detailed information see the Reference guide
Binding(Assign to Armature).
2.) While skinning a Mesh
Avastar supports 2 different skinning patterns for animating an SL mesh character:
- Via weighting the mBones
(also named Classic Weighting) - Via weighting the cBones
(also named Fitted Mesh Weighting).
Avastar can pre configure a Mesh to use either of the weighting patterns. For details read the Skinning section.
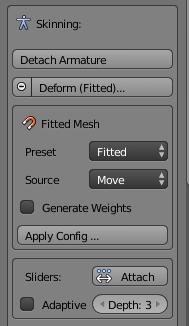
Note: Of course you can mix mBones and cBones manually. In that case you want to use the Fitted Mesh weighting Preset. For more detailed information see the Workflow
Skinning with Weight Copy
3.) Weight Copy Tools in Weight Paint Mode
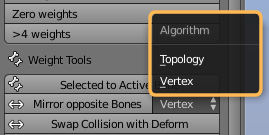
Note: The Selector in the Mirror Opposite Bones button is new with Avastar-1.3
The Weight Copy Tool Reference
Below you find all Copy tools explained in more detail.
Selected to Active Bone
If you want to copy from another bone, then you must ensure that you have selected exactly 2 bones, where the source bone must be selected first while the target bone is SHIFT Selected second (so the target bone becomes the active bone!)
Note: The target bone’s weights will be entirely replaced by the weights from the source bone, not added or merged!
Mirror from Opposite Bone
If you want to mirror copy then you only have to select the target bone(s). You can select a set of bones. Avastar will perform the mirror function on each selected bone.

Note: If you have Sparkles-Pro (to be released soon), then you get one additional option Shape Mirror Copy which is less accurate but works in any case even if the topology is completely different on both sides of the mesh.
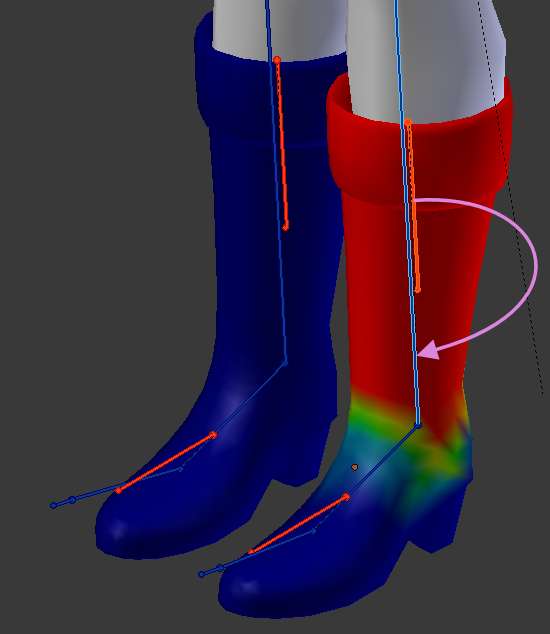
Details about Mirror Copy
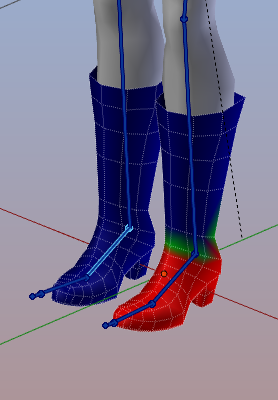
The boots look pretty much equal, so you have the impression that a weight copy should be no big deal. But actually i have moved the left boot slightly out of symmetry, so all vertices have a small offset from perfect symmetry. And you can not see this slight asymmetry by just looking at it.
Lets assume you have carefully weighted the left boot and now you want to mirror copy the weights from the left ankle to the right ankle.
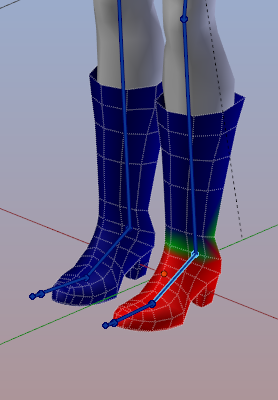
Whenever you see this happen you can be sure that your mesh is not exactly symmetric. In that case you can try a topology mirror copy, but unluckily this has its own pitfalls as well…
The problem with topology mirroring is that the used function needs a more complex mesh to identify the mirrored vertices. I have not fully understood how it works, but apparently it does not work for low polygon meshes, hence Topology mirroring is in general not suitable for game engine development.
Stepping out of the pitfall
So if you have the situation that i just have explained above, then you have 2 options to proceed:
- Either you decide to use Blender’s Symmetrize function (in edit mode Mesh -> Symmetrize)
- Or you can decide to delete half of your mesh and use a Mirror modifier to fix this issue. Using the mirror modifier has the nice extra advantage that your weights get automatically mirror copied when you apply the modifier.
However, if you are working with slightly asymmetric meshes, then you might not be able to use mirror weight copy. Then you only can weight both sides of your mesh manually.
Sidenote: In our new Blender Addon Sparkles-Pro we have added an additional Shape Mirror Copy which is less accurate but works in any case even if the topology is completely different on both sides of the mesh. So if you are lazy and you want the one click solution, you may want to check out the Sparkles Pro tool.
Note: If you select a bone AND its mirrored bone, then only one of the bones will be mirrored. That is: We do NOT swap the weight data and thus you always end up with a symmetric result! This may not be what you want in all cases.
Swap Collision with Deform
Each classic mBone is related to a corresponding fitted mesh cBone. Hence when you select any of the Deform bones the tool knows which is the counterpart bone according to the table below.
Each time when you call the tool, the weights of the selected Bone(s) will be swapped with the weights of their corresponding counterpart.
The relation table
| Classic | Fitted Mesh |
|---|---|
| mCollarRight, mCollarLeft | R_CLAVICLE, L_CLAVICLE |
| mShoulderRight, mShoulderLeft | R_UPPER_ARM, L_UPPER_ARM |
| mElbowRight, mElbowLeft | R_LOWER_ARM, L_LOWER_ARM |
| mWristRight, mWristLeft | R_HAND, L_HAND |
| mHead | HEAD |
| mNeck | NECK |
| mChest | CHEST |
| mChest | UPPER_BACK |
| mChest | RIGHT_PEC, LEFT_PEC |
| mTorso | BELLY |
| mTorso | RIGHT_HANDLE, LEFT_HANDLE |
| mTorso | LOWER_BACK |
| mPelvis | PELVIS |
| mPelvis | BUTT |
| mHipRight, mHipLeft | R_UPPER_LEG, L_UPPER_LEG |
| mKneeRight, mKneeLeft | R_LOWER_LEG, L_LOWER_LEG |
| mAnkleRight, mAnkleLeft | R_FOOT, L_FOOT |
Important: The grey relations are not ambiguous thus they are ignored by the Swapping Tool!
Remove weights
Copy from Rigged
If you want to copy weights from other meshes (weight sources) to a mesh (weight target), then all source meshes and the target mesh must be siblings of the same armature. (all meshes must be attached to the same armature). All currently selected bones will become Copy targets in that case.
Note: Only visible weight sources are taken into account. Hence at least one weight source (mesh) must be visible.
Note: If you want to do a full weight Copy, then you only need to select all SL Bones (the blue ones) as seen in the image to the right.
Note: Custom meshes can also be used as Sources for a Weight Copy, provided they are siblings of the active Mesh!
Note: the topology of the source meshes and the target mesh may be different!

Show Bones (Armature Properties)
You can enable/disable the visibility of each bone set by enabling the corresponding view button (see image).
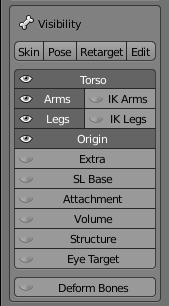
Bone Sets
- Torso, Arms, Legs, Origin: These buttons control which of the Control Bones (green) are visible
- IK Arms, IK Legs: These buttons control which of the IK Bones (yellow) are visible
- Extra: There are a few Extra bones which normaly are not used for Animation in SL. These bones are either not weighted to the default Avatar (Skull, Foot Bones and Toe Bones) or are automatically animated (Eye Bones). However you can use these Bones in your animations for custom meshes.
- SL Base: to display the SL Bones (Blue)
- Attachment: to display the Attachment Bones (red)
- Volume: to display the Volume Bones
- Structure: to display the Structure bones
- Eye Target: to display the Eye target (needed for animating the eyes)
- Deform Bones: to display all bones which have the Deform Option enabled. The content of this set can change dynamically (see fitted Mesh)
Presets
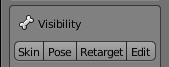
- Skin is used when you want to do weight painting on your Mesh. This preset will enable the SL Bones and also unblocks their rotation setting so that you can rotate the bones for testing your weights.
- Pose is used for all your animation work. This preset enables the green control bones which are optimized for your Animation tasks. This is also the default preset forAvastar.
- Retarget is used when yuo want to import another Animation from a BVH file.
- Edit is used when you want to edit the Bone’s Rest poses, for example when you create a non human character.
Show Bones (Tool Shelf)
The Show Bones panel also shows up in the Tool Shelf. There it provides some additional entries for convenience:
- Bone Display style: To change the bone shape.
- X-ray: To display bones even when they are occluded (hidden) by the mesh
- Shapes: To enable the usage of Custom shapes
- Limits: To display the bone movement ranges.
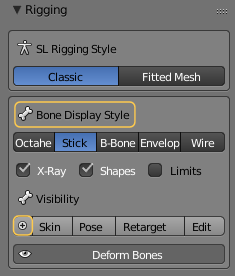
The + icon on the left of the preset buttons expands the Bone Panel
Note: The additional entries in this panel are “borrowed” from Blender and made available on the tool shelf to have all functions at one place and thus avoid frequent switching of the focus.
Note: In the tool shelf the Bone Visibility Panel can be collapsed and expanded by clicking on the small plus sign to the left of the Bone Presets.
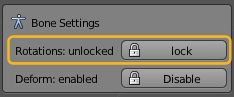
Bone Settings (Tool Shelf, Weight Paint mode) |
|
|
Lock/Unlock rotations: With Avastar we have separate (green) animation control bones and Deform bones (the blue SL Bones) The (blue) deform bones contain the weight maps for the character. But the SL bones can not be used for posing, they are fully dependent on the Control bones. However, when you do weight Painting on your armature, then you want to pose the model while you paint so that you can test your weight maps. To make this easier, we have added a switch to unlock rotations of all SL Bones from their corresponding control bones. That is: You now can rotate the SL bones for posing and testing your weights. |
Note: As long as the Rotations are unlocked, the green control bones are effectively detached from the SL bones. So when you have finished your weighting task, then it is recommended to lock the SL bones again. Then the SL bonjes snap back to the green control bones. |
|
Disable/Enable deform: By default only the blue Bones are enabled for deforming. But Avastar allows to additionally use attachment bones and Collision Volumes for weighting your meshes. If you want to experiment with this feature, then you also need to enable “Deform” for these bones. The Deform button operates on the current selection of bones. |
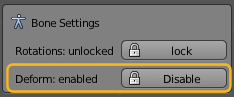
Important: It is not recommended to use Attachment Bones and Collision Volumes for weighting purposes. Linden Labs does not officially support this feature and it can break at any time in the future. So please for now do not use weighting of collision bones / attachments for anything else but experimenting with the feature. |
- More about the Shadow meshes (why shrinkwrap works)
- Adding a mask modifier to handle Poke through