Note: This is our preliminary documentation for the Avastar 2.0-beta23 update. If you are looking for the ongoing test report of Avastar-2.0-beta then please proceed to the Avastar-2.0 test report.
The Bento Project is available…
on the SL main grid (Agni) since a couple of months (you need the Bento viewer, see below). The new skeleton has been finalized and many issues have been fixed.
The most important changes…
are on the face, especially the Mesh eyes now behave exactly in the same way as the System Eyes do. They even scale with the eye size slider!
Avastar fully supports Bento…
and all the related Appearance sliders, for human characters as well as for non human characters. We made Avastar behave just like the SL viewer does, so you now get true “What You See Is What You Get” character editing in Blender.
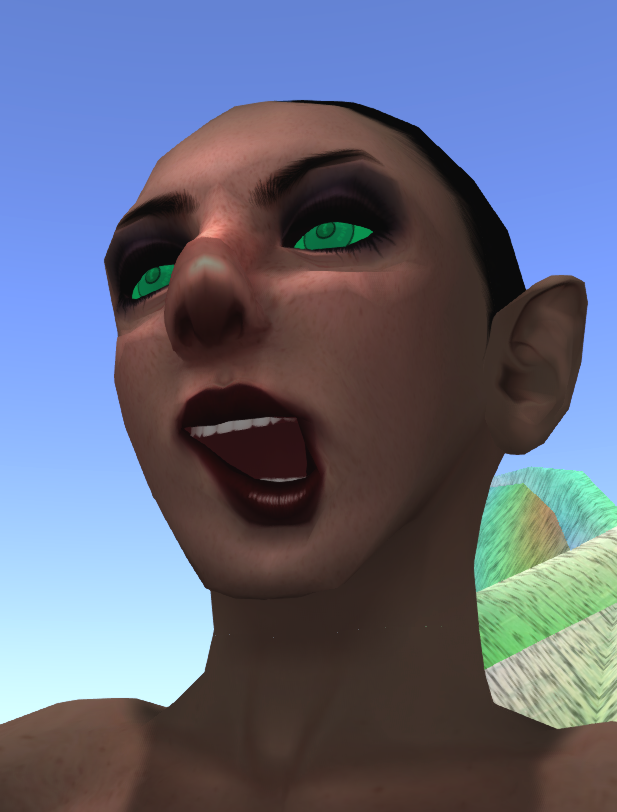
Please use this Avastar version with care and report back any issues!
We appreciate any feedback!
Important Note: The Rig Upgrade Tool still has issues
when the Origin and the root bone are displaced.
We are working on a fix for this.
Preparations
If you want to test the propsal then you need:
- The newest Bento Viewer from the Official SL Alternate viewers page
- Avastar-2.0-23 from your Download folder
Please install Avastar-2.0-23 as usual. You find all important information in the installation manual.
The knowledge Department
Here you find some important informations which can help you to understand how things are working.
Some Bento Gotchas
The source of all issues
Animations can possibly affect your Avatar shape while the animation runs. The main reason for this is that sliders and animations both are allowed to modify bone locations (translate). This can cause a conflict:
- The user edits the Shape by using the appearance editor.
- The Shape sliders place the bones at specific locations.
- A creator publishes an animation with Translation components.
- User plays the animation on top of their shape.
Result: The sliders and the animation concur about where the bones shall be placed. Here is a table for what sorts of transforms are possible for sliders and animations:
| Transform | Sliders | Animation | |
|---|---|---|---|
| Translate | Yes | Yes | conflict |
| Rotate | No | Yes | good |
| Scale | Yes | No | good |
The SL animation system was originally based on the assumption that sliders only affect translation and scale while Animations only affect rotation. So Shape definitions and animation could cooperate nicely.
But since we can import animations with translation components this rule no longer applies and now we have an issue.
In many cases the dependencies between sliders and animations are only small or at least acceptable, so you may be fully OK with that. However the shape changes introduced by animations depend on the Shapes (of course). In theory an animation plays exactly as intended only for the specific mesh and on the specific Shape for which it has been made. In practice the problems are less apparent, but still there.
However things are not as bad as some people have indicated in the past weeks. Some sliders do not change the bone locations but only their scale. And animations do not necessarily need to move all bones. Here are 2 videos from Medhue Simoni which demonstrate what you can do with the sliders:
This video uses skeleton definitions from begin of june 2016
This video uses the most recent skeleton definition files. Medhue has shown that the current system is already versatile and useful. But the problems mentioned above still apply.
However, we can never have a perfect system. But we can still try to improve it. The Bento team has taken a closer look into this topic and optimized the sliders to improve the cooperation of shapes and animations.
New Bones for better Animations
The Avatar Definition files (skeleton and appearance sliders) has been reworked with 2 goals in mind:
- Optimize the system to allow an easy creation of good reusable animations.
- Minimize the influence of animations on the character shape.
The main changes where to move the bones to less problematic locations and to use Scale instead of translation in the Appearance sliders wherever this was possible. In the following section you find a summary of all made changes.
The Wings
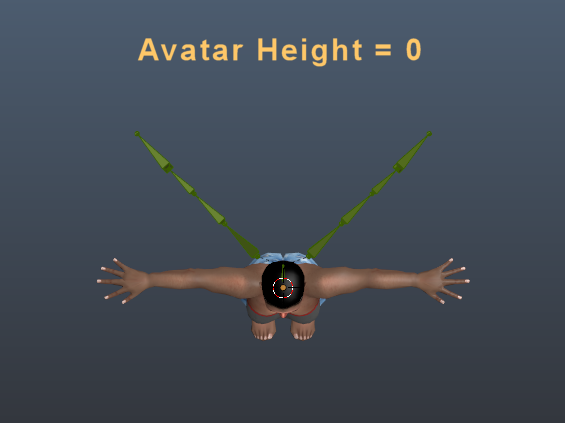
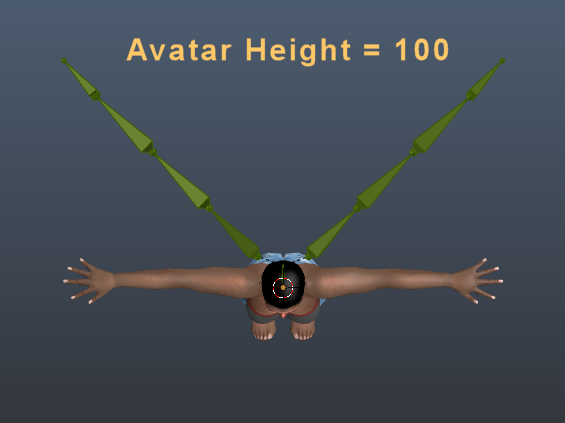
The Avatar height slider now applies offsets to the Wing bones. The slider intentionally uses only Offsets and no scale. This makes it possible to disable the slider influence for cases where the Wing bone chains are used for different purpose.
The Tail
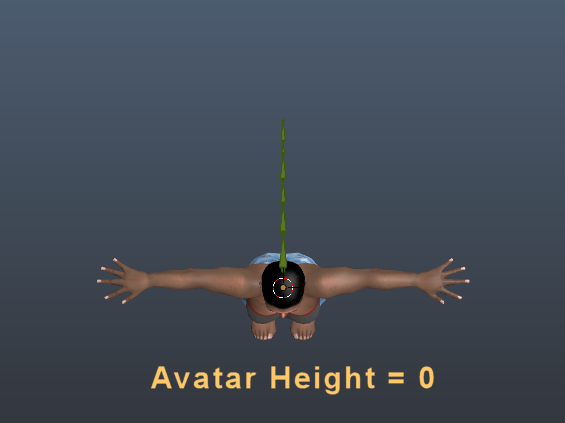
The Avatar height slider now applies offsets to the Tail bones. The slider intentionally uses only Offsets and no scale. This makes it possible to disable the slider influence for cases where the tail bone chain is used for different purpose.
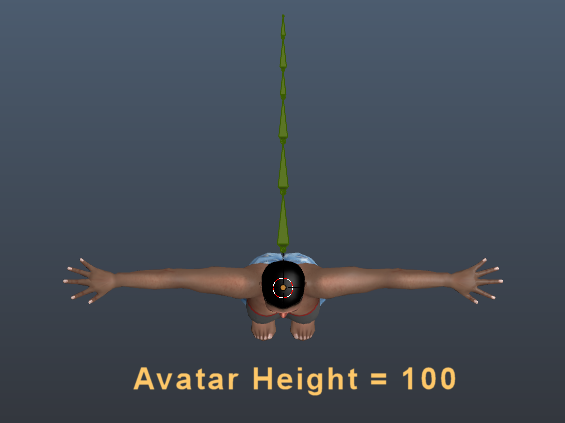
Sidenote from the developers
Here we have a situation where we can not make things right. we have 2 choices:
Use only scale on the slider definition
In this case rotation-only animations will work regardless of the slider settings. This makes animations reusable.
But the downside is that the bone chain can not easily be reused for different purposes, especially when the bone chain length shall not depend on the Avatar height.
Use only Offsets for the slider definition
In this case we can easily reuse the bone chain by adding a joint offset to the bones in the chain. This detaches the bone chain from the slider influence and now changing avatar height has no longer any influence on the reused bone chain.
But now we have a problem with animations: translation based animations will spoil the slider settings, and rotation based animations will spoil the shape (depending on the slider setting)
The final developer decision
At the end we only had a choice between disabling sliders entirely for the wings and tail, or add offsets which can be disabled on purpose by the creators. We decided to use offsets as that is better than nothing at all. So at least for simple cases the avatar height sliders can influence the bone chains when wanted.
(This note was added by Matrice)
The Eyes
Alt Eyes parented to mFaceRoot
In the original Bento proposal the alt eyes have been added to the exact same location as the system eyes and they have been parented to mHead.
Now the alt eyes still are located at the same location as the eyes, but they have been parented to the face root. This has been done to better support creators of non human heads.
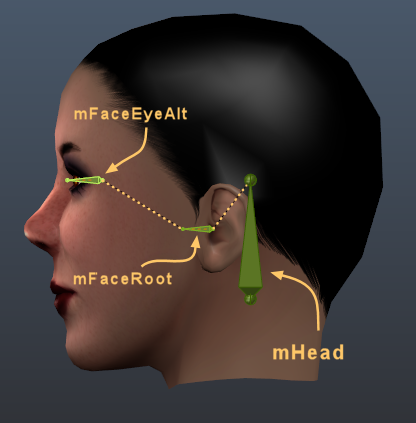
Alt Eyes are auto animated
Scaling for custom mesh eyes (Eye Size)
When you weight your custom eyes to the mEye or the mFaceEyeAlt bones, then scaling the eyes with the eye Size appearance slider now also affects the size of custom mesh eyes (right side of image).
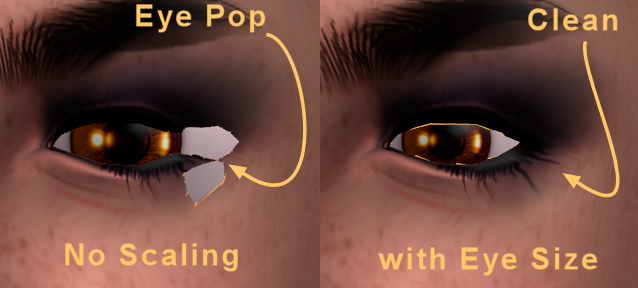
Left: Custom eyes, no Scaling (current behavior)
Right: Custom Eyes, with Scaling (new behavior)
Note: The Eye Size slider adds a small forward/backward movement of the eye joints. (grey in the image).
However the eyelids do not follow the Eye joints (green in the image). This results in a small dependency of the eyelid movement (green circles) on the slider value for the Eye Size. The grey circles show the ideal curve for the eyelids.
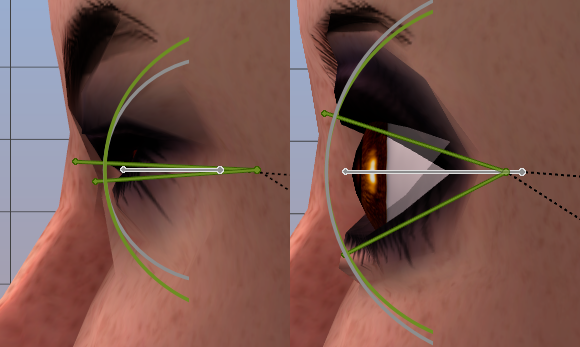
Left: Slider = 0, Right: Slider = 100
Eye Lid Joints (mFaceEyelid…)
The Eyelid joints have been moved to match the Eye joints. This was made to create more consistent Eyelid animations based on rotations only.
The visual length of the mEye and mFaceEyeAlt bones have been reduced to roughly match the size of the eye lid bones.
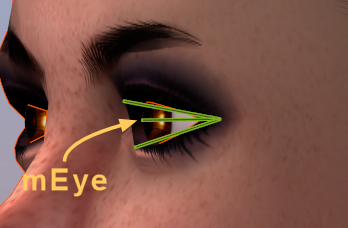
The Jaw (mFaceJaw)
The Jaw joint was moved to an anatomically more correct location. This was made to provide better movement of the mouth area when opened by using rotation-only animations.
The Jaw bone was previously moved around by a couple of sliders. This is no longer the case. The bone now remains stable below the Face root bone.
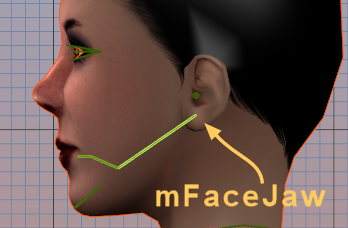
The Jaw Angle (mFaceJawShaper)
If we have only one Jaw bone then we have to use the bone for shaping and for animation. Because of this a new Jaw Shaper bone was added to separate the Shaping from the Animation.
The new bone moves up/down with the Jaw Angle slider as indicated in the image. It is parented to the face Root.
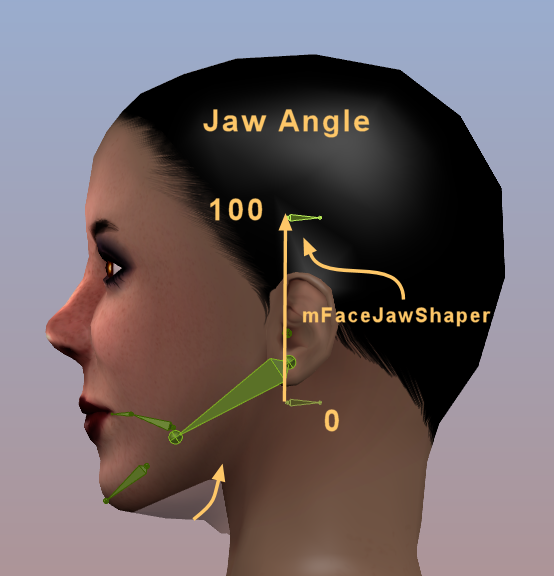
Side note from the developers:
The Jaw Shaper bone can be parented either to the Jaw or to mFaceRoot. Both solutions work but parenting to mFaceRoot has 2 advantages:
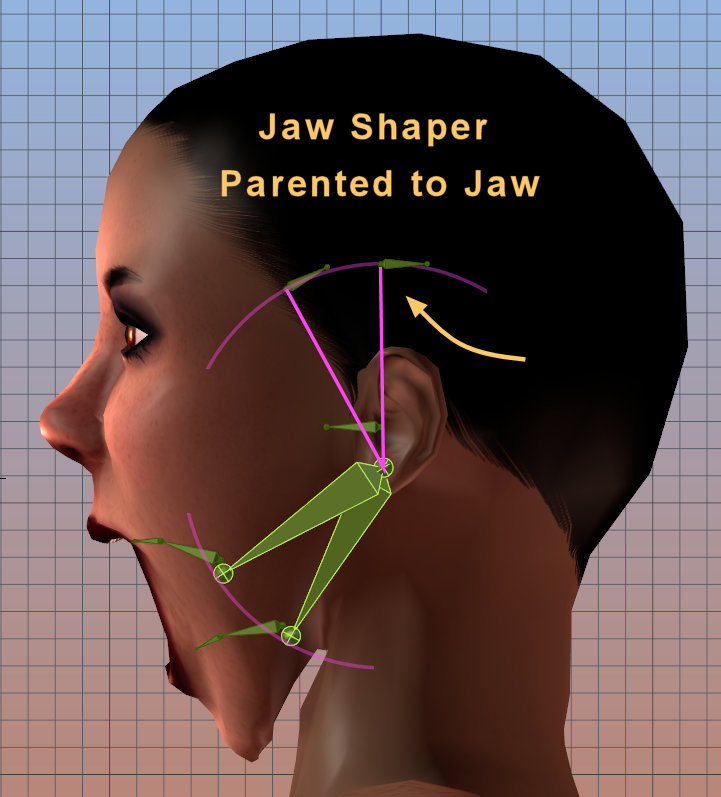
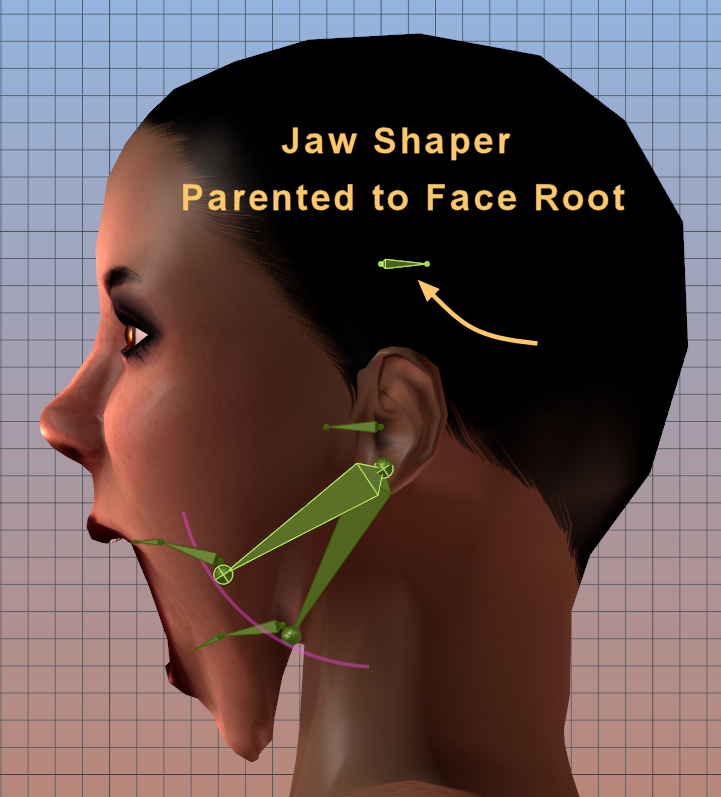
- If we parent to the Jaw bone, then you can see in the left image how the Jaw Shaper rotates together with the Jaw (when mouth opened). This can cause a sinking of the neck into the mesh, see between the jaw and the neck. Of course this depends largely on how the neck and jaw have been weighted. When the Jaw Shaper is parented to the Face root (right image), then the bone remains at its position independent from the Jaw rotation. Hence parenting to the face root seems to be the more stable solution.
- The Jaw Shaper bone can be easy reused for different purposes, like for example unicorn horns. So the decision to parent to mFaceRoot seems to make the system more flexible.
(This note was added by Matrice)
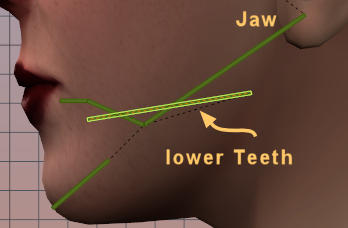
Lower Teeth (mFaceTeethLower)
The lower teeth are now parented to the Jaw bone. This was made to provide anatomically correct behavior.
Note: Now the lower part of the face (chin, lips, teeth) is parented to the Jaw bone, so when you move the Jaw bone the lower part of the face follows in a natural way.
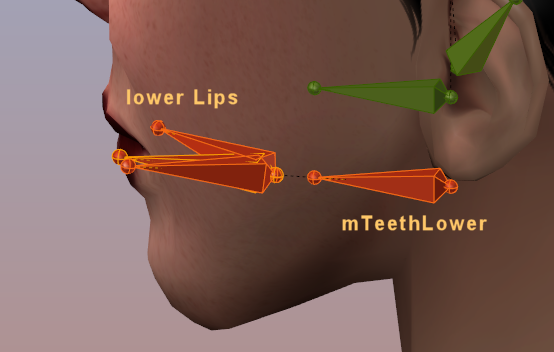
Lower Lips parented to lower Teeth
This substantially simplifies the slider definitions for the bones which influence the mouth. The benefit is that mouth moving sliders now only need to adjust the teeth bones. This in turn removes any translation parts from the lips and so it makes animating the lips much easier.
Upper Lips parented to upper Teeth
Simplifies the slider definitions for the bones which influence the mouth. The same benefits apply as described above.
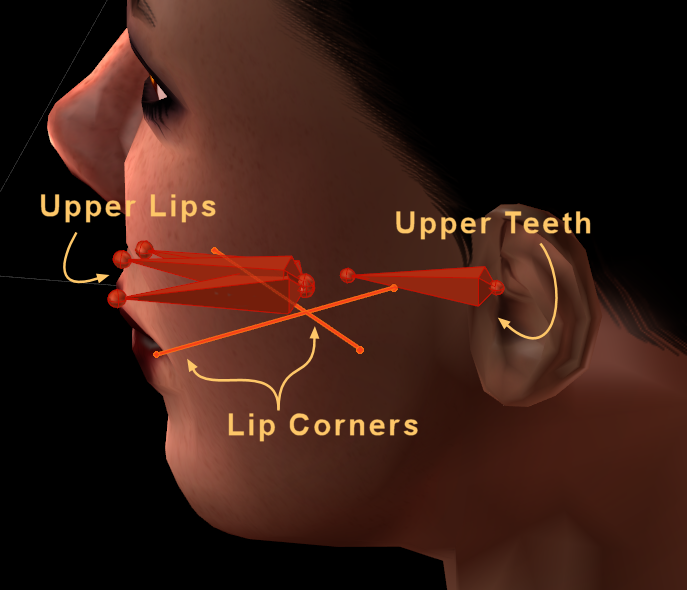
More about Lips
The Lip joints have all been moved to the Avatar symmetry line (x=0 in Blender y=0 in Maya) This change improves rotation only animations of the lips.
In the original skeleton the lip corners move sideways when the bones are rotated around the Z axis. In the new Skeleton the LipCorner bones have been crossed. Now the lips move sideways and slightly backward (better match to the curve of the mouth) when the bones are rotated.
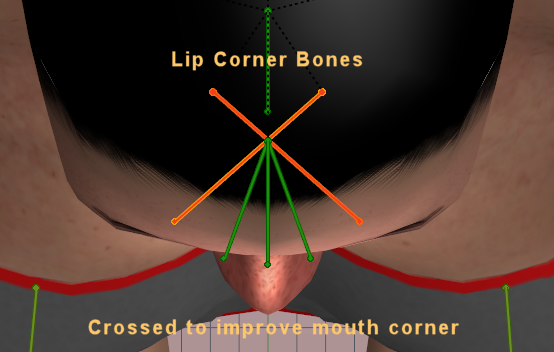
This change was made to simplify the creation of reusable mouth animations:
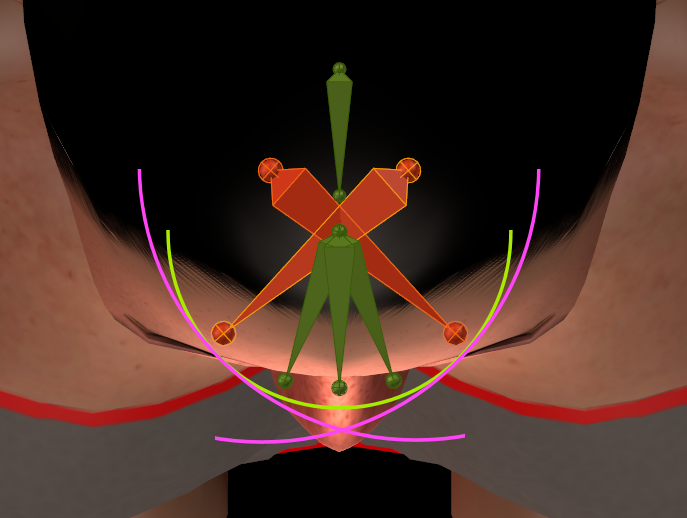
Green: Lip Bones (Upper and Lower)
Red: lip corner bones
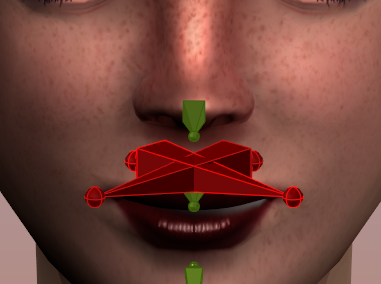
The Crossed bones Allow better quality Rotation Animations
Side note from the developers
Some creators have proposed to get rid of the teeth bones because they are anatomically not necessary. In principle one could attach the upper teeth to the Face root and the lower teeth to the jaw bone. But when you do that, then you no longer can shift the mouth up/down/left/right by using the mouth appearance sliders.
Hint: To get good slider behavior you should weight the lower teeth to the lower teeth bones and the upper teeth to the upper teeth bones. If you decide to weight the teeth to other bones, the sliders can possibly damage the teeth shape.
(This note was added by Matrice)
Nose Size and Nose Width
The Nose size and Nose Width have previously been controlled by moving the mFaceNoseCenter, mFaceNoseRight and mFaceNoseLeft bones. This has been changed to scale the nose center bone. This change allows to animate the nose independent from its size.
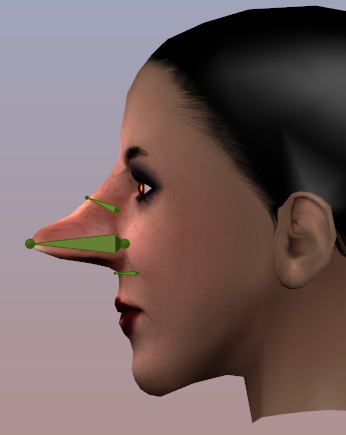
Scaled Nose
Head Length
Originally Bone offset was used to shift the teeth forward/backward. The Teeth Bones now use scaling to get into position. The new behavior is much more comparable to what the system character does:
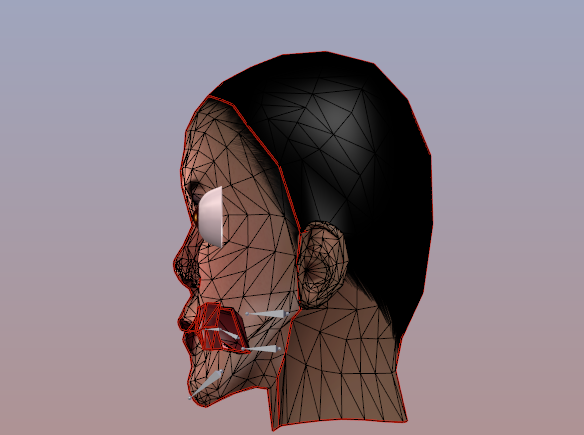
Head Length: 0 Teeth are compressed
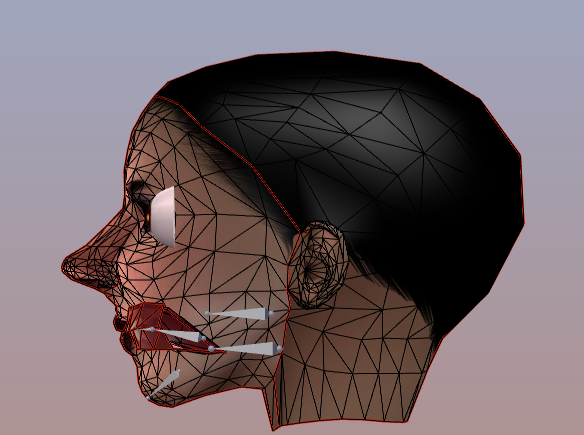
Head Length: 100 Teeth are expanded
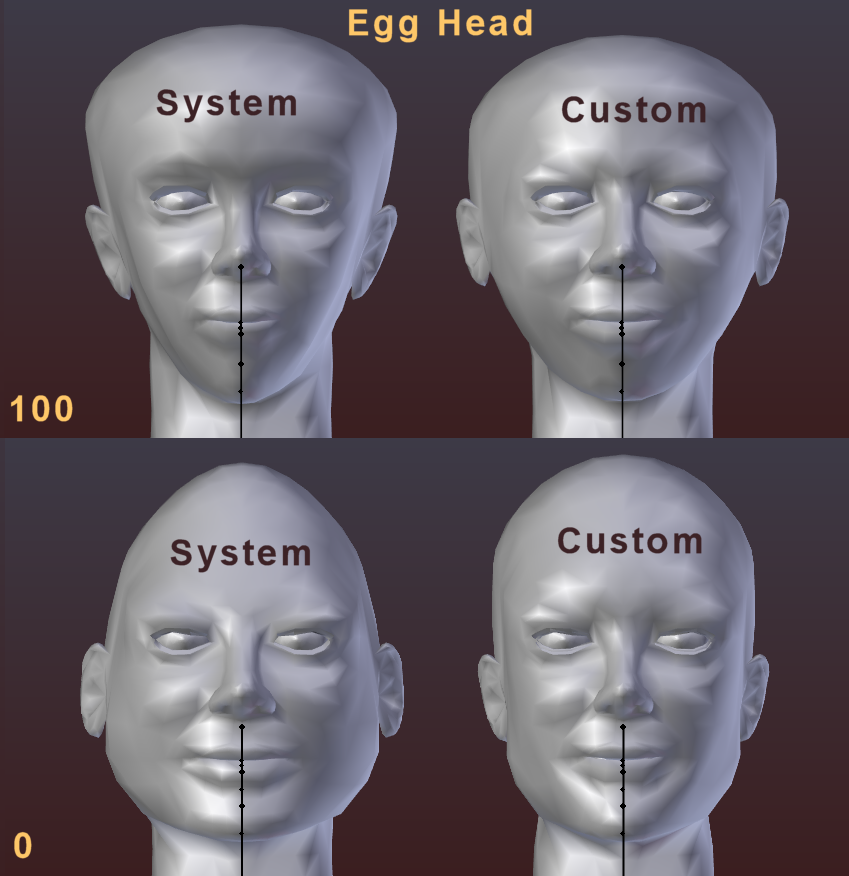
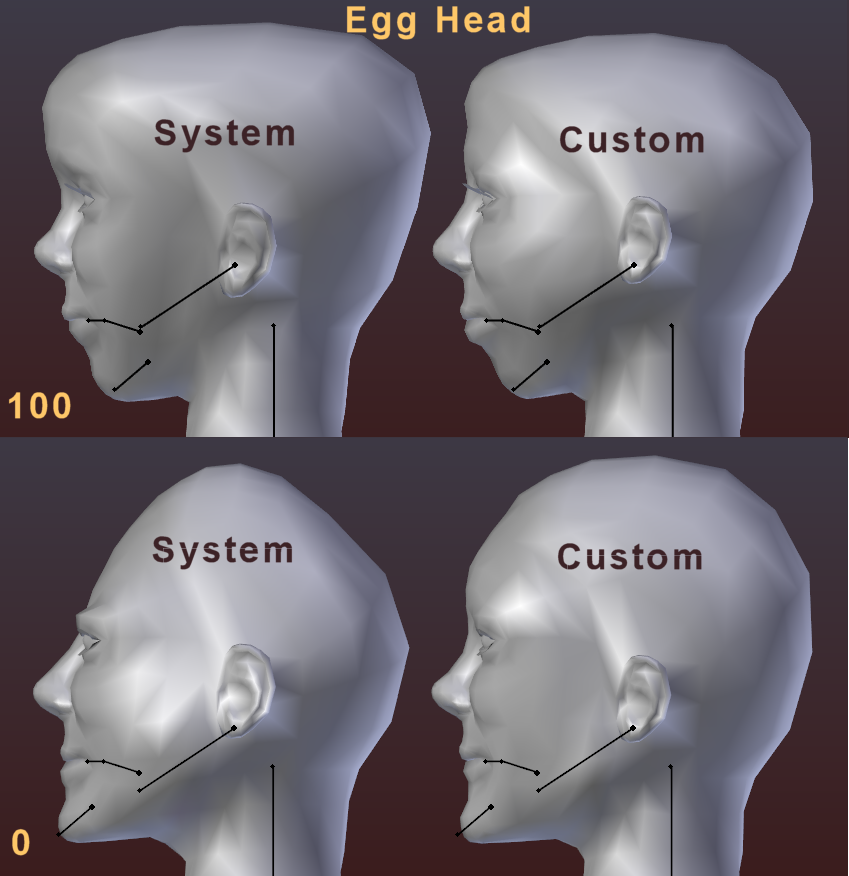
Egg Head
The Egg Head Slider can not be set up to reproduce exactly the same changes on Custom meshes as it does on the System Character. To get this done we needed at least one more bone on the top of the head. However after a lot of time and experimenting the custom meshes now look at least somewhat comparable to the system character:
Tongue Bones moved upwards
The Tongue of the system character is placed very deep inside the mouth, well below the lower teeth. Originally the tongue bones where adjusted to the system tongue. But this looked somewhat wrong.
Now the tongue has been moved upwards, see image (right). It is unclear if this is a better choice or not. Feedback for this is wanted.
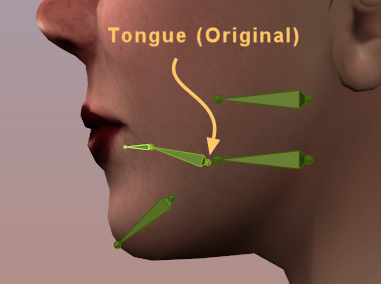
Tongue where it was originally placed
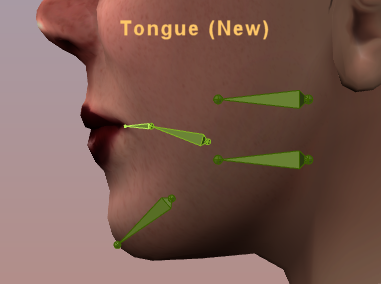
Tongue Rest pose shifted upwards
Tongue Parented to Lower Teeth
The tongue should move along with the mouth for the mouth shift slider and the mouth position slider. Therefore the Tongue Base has been parented to mFaceTeethLower (ionstead of the original mFaceJaw).
Additional Sliders for Eye Brows (Hair Style Editor)
Following Hair Style Sliders have been attached to the Bento Bones:
- Eybrow Size
- Arced Eyebrows
- Lower Eyebrows
- Pointy Eybrows
Other modifications
- minor tweaking of the lips (lip fullness, thickness, ratio now more appealing)
- Lip Cleft Depth now mostly based on Scale
- Chin Depth now only uses the Chin Bone
- Wide Eyes now uses scale
- Egg head reworked (made much less complex)
Posing Sliders and Shaping Sliders
While working on the changes above it turned out that some sliders seem to be more useful for defining specific poses like the upper eyelid fold slider. While other sliders are purely made for changing the Shape like the head size for example. It looks like the Posing Sliders are more troublesome when combined with animation.
Here is a list of Posing sliders which should not be used for shaping the character if the user intends to apply facial expression animations:
- Outer Eye Corner
- Upper Eye Lid
- Mouth Corner
While those sliders can work with animations like all other sliders do, they tend to add trouble at times, especially when used with other sliders in combination and when using extreme slider values. Then animations can possibly add distortions here.
Note: Some have proposed to simply remove those sliders to avoid confusing users and creators. For now the developers decided to keep the support for those sliders available since Animators have the choice to disable those sliders simply by not weighting their creations to the related bones.
Posing Bones and Shaping Bones
We also seem to have Bones which are dedicated to be used for Animations only (not weighted), while other bones are weighted, but mostly used for Shaping. Here is a list of affected Bones :
Shaper Bones
- mFaceJawShaper
- mFaceRoot
Poser Bones
- mFaceJaw
- mFaceUpperTeeth
- mFaceLowerTeeth
- mFaceNoseUpperBridge
Shaper Bones should not be animated
Poser Bones should not be used for weighting, or only be used for exclusive weighting – verts are weighted to only one bone.
Avastar-2 essentials
Create a new Avastar Character
The Avastar Creation pannel now allows to create Old style (basic) avatars with only the 26 SL Bones, 26 Collision volumes and the attachment bones (just like with Avastar-1)
But you also can create Bento Style (Extended) avatars with all the new bones (head, wings, tail, hinds) in place.
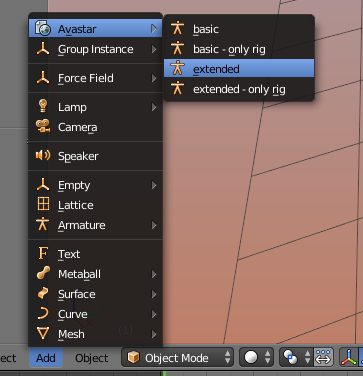
Editing the System Character
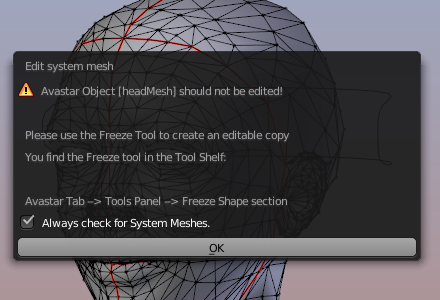
You should never edit the system meshes of the System character. This is one of the most evil ideas you ever can have. And because of this we now display a popup whenever you attempt to edit an Avastar mesh directly.
However sometimes you want to work on the system meshes. In that case you must use the freeze tool from within the Tool Shelf. This tool makes editable copies of the System meshes.
Handling of outdated Rigs in File
In the past we tried to provide some sort of fully automatic upgrade tool for Avastar rigs. But we found that users can change the rig in very unexpected ways. So we decided to keep things simple because we can not handle all possible situations anyways.
Upon loading a blend file we now only check for the Rig version and the Avastar version with which the rig was made. If those values do not match with the current Avastar, we create a popup as seen aside. No more no less.
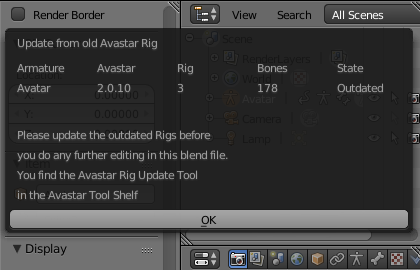
Half automatic Upgrade tool

I’m not clear about the outdated rigs thing. Is updating the model that important? When the template opens I have a 2.0.18 rig on a 2.0.23 avastar.
I checked the rig transfer tool page, and the workflow_update_rig page, and they explain how to use the old transfer tool, but the transfer tool in the tools drop down is different. Here’s what I’m doing right now…
I leave it on pose position.
I set target rig to extended
I check attach sliders and rebuild avastar meshes
I uncheck rebuild joint info and rebuild missing bones
I leave the snowflake icon unselected
I click Update Rig
That seems to work for the animation and textured avastars. When I do that for the bento angel, it looks like the update button makes another mesh on top of the avastar I’m looking at. Should I uncheck rebuild avastar meshes and check rebuild joint info when I do this for the angel? Am I doing any of this right?
I think what I need is a screen cap of the transfer tool pane to show me how I should set it up before I click update rig.