NHR-7 – Skinning
Free PreviewWe’re finally here! The skinning process is what defines how the mesh should deform to follow our skeleton’s movements. It’s the final, most important thing we have to do to be able to upload our newly created character to Second Life. Avastar provides quite a few options to help us in this process, but for the sake of clarity we also describe the manual process.
One major aim of this course is also to give you knowledge at hand that allows you to understand what Avastar does under the hood. Thus we are looking behind the curtain instead of just telling you about magic buttons and cook book solutions. So be prepared to get into some details.
The course is separated into 7 lessons.
This is lesson 7.
Content of Lesson 7:
- Preparation
- Parenting
- Weight Tools
- Workflow Preset “Skin”
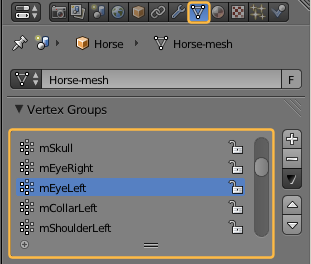
- The Vertex Groups Pane
- Vertex Groups in Edit Mode
- Pose changes in Edit Mode
- Weight Display in Edit Mode
- Editing Weights in Edit Mode
- Finding Broken Verts
- Quick Tip for Eyes
Preparation
Select the horse first, then SHIFT-select the skeleton, so that both are being selected at the same time.
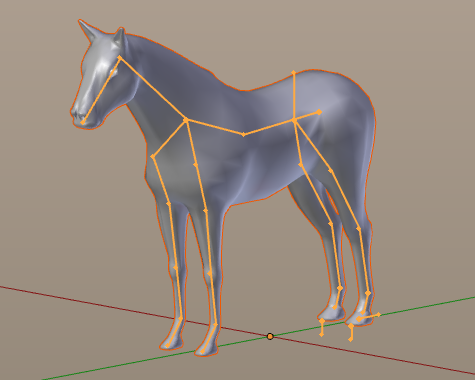
Blender needs the armature to be selected last!
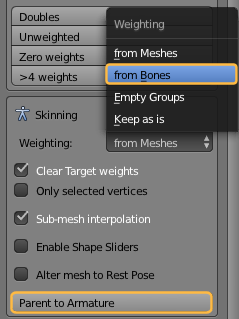
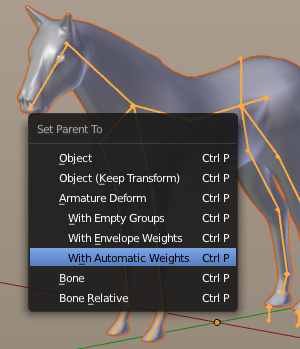
Parenting
Object -> Parent -> Armature deform -> …
This is intended to call the selected function. But due to a bug in the Blender UI the popup box shows up instead, so you have to select your option twice.
The Armature Deform parenting does a couple of tasks in a row:
- The mesh horse object will be parented to the Armature OBJECT, meaning that in object mode the horse will keep following the Armature when it is moved in object mode.
- All vertex groups for the horse bones are created in the horse object data. There is exactly one vertex group per deform bone.
- The vertex groups contain an initial mapping between the mesh vertices and the deforming bones in the armature. The weight maps are automatic calculated to deform the mesh accordingly to the matching bones.
- A new Armature modifier is created and already set up to target Avastar’s Armature.
Note: Although Blender does a very good job here in general, this automatic weighting can contain wrong mappings. Hence this is meant to be an initial configuration for later manual improvment. The automatism can not ensure that all weights are correct and work as intended.
From now on, the horse will follow the skeleton in all the transformations we apply to it in both Object Mode and Pose Mode. But as indicated we have to carefully check if the mesh behaves correct and as intended in all places. And yes, there is a problem right now, hence…
Weight tools
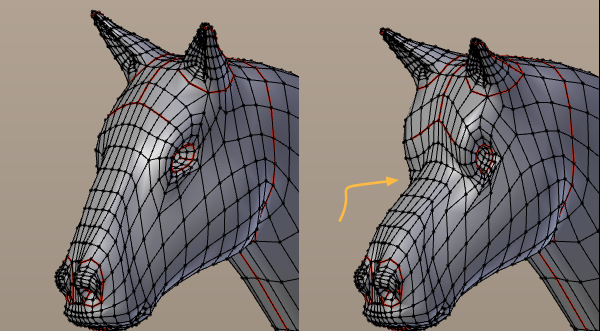
Left: Original mesh. Right: Mesh deformed after parenting
When we examine the horse’s head closer we see that it appears to be crushed on the forehead. This happens because the eye bones have been automatically weighted to the head. Those bones’ vertex groups should only influence the eye meshes and nothing else. But we do not have any eyes in this horse model, we actually could delete all weights associated to the eye bones. This is the task we need to work on right now.
But we also realize that the rest of the automatic skinning already works pretty well. So we only have to fix the eyes.
Workflow Preset “Skin”
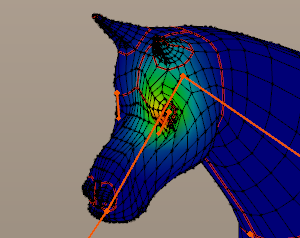
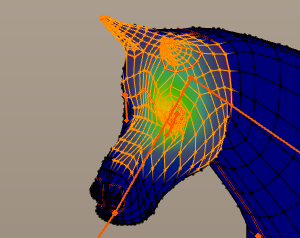
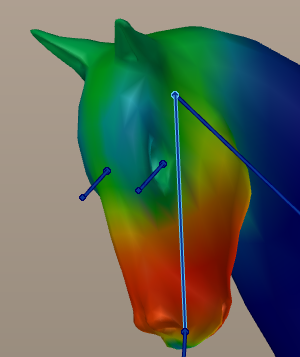
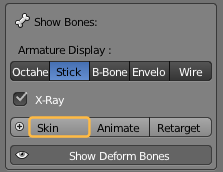 So… select the Skin Preset. When you now select one eye bone, you should see the weights represented as colors from Blue(Cold) to Red(Hot), see image.
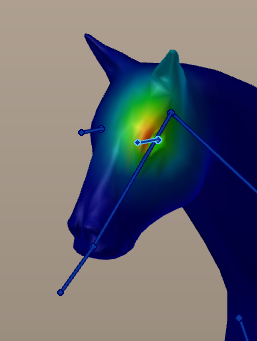
When you select one eye bone, you see it is unintentionally skinned to the head.
Advanced: What the preset does…
- Ensure that your Armature is in Pose mode
- Open the Armature data properties window locate the Skeleton Panel
- In the Skeleton Panel enable Layer 7 (the one which contains the SL Base Bones)
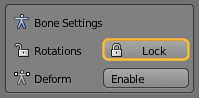
- And disable all other layers
- Open the bone constraints tab
- For each visible bones disable the Copy Rotation constraint
- Ensure that “X-Ray” mode is enabled for the bones
- Select your Mesh
- Set the Mesh to Weight Paint Mode (CTRL-TAB, or use the modes selector on 3D Viewport’s header)
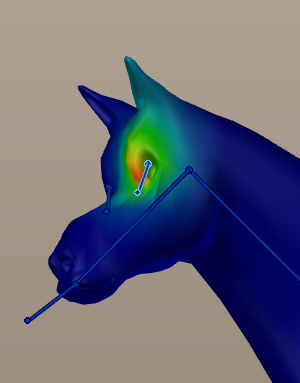
When you check your model after you have called the Skin preset, the distortion seems to have disappeared. this happens because the Preset unlocks the bone rotation constraints which normally glue the SL Base Bones to the control bones. And the control bones have their own constraints which force the eyes to look at the eye target even in rest pose…
You see the rig can become rather complex. However, here is a trick how we can keep the constraints intact in Skinning mode:
Note: The amount of distortion is depending on where the Eye Target is located. When you have put the eye target far away from the head, then you might not see the distortion. In that case select the eye bones and rotate them manually to see their influence on the head.Our goal will be to get rid of these distortions. So lets see what options we have…
Once we’re in weight paint mode, we can either select the bones for which we want to define the deformations. And then use paint brushes to “paint” weight data on the mesh surface. Or we can use …
The Vertex Groups Panel
Vertex Groups in Edit Mode
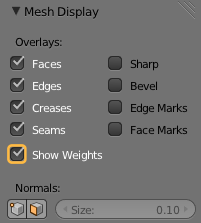
And in the Properties sidebar (right sidebar) you even can turn on the display of vertex group data in edit mode. (see image)
There is one other setting that can help us a lot. Do you remember that normally any mesh changes due to Posing do not show up in Edit mode ? You can change that as well!
Pose Changes in Edit Mode
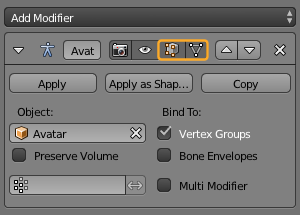
- Open the Modifier Stack
- Locate the Armature
Now Enable following options:
- Use modifier while in edit mode
- Apply modifier to editing cage during edit mode
Weight Display in Edit Mode
Editing Weights in Edit Mode
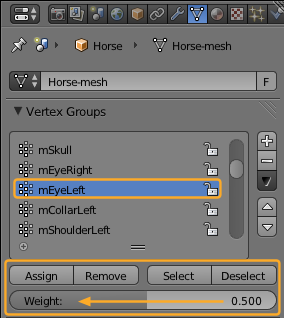
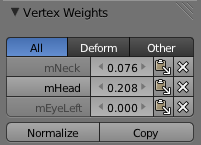
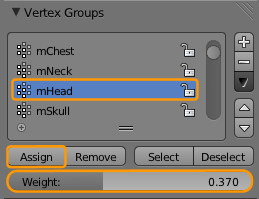
In Edit mode the Vertex Groups Panel now shows 4 new buttons and a slider labeled “Weight”. The Name field still shows the previously selected bone’s Vertex Group (vgroup) as the currently active for editing.
The buttons are used for:
- Assign selection to active vgroup
- Remove selection from active vgroup
- Select all vertices from active vgroup
- Deselect all vertices from active vgroup
We will now use the Vertex Groups Panel to set all weights of the Eye bone to 0.0:
- Make sure that no vertex is selected on the horse head!
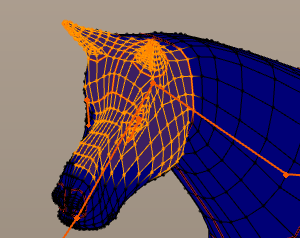
- Use the Select Button in the Vertex Groups tab to select all vertices assigned to the Vertex group
Now you see a big area of vertices has been selected in the View Port. All these vertices are influenced by the Eye Bone.
This is obviously wrong, since the eye bones are meant to drive the eyes and nothing else! And since we do not even have eyes in our model (yet) we could simply remove the Vertex Groups (vgroups) for now…
So we have 3 options:
Remove the Eye Vertex Groups
Remove the vertices from the Eye bones
Assign a value of 0.0 to all vertex values of the Eye Bones
Assigning Values to Vertex Groups
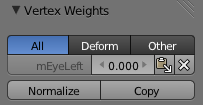
So lets use the third option to set all vertices of the Eye bone vertex group to 0.0 as follows:
- Set the Weight slider value to 0.0
- Click the “Assign” button in the Vertex Groups Panel
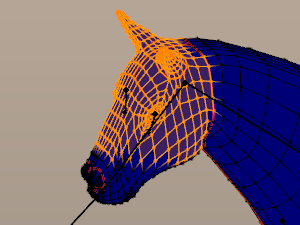
However, the eye bone still has all the vertices associated, but due to the weight value of 0.0 they no longer influence the head.
If you look carefully you see that only the left side of the head has been fixed. Sure that! What we just have done to the Left Eye Bone has to be done again for the Right Eye Bone. So go ahead:
- Unselect all vertices
- Select the mEyeRight bone in the Vertex Groups list
- Select the associated vertices from the “Select” function in the Vertex Groups List
- Assign a value of 0.0 to all vertices in the selected Vertex Group
Now the head is fixed… almost. We still have one more task to do, that is finding not well behaving vertices. Actually we have a few broken vertices in the horse. In the following section i will go into some detail about how Blender can help you to fix vertex groups and single vertex weights.
However this is not a dedicated tutorial about how to skin (weight paint) your model. It just describes the tools which blender has to offer and shows on the horse mesh how the tools play together. I encourage you to do your own experiments here. Knowing the tools is half of the job…
more on finding <em>broken vertices… </em>
Finding broken vertices…
When you skin a mesh, then you sometimes see very bad behaviour in parts of your mesh. There are a couple of reasons why these issues can happen. For example your weighting is not optimal, your model has bad edge flow, etc. However there are a couple of issues which can be spotted easily:
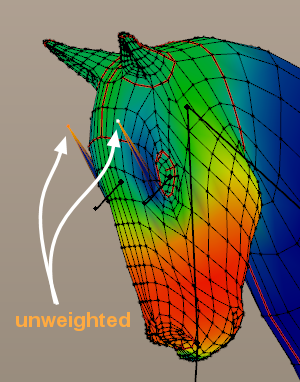
Unweighted verts
Advise: Avoid unweighted verts!
However, for usage in Second Life you have to ensure that each single vertex is weighted to at least one bone. Depending on the viewer version the Mesh importer will either reject the import or the viewer will not display unweighted vertices when the mesh is worn.
Pure Blender:
- enter Edit Mode
- Select -> Ungrouped verts
With Avastar
- Open Tool shelf (in any mode)
- Custom Mesh -> Unweighted
Now all unweighted verts are selected.
Assign selected verts to the most appropriate (often the nearest) bone and give them a weight above 0.0
Unfortunately there is no automatic fix available.
You have to decide on your own to which bone(s) the zero weighted verts shall be assigned and how much weight they shall get.
Zero weighted verts
Advise: avoid Zero weighted if possible.
Pure Blender:
- Not directly supported (see below)
with Avastar:
- Open Tool shelf (in any mode)
- Custom Mesh -> Zero weights
Now all zero weighted verts are selected.
Assign a value above 0.0 to at least one of the attached bones. Unfortunately there is no automatic fix available.
You have to decide on your own to which bone(s) the zero weighted verts shall be assigned and how much weight they shall get.
Too many weights on verts
Advise: Avoid too many weights on bones
Pure Blender:
- Not directly supported (see below)
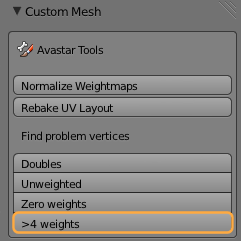
With Avastar:
- Open Tool shelf (in any mode)
- Custom Mesh -> >4 weights
Now all verts with >4 weights are selected.
Remove the weights with the lowest values from the list of assigned vgroups until there are 4 or less vgroups left.
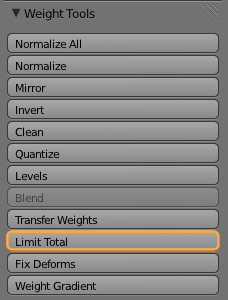
In Weight Paint mode you can use the tool “Limit total” from the tool shelf to automatically reduce the number of weights to a certain limit.
Show unweighted in weight paint mode
When your mesh is in Weight Paint mode you can use a helper tool to show unweighted vertices.
- Open the Tool shelf
- Locate the Options panel
- There enable Show ALL Zero weights
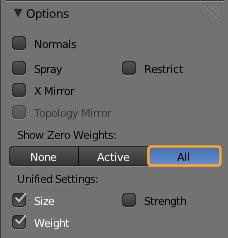
Now all unweighted and all zero weighted vertices will show up in black instead of blue. This is true for Weight Paint mode as well as for Edit Mode, see image.
However, using a color of black to mark unweighted verts might not be the best choice. Fortunately we can change that…
Change display of Zero weighted
You can change the color used for displaying the zero weighted verts in the Theme editor (in user preferences):
- Open the User Preferences (File -> Userpreferences…)
- Switch to the Themes panel
- Select the 3D View (on the left side)
- Edit the Vertex Group Unreferenced color (see image below)
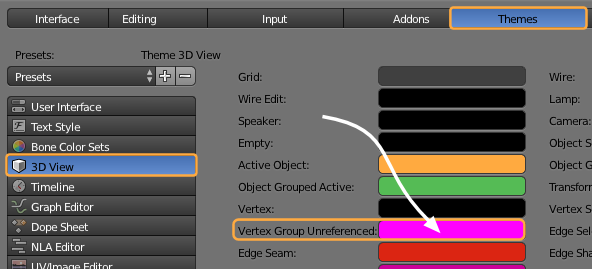
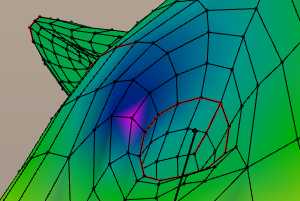
I found magenta is a good alternative setting. But you can experiment and find your own best practice color here.
Note that you will see a similar spot on the other eye socket as well. Remind this for later fixing.
Editing the Weights of one Vert
This panel is actually a vertex Weight Editor. You can modify each weight of the active vertex, you can propagate the weight of the active vertex to all selected verts, and you even can delete weights from this editor. So lets see what we can do with our broken vertex on the eye socket…
So… how can we get another weight into the list ? Well we know this already. We can use the vertex group List as follows:
- Open the Object data Properties to see the Vertex Groups List
- Select the mHead Bone
- In the Weight slider set any value above 0.0
- Hit the Assign button
Now check in the Vertex Weights editor again:
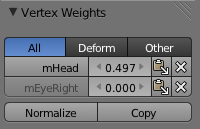 Now we could make this perfect and safely delete the weight from the mEyeRight bone. We can do this because the vertex is also weighted to the mHead bone and all is well.
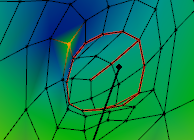 The previously zero weighted vertex now has one weight that assigns the vertex to the mHead Bone.
So what i have demonstrated on one vertex needs to be done for every other unweighted or zero weighted vertex in your mesh. Actually there is only one more such vertex, on the other side of the head, in mEyeRight. With what you just learned it should be no problem to get this vertex fixed as well.
Find “Zero Weighted” using Poses
There is yet another maybe more intuitive method to find apparently broken weights. The idea is that zero weighted vertices only need to be touched when they appear to move wrong during animation. In practice we will start bending our model in various ways to see if we can find areas where the mesh behaves wrong or weird or both.
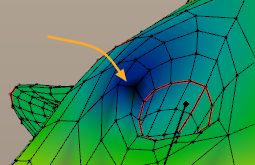
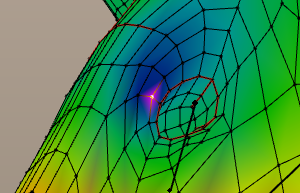
Inspect the Head
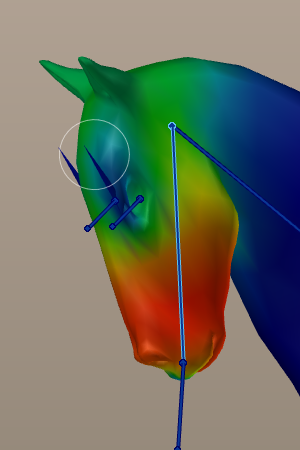
Now select the mHead bone (i assume the armature is in pose mode) and bend the head as seen in the image. You already can see the 2 unweighted vertices have not moved along with the head. Now switch to edit mode and select the 2 verts.
From here you have several options to fix the weights. But in any case please remind that currently the mHead Bone is the active bone in the Armature!
Fix from Vertex Groups List
- In the Vertex Groups list set the Weight Slider to a value of about 0.3 the value is not important, it only needs to be above 0.0
- Then Assign this value to the Selected verts.
Immediately the 2 spikes go away. The 2 vertices have snapped into position. That’s all, you are done
Fix with Brushes
Instead of manual setting the weight you also can paint the weight on the mesh.
- Go to Weight Paint mode
- Select a Blur Brush from the Set of available brushes (See top of Tool Shelf)
- now paint on the spikes by wiggeling the brush a bit
Immediately the 2 spikes go away. The 2 vertices have snapped into position. That’s all, you are done
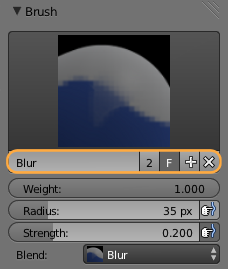
In the image you see the spikes in weight paint mode just before they get painted (and snap into position)
more about Blur
As soon as you start blurring the weights, the 2 spikes go away one by one. The 2 vertices have snapped into position. That’s all, you are done.
More about “too many weights”
However Avastar offers a tool for this as indicated before:
- open the Tool Shelf
- Locate the Avastar Tools section in the Custom mesh panel
- And hit the >4 weights button
Now your mesh will have all verts selected which have more than 4 weights assigned.
Now you can edit each vertex separately and use the Weight Editor to reduce the number of weights until there are 4 weights at maximum. but there is an easier way to go. We have a tool for this. You find the tool in the Tool shelf when you are in Weight Paint mode. It is in the Weight Tools Section and it is named Limit Total.
As soon as you clicked on this tool, 2 events will happen:
- All vertices with more than 4 weights get some weights removed by starting with the lowest valued weight and continuing until the vertex has 4 weights left over.
- An Operator panel shows up in the lower left corner of the Tools Shelf. In the operator panel you can change the settings. so you can adjust how many verts shall be capped.
Quick Tip for Eyes
In this tutorial we fixed the eyes issue on the head, and you might want to add your own mesh eyes to the character. For this task you should:
1) Assign a separate material to the eyes,
2) parent them separately to the armature,
3) make sure it contains only the eye vertex group with value at 1.0 (solid red),
4) JOIN IT TOGETHER WITH THE REST OF THE HORSE BODY! (in Object Mode, select the eyes, then the horse and hit CTRL-J to join the separate object into one, single solid object)
Don’t leave the eyes, or any other separate pieces, as they are. If our newly created horse avatar is composed of linked pieces, the Second Life animation engine would understand that the edited skeleton data is to be applied on the inworld character AS MANY TIMES AS THE NUMBER OF PIECES THE HORSE IS COMPOSED OF!! This means unwanted kinky deformations that would totally break it once worn. Make sure that at the end of the process, all of the mesh is joined so it goes into edit simultaneously even if certain parts look physically separate.
The End
By now we have guided you through a lot of detail information. The course in its current form reflects what we think is important information for your work. You might have become overwhelmed occasionally or bored at other times. However we hope that your overall experience on this entire course was beneficial for your work.
As always we strongly encourage you to give us feedback. We might have missed to include important information. Maybe you found an error or confusing parts. Hence we highly encourage you to give us your Feedback . As this is the very best way to improve the course by any means.
Thanks to everyone who has joined the course and congratulations to all who followed the lessons up to here.
With all the best wishes from
Gaia and Optimo
how can i walk like a horse?
While i agree that it would be nice to have a chapter about animating, i am afraid that “animating a non human character” is a very big topic on its own, so this would be an additional course rather than an additional chapter to this course.
However, since animation is entirely done with Blender’s own functionality, please check on the web for animation techniques for quadrupeds. Actually you can animate the horse in whichever way you like, then later just use the Avastar animation exporter for your exports. This should work as long as you keep the Avastar Rig intact.
Good work! I’d like to see parts added about using extra bones, weighting attachments, and so forth.
Real great! 😀 Just need a part about creating the animations for the horse.