NHR-4 – Modify the Rig
Free PreviewIn this lesson we will start with the default Human skeleton and bend it “into” a Horse skeleton. This approach is dictated by the limitations imposed on us by Second Life. We are obliged to reuse the Second Life Avatar’s skeleton as it is. We only are allowed to move the joints around. However we will see that we can get very close to a reasonable Qudruped skeleton that also would work for almost any other quadruped as well.
One major aim of this course is also to give you knowledge at hand that allows you to understand what Avastar does under the hood. Thus we are looking behind the curtain instead of just telling you about magic buttons and cook book solutions. So be prepared to get into some details.
The course is separated into 7 lessons. This is lesson 4 (updated for Avastar-1.2)
Content of Lesson 4:
- Homework first
- Prepare the Model
- Prepare the Armature
- Hide the Avastar shape
- Use Orthographic View
- Advanced: Manual edit & Snap
- From Human to Horse
Homework first
Let’s first take a look at the actual anatomy of such animal and compare it with a human skeleton:

Arabian horse Skeleton (Wikipedia)

Human Skeleton
Although on first look the skeletons are very different, they still have a lot of common in their structure. The art is to find the matching bones. For example Anterior legs (front legs) seem to have an extra bone in the front which is actually the clavicle (Collar Bone)… It’s important to spot these matching bones. Thus we can place the rig’s bones in a correct (and actually useful) spot for a couple of reasons:
- Weight assignment: Bones typically get a limited range of influence. This means that we need to cover most of our model’s surface with bone influences. This helps holding better deformations.
- Animation: The final movements will result much more accurately and realistic even if we do not use an actual motion capture animation.
With this said and noted in our minds, let’s proceed to the actual editing.
Prepare the Model
Load your Horse Model and make sure that:
- The 3D cursor is on the origin point of all axes <0,0,0>. If not, snap it back there by hitting SHIFT-C
- The Horse Model’s origin matches that place as well. If not, select the horse mesh in object mode, go to the Tool Shelf (type ‘T’ on keyboard) and locate the button labeled “Origin”. Click it and a selector will appear, there choose Origin to 3D cursor.
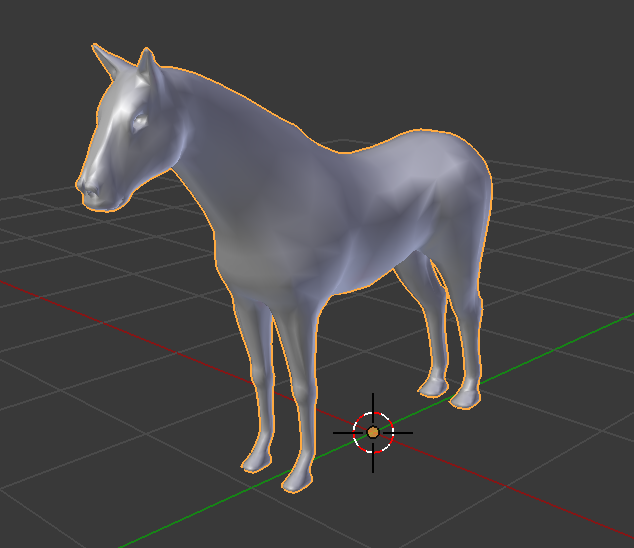
When you have done all preparations then your 3D View should look similar to the image on the right.
Now add a new Avastar to the scene. It will automatically be placed at the 3D Cursor.
Prepare the Armature
Do all the preparation steps described in Lesson 1 of this course:
- Enable X-Ray Visualization
- Disable Custom Bone Shapes
- Display additional Bones:
- Enable Extra Bones
- Enable Structure Bones
- Enable Display of Eye Target (optionally)
- Enable Structure Select (in edit mode).
When you now switch back to object mode, then your 3D Viewport will look like on the image aside.

Hide the Avastar shape
We really do not need the Avatar default shapes. We could even delete the shapes now. For now lets just hide the shapes:
- Select the Avastar Armature
- Then move to the Armature Data Properties Window (the Stick man Icon)
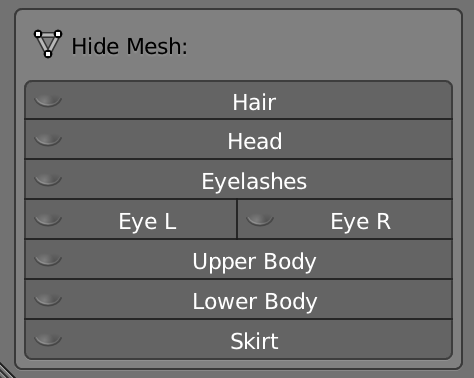
- locate the Hide Mesh Panel.
- There hide all elements.
Hint: Of course you also can just select all shapes and press “h” in object mode (it does exactly the same)
Use Orthographic View
Our horse has a left/right symmetry and we want to ensure that this symmetry is preserved in animations. Thus we will only work in orthographic views (Front, Side, Top)
And although it is not strictly necessary it is a bit easier to work in Orthographic View mode as well.
As a small reminder here are the settings:
- Switch to Orthographic view: Numpad 5
- Switch to front View: Numpad 1
- Switch to side view: Numpad 3
- press the CTRL key together with the Numpad key to get to Bottom, Back and Other side.
Advanced: Manual edit & snap
If for any reason (and we can not imagine what reason that might be) you have to do all editing manually (and do not want to use the rig adjustment tool) we provide a brief description in a nutshell for how to work regardless of any plugin support:
From orthogonal views, select both SL and Control bones in edit mode and move them. This process should ensure the retention of all bones proportions and offsets on both skeletons.
Pay close attention to those many not-connected bones, which means they are floating and not following what they are supposed to follow when you move them around. The more consistancy we keep, the easier this whole process will be.
Examples of these “floating bones” are:
Thighs Hips (SL hips, Pelvis, Inverse Pelvis, COG and Torso)
Most dangerous among these is the Avatar foot set up. This is the reason of enabling visualization of “Extra bones”: we need to move this set-up of bones, that make the IK feature work correctly, along with the rest of the bones on the feet.
From Human to Horse
Now that we know about what we have to pay attention, we can start moving stuff around. In this tutorial, we’re going to start from the upper body, and slowly rearrange the whole bone structure (We are now working on the Armature in Edit Mode ):
In Side View, select all of the upper body bones down to the hips, including COG, Pelvis, Pelvis Inverse. Ensure that the Hip Links are not selected.
Now move the selection upwards and rotate it about 90° (bend the upper body forward) and finally move it a bit backwards as indicated in the image.
Now we’re going to rearrange the skeleton in a more horsey way.

Let’s grab the whole leg part, including ALL foot bones. Use the Box selection to include everything much easier (B on the keyboard).
Move the legs to a closer location to where they should be on a horse, like shown in image. Constrain the movement on the Y axis to make sure that the imaginary ground plane on which the feet stand is kept at the same height (as the Origin)
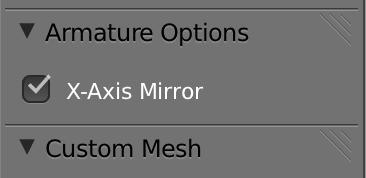
When we are at this stage, since we should work symmetrically on left/right matching bones, make sure to also enable X-Mirror editing on the Tool Shelf (T). (Look into the vertical Options Tab…)
The rear legs
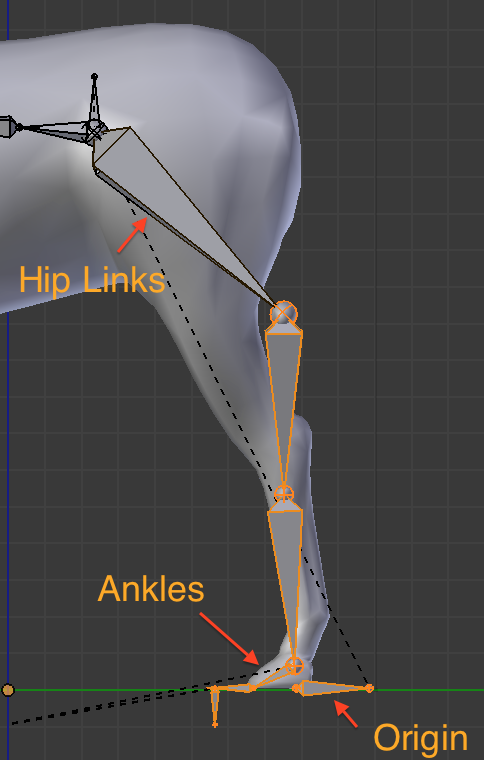
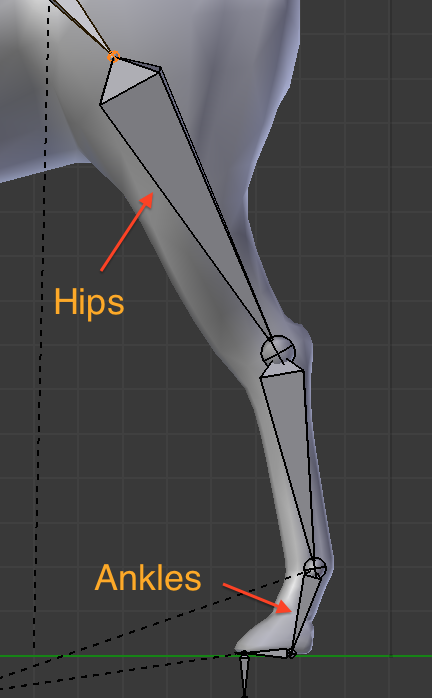
It’s time to give the rear legs a better shape. Select the Joints (those balls at either ends of every bone) and move them into a fitting position, as shown in the next picture.
This is not yet the final arangement, but it works as a basic shape. The final reshaping will take place only when all bones will be in a more correct position.
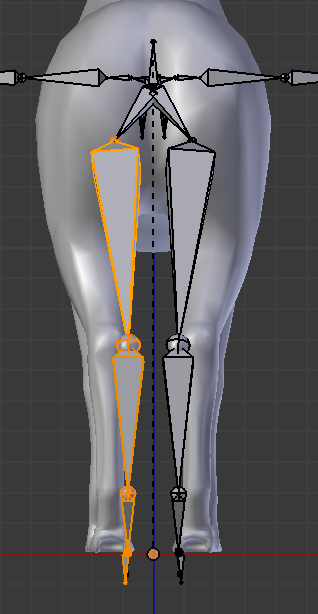
Lets proceed to Back View ( CTRL +1 ) and check the back legs. Apparently we need to reshape the distance between the legs, which is obviously bigger in a horse than in a human. The X-Mirror feature that we enabled earlier is going to help us (provided that the model is symmetrical too; this horse is). So as we did before, select one whole leg’s bone chain and move it into a more appropriate location.
If necessary, also move single Joints to better fit the leg’s structure, like on the reverse knee that horse back legs have.
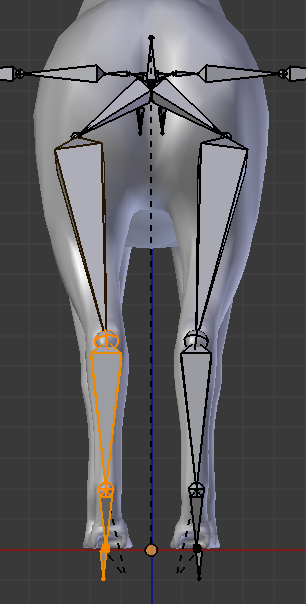
The back part of the skeleton is all nice and smooth now, slowly taking the desired shape of a horse.
Let’s get the arms out of the way now, so that we have more visible room to later edit the spine bones. Again, the X-Mirror features helps us retain the symmetry, so we need to work only on one arm.
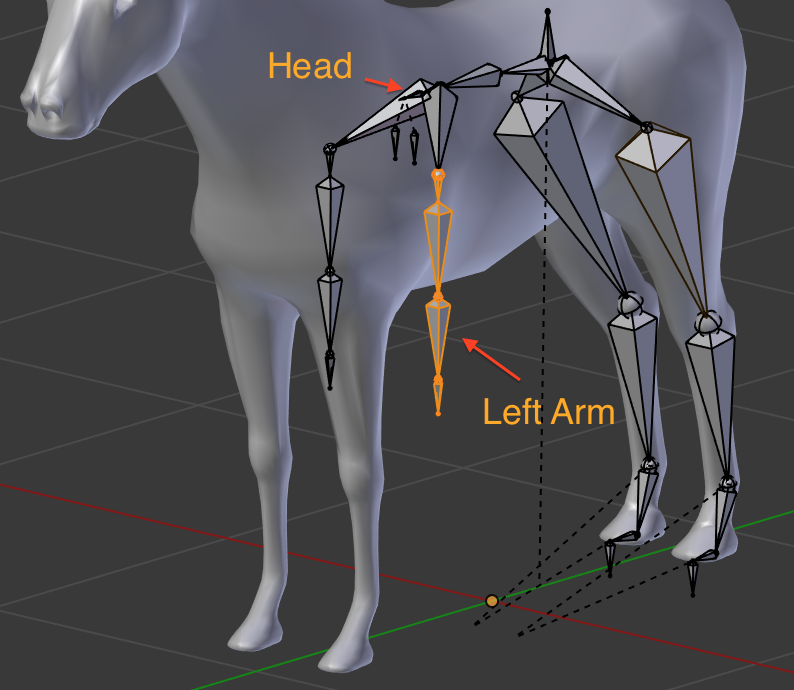
Select all the arm bones from Clavicle down to the hand and move it towards the front legs of the horse (the other side’s arm will follow).
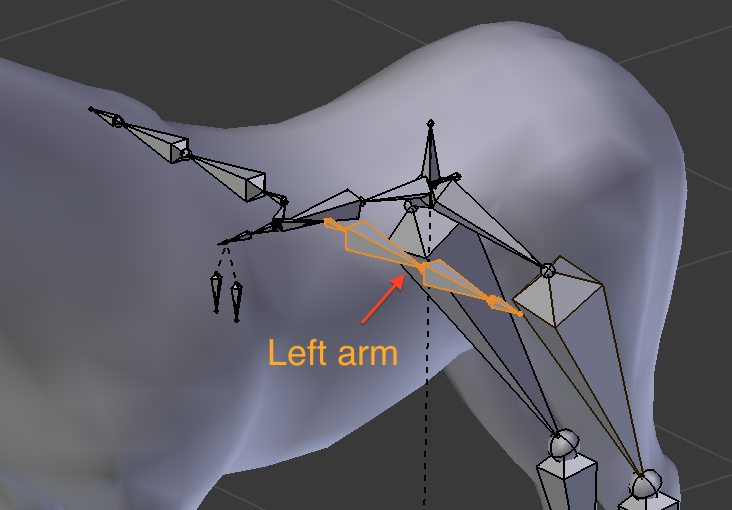
Also rotate the selected arm bones to make them better fit to the corresponding front leg. And remember to either work in front view or in side view.
After moving and rotating the left arm your horse will end up looking similar to the image on the right. Please note: the head is now buried in between the clavicles. We will have to rearrange this next.
Adjust the head
Select the Head, Skull and Eyes and move them towards the horse’s head (always in Side View).
Hint: You can work in an arbitrary view if you prefer, but then you also should use the axis constraints so that selections move only along global X, Y, or Z
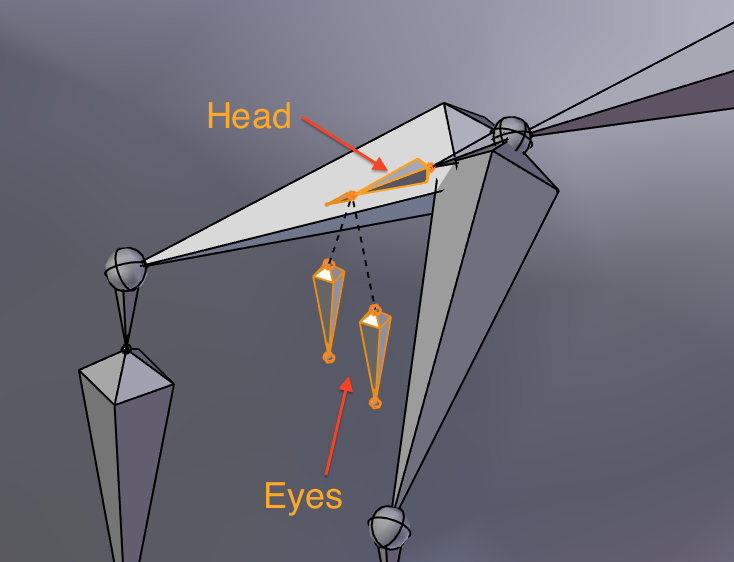
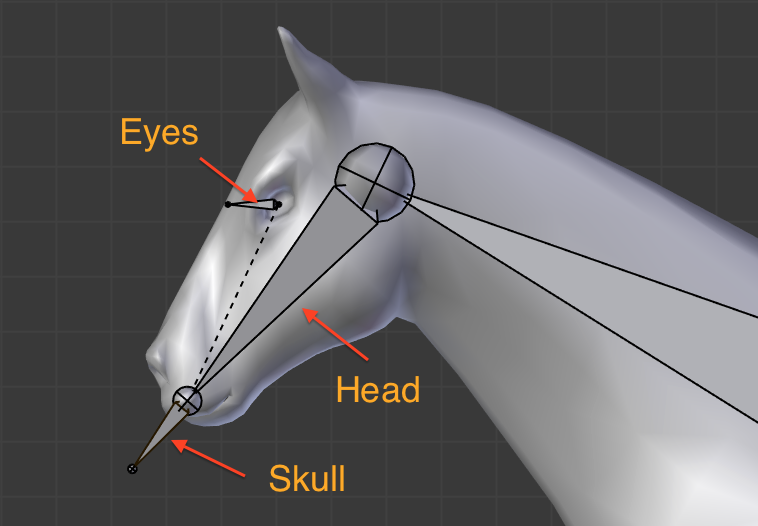
Now we do what we did before: grabbing single joints to fit the horse neck and head.
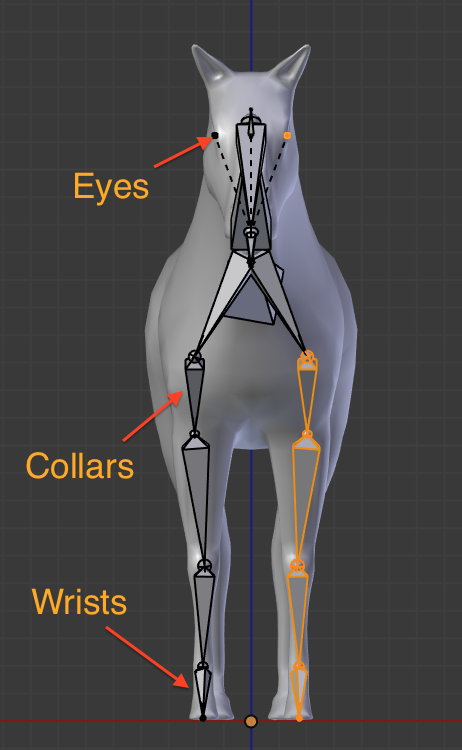
Grab the eyes bones and place them in correspondence with the eye sockets, making them point forward.
Hint: You need to switch to Front view for adjusting the distance of the eyes.
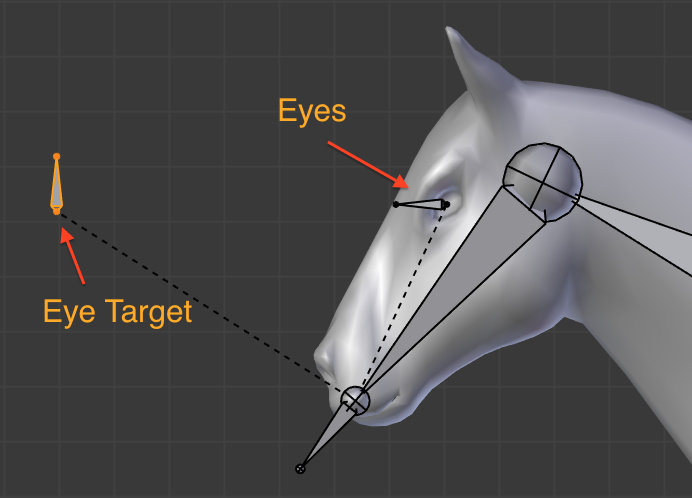
Finally place the Eye Target bone accordingly, as shown in the picture.
Hint: In the previous images the Eye Target was hidden. You might need to unhide it in the Armature Data Properties Window (Stick Man Icon) in the Rig Display panel (Show Bones section)
Adjust the clavicle
From the horse skeleton picture shown at the beginning, we’ll need to make sure that we place the clavicle in the correct location (a thing that we can do better when we have a horse spine in place). At this time, the spine is still human-like. Let’s make some room for the spine then.
Select the arms including the Collar Bones. Then move the bones closer to the front legs of the horse as shown in the image.

Quadrupeds are extremely flexible, extending and compressing all the time while moving. We need to make the spine shape suitable for such simulation.
However let’s put first the arms into place. Then it becomes much easier to determine the finally locations of the spine bones for simulating the behaviour as shown in the image.
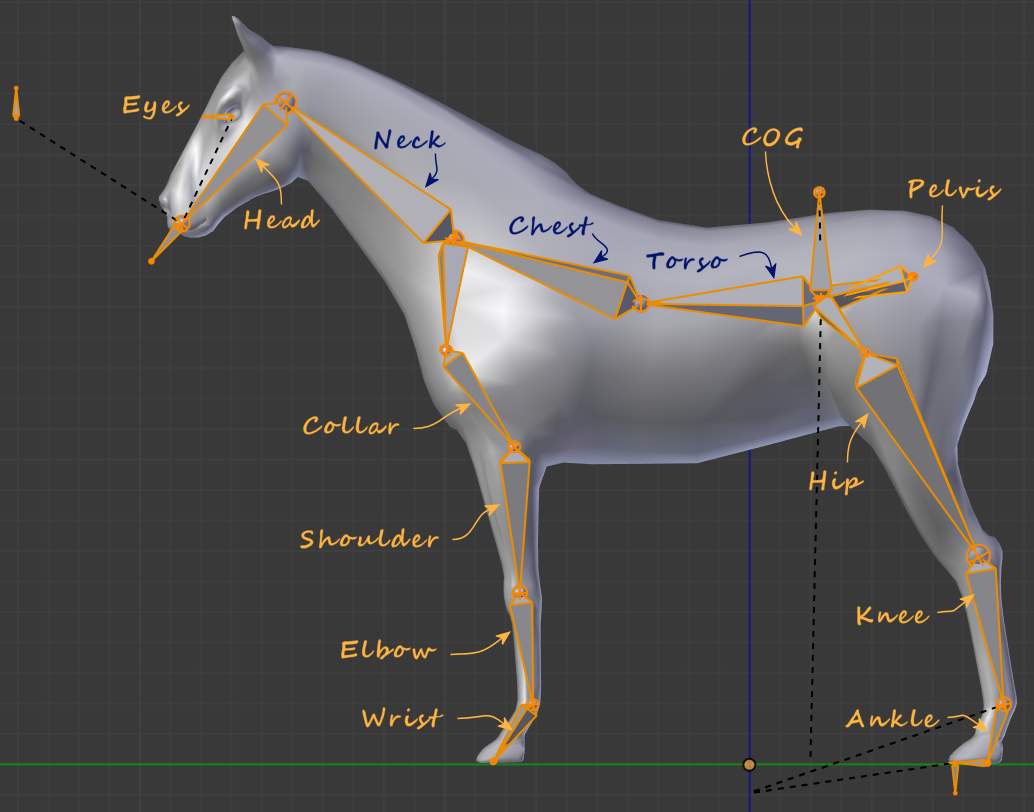
 Horse (Wikipedia)
Adjust the front legs
As we did for the legs, grab joints and move them into position, starting from the hand tip, up to the clavicle. In the image i have selected all bones which i have moved around in this step.Here are some hints:
- Please work in side View and in front view.
- Fortunately we still have X-mirror enabled so that we only need to work on one side.
- Finally, if you have not already done so before, take a moment to fix the eye positions to match with the eye sockets of the Horse mesh.
The image to the right shows the horse after i adjusted the bones.
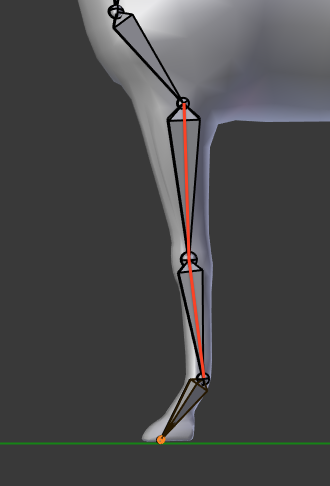
And this image shows the bones in side View again. And there we have a problem…
From the side view we can notice that, at first, the leg is completely straight, exactly as the red line drawn on top of it. This is a mistake that we need to fix right away.

We fix this by moving the joints slightly out of the line, as shown in the image on the right. A few degrees away from the straight line works fine.
Please note that the knee is pulled slightly forward.
It’s a great improvement from what we started from, isn’t it? Now it starts resembling a real horse. Let’s move on now, and finally fix the spine.
Adjust the Spine
This will lead to minor hip and leg adjustments to better comply with the RL skeleton picture shown at the beginning of this tutorial part.
Move the Joints to roughly follow the vertebrae in the RL skeleton. We have only two bones, so try to distribute them equally and proportionally. Notice also that Pelvis, Inverse Pelvis and COG have been adjusted too at this stage, to have a smoother “flow” along these bones.
Horse spines are very flexible even if not immediately visible from outside. But breaking down the above shown movie of a RL horse while walking or galloping should make it more visible to us.
Preview on next lesson
Now that we have defined our new shape, it’s important to fix the bone rolls. Bone rolls values are extremely important to let the rig work correctly during animation, avoiding tedious and sometimes almost impossible fixes. These values will determine which is the natural bending direction of each single bone in this rig. This is the reason for that long explanation about joint orientations, bvh standard and the in depth discussion of how to setup bone roll. This is what we have to comply with now…