SLS-5 Weight Maps
Free PreviewFor the impatient: No i will not explain what Fitted Mesh is. However i am almost sure you will find out on your own after you have read this chapter. At a moment in time the big light bulb in your mind will flash and suddenly you will understand that fitted mesh is …well just weight for the light bulb…
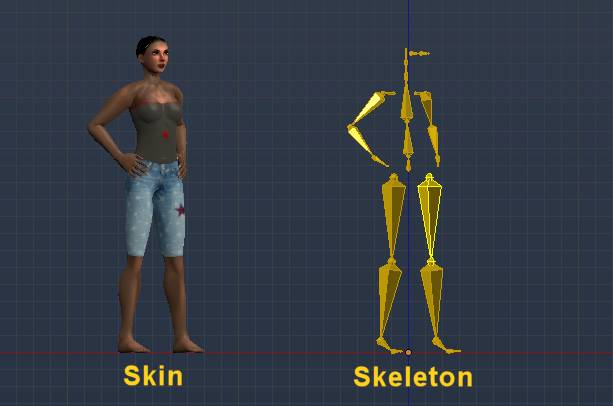
Skeletal Animation (introduction)
But you might have overlooked an extremely important detail:
If this doesn’t make sense to you now, then read on. At the end of this chapter you will know what that means. If that makes sense to you, then you probably already know what i will explain in this chapter. But beware, this is only one topic. we will have more to understand…
A simple example
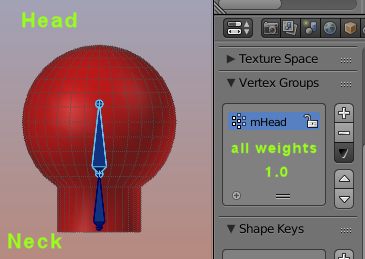
Lets begin simple. In this example we will examine the mHead and mNeck bones. Lets first focus on the mHead: This bone has (like all other bones as well) a complete transformation matrix, that is:
The bone can be
- moved (Location, or better: Translation)
- rotated (Rotation)
- scaled (Scale)
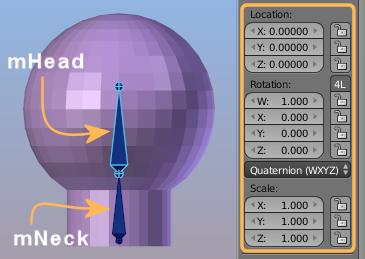
You probably know about bone Translation and Rotation because that is what you typically use to animate your character. But Bone Scale also takes an important role in Avatar shaping as we will see in a moment!
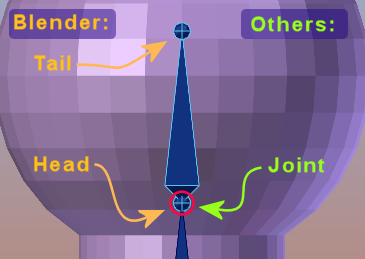
About conventions:
In Blender bones are defined by a Head and a Tail. Each bone has its own bone transform matrix for defining location, rotation, scale with the pivot (the reference point for the transformation) always placed in the bone head.
In other 3D Tools…
it is common practice to introduce Joints as the working items. A joint is equivalent to Blender’s bone head. And Blender’s Bones are represented as connection lines between 2 adjacent joints.
We will now examine how the weights in the weight maps of a mesh influence how the mesh reacts to bone movements. In this chapter i expect that you already know the absolute basics about weight maps and how they are related to meshes and bones. So if you need to refresh your knowledge about Bones and Bone weight maps, then please step back to Lesson 1 to get prepared.
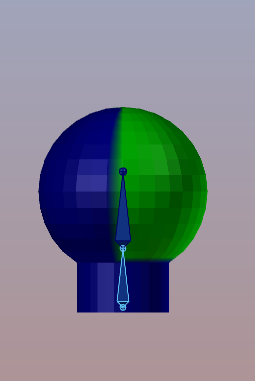
The initial setup
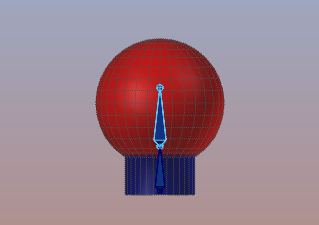
Note: The pivot point for this mesh scaling is always the bone Head (joint). The Mesh origin is not relevant here.

Bone scale set to 1.2. The entire mesh scales up relative to the Pivot of the mHead bone.
Restricting the Bone’s Influence
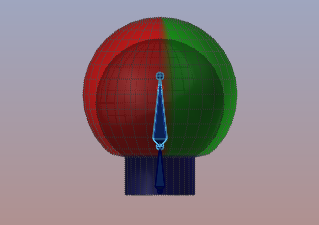
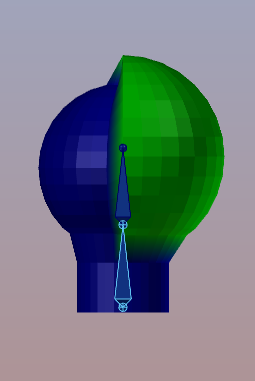
So lets revert the bone scale, then remove the weights from the lower part of the mesh. Actually i have set the weights all to 0.0 on the lower 2 edge loops (they display in dark blue now)
On lower part of mesh: weights all set to 0.0
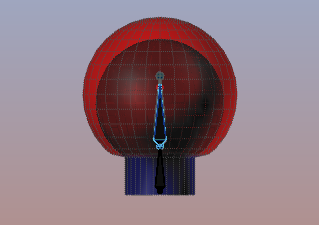
bone scale set to 1.2. Now the neck part remains unchanged.
Observation
- When weight is set to 0.0 the weighted vertex is not affected
- When weight is set to 1.0 the bone scale propagates fully to the vertex.
Conclusion
And more mathematically: the mesh transformation induced by a bone transformation is proportional to the values in the associated bone weight map where a weight of 0.0 keeps the mesh unaffected, while a weight of 1.0 propagates the bone transformation fully to the mesh. Lets check if that is true…
In a nutshell: Weights define the relative influence of those bones which take part in the animation. When we only have one bone, then any value > 0 means: “fully inherit the bone matrix of the bone”.
Weights are Relative
First of all we have to review our initial observation now (see above). Until now we only have looked at one single bone. But in practice skeletons always have multiple bones and in principle each bone can influence each vertex. Because of this the weights are not interpreted as absolute values, but they define a relative influence per bone.
So actually we have to sum up all weights from all bones for a particular vertex, then calculate the relative weight for each bone… For example, if you have 2 bones and both bones get weighted with a value of 1.0 to a vertex, then the sum of all weights is not 1.0 but 2.0. However the influence of all bones on the vertex can not become more then “full influence”. Thus if we want to keep our initial observation correct, we need to rebase the weights such that the highest weight sum gets remapped to “full influence”. So we are talking about …
Normalized weights
Basically a weight normalization ensures that the sum of all weights for a given vertex remains 1.0 while the relative weights are preserved. So in the example of 2 bones, each having a weight of 1.0 we calculate each bone’s effective weight W on a particular vertex as follows:
W = bone_weight / sum_of_weights
For example, if we have 2 bones, and both bones are weighted with weight=1, then the effective weight of each bone gets:
W = 1.0 / (1.0 + 1.0) = 0.5
Special case: One Bone only
In this case the sum_of_weights for a particular vertex is always equal to the bone weight. So regardless of the weight value, the effective weight for this special case is always:
W = bone_weight / bone_weight = 1.0
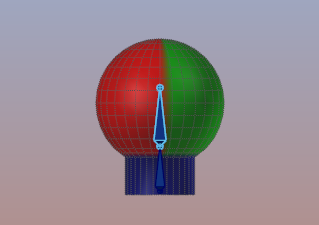
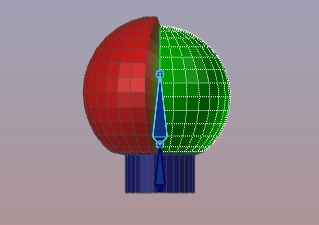
And this explains why the green part of our sphere scales identical to the red part (we only have one bone weighted to each vertex of the sphere).
Note: If there are no weights for the vertex defined, then there is nothing to be normalized and the vertex is just ignored.
For Blender users:
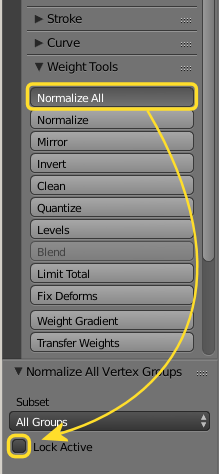
When you work with Blender, then you always can weight any bone with a value between 0.0 and 1.0 and just ignore how Blender uses your weights (Blender will always take care to interpret your values as relative weights). But you also can force your weight maps to show the effective weighting (normalized weights). For this purpose Blender provides the Normalize Tool:
- Enable weight paint mode or edit mode)
- Open the tool Shelf
- In the Tools Section you find the Weight Tools
- There you find the Normalize All Operator
When you click on that button then an Operator panel opens in the lower left corner of the Tool Shelf. If you want to normalize all weights, then you want to use the Subset Deform Pose Bones and you want to disable the locking of the Active Weight Group.
Note: You do not need to use the Normalize Weights tool and let blender do the job silently in the background (Blender does that anyways). However, using the Normalize tool should never influence your animation at all! It only will give you a better (easier to understand) picture about which bones actually influence which vertices in which way.
Verify
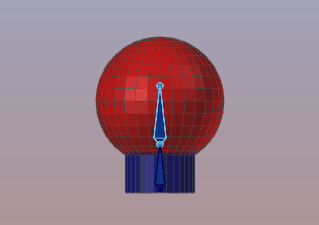
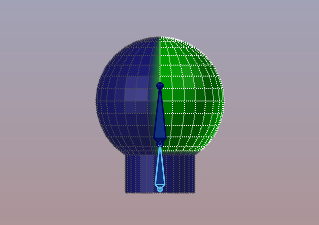
Here you see what happens with the weight map of the mHead bone when we use the Normalize All on our Object:
Before Normalize
After Normalize
Important Note for Blender Users: The blue neck part does not get normalized because i explicitly removed the weights from the weight map. So the corresponding vertices are not weighted at all, thus the Normalize Tool will ignore them. If you have added the neck vertices to the Head Weight Map but used a value of 0.0 (no influence, visualized in blue), then the Normalize All tool automatically changes the weight values from 0.0 to 1.0 So i recommend to remove the vertices from the weight map instead of applying a weight value of 0.0
Fixing the Weight Maps
By now we got a clue how we can force the right part of the head to scale only 50% instead getting the full scale. So we weight all vertices on the right side of the sphere to 0.5 as before. But now we know from what we just learned that we have to place the other 50 percent of influence to other bones so that the relative weights remain intact.
In our case we can simply use the neck bone to keep the remaining influence:
Right part of the sphere weighted to the mHead Bone (weight:0.5)
Right part of Sphere also weighted to the mNeck bone (weight:0.5)
Can you now predict what will happen when you scale the mNeck bone instead ? The first guess will be, that the mNeck bone only affects the green part of the mesh… Check it out and see the next caveat…
Now the left side scales by 1.2 while the right side only scales to 50% of the scale (1.1 instead of 1.2)
Bone parents and children
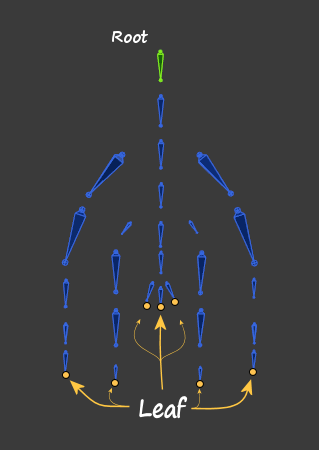
The last bone in a line of bones (bone chain) is sometimes named the Leaf Bone.
Also bones can be connected, such that the head of a child is glued (contrained) to the tail of its parent. And for each bone we can define which parts of its transformation matrix influences (gets inherited to) its child bones.
Note: When we translate this to our simple example, then the mNeck Bone takes the role of the Root Bone and the mHead bone takes the role of a Leaf Bone.
The SL Skeleton as a hierarchical Bone Tree
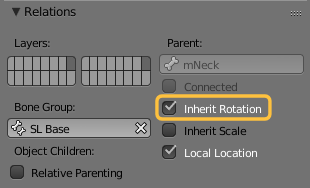
Note: I could not find out what the Local Location option implies.
Regarding Location, the bone hierarchy defines strictly how the bones move in relation to each other. In short: A parent bone always moves all its children along with it.
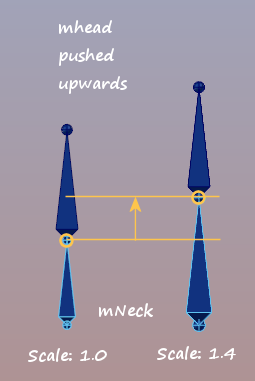
Back to Neck…
So what happens when we scale the mNeck bone ? First of all the bone’s tail moves upward when the bone scales. Then due to the general rule Children follow Parent all child bones will move along with the bone tail.
So in our case the mHead bone moves upwards when the mNeck bone gets scaled. So far no weight maps are involved.
… and Weightmap magic
When we look at the vertices which are weighted to the neck bone (the right side of the sphere, with green weights in the images below), we expect them to scale up with 50% of the bone scale. And indeed we can see that happens.
We also see the left side of the sphere is not affected by the scaling of the mNeck Bone (because the left side of the Sphere is not weighted to the mNeck Bone). However we see that the left side of the sphere moved upwards. How can this be ?
The answer is: the left side of the sphere moves because the mNeck bone has pushed the mHead bone upwards. And because the left side of the sphere is weighted to the mHead bone, the mesh moves upwards along with the mHead bone. So actually the mesh now behaves as expected:
no scale applied
mNeck scaled by 1.4
So far we have looked at what happens when vertices are weighted to one single bone alone, or to 2 adjacent bones. We already can see the mesh bending and stretching can easily become very complex. So when you weight your bones to vertices, then you should strictly take care to keep things simple and follow the
This may sound a bit too simple and you might think that you can not solve most of your issues with just 2 weights. But experience will make you confident over time that “less is more” here.
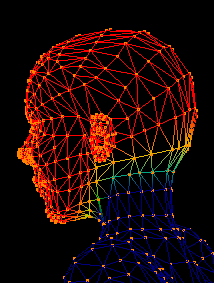
As an example let us take a look at the SL Avatar. This is the SL character. Here i have colorized all vertices in green where the character is weighted to 2 bones. While all not colored vertices have only one single weight.

green areas show places where 2 weights are assigned to each vertex
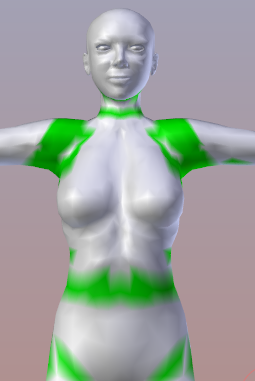
Even along the collar we only see 2 weights per vertex.
So you see the SL character is indeed weighted very efficiently with very few weights only. And this is not at all bad.
By now we have taken a first look at how vertices and bones interact on behalf of weight maps. We have seen that bones can propagate movement (translation), rotation and Scaling to the mesh. In the next chapter we will continue looking at this Skeletal Animation System from another perspective to finally understand how the parts interact with each other and how actually the Second Life Skeleton functions.