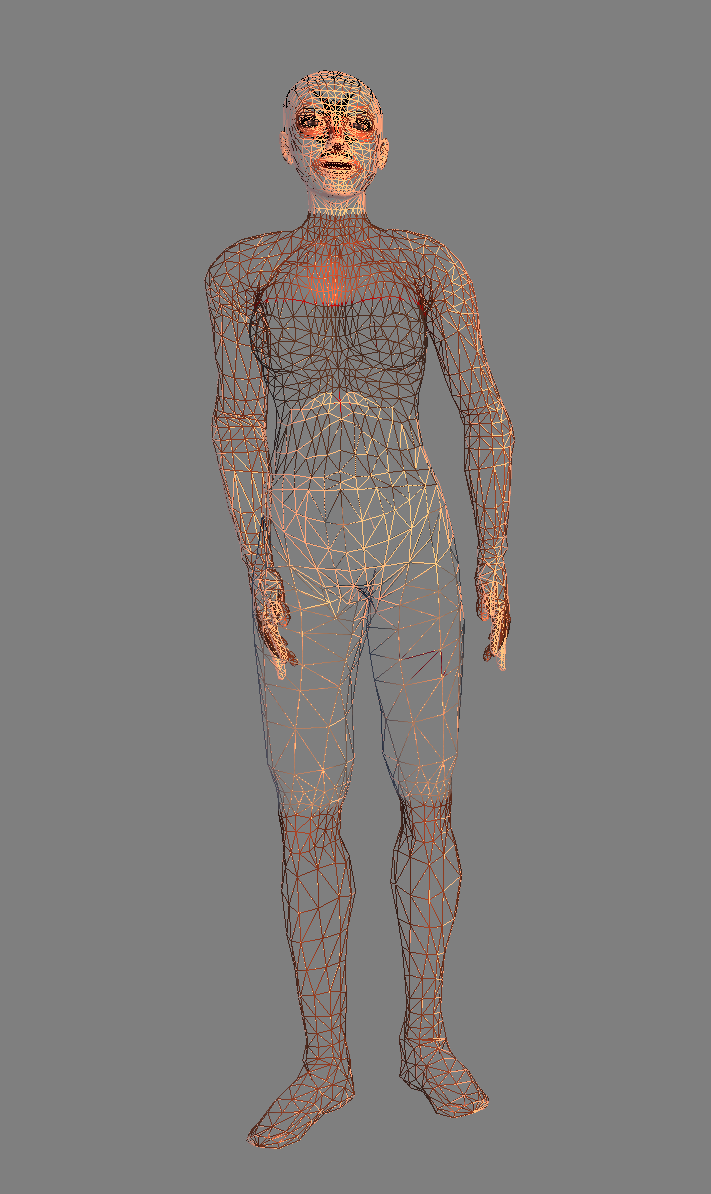
SLS-2 Working with rigged Mesh I
Free PreviewIn this lesson we will take a detailed look into how a rigged mesh character behaves in second Life. I have chosen to use the mesh clone of the SL Avatar for this purpose. The main reason for this choice is:
We can make a direct comparison between the Rigged Mesh and the SL Avatar.
Note: This lesson is not about creating mesh characters. We first will examine in great detail how mesh characters behave (and where their behavior differs from the SL Avatar), that will help us later to make the right decisions when we are working on our own models. You can download the mesh clone from here:

If you don’t use Blender then you can use the .dae file for importing it to Second Life.
Exporting the Mesh
Second Life provides a Collada Importer for Custom Meshes. The Collada format allows to specify static meshes and rigged (animated) meshes. So in principle your 3D modelling tool just needs to support the Collada format to allow transfer of objects to Second Life. However, the Collada format is very complex, and sadly it has some nasty tool dependencies (see in the toggle tab below).
For Blender: Blender’s own native Collada exporter has an option that allows to directly export Second Life compatible Collada files. However, this is a low level exporter which needs the models to be prepared in a specific way. Our Mesh Clone has all necessary settings, so we do not need to worry for now.
Note: If you are using Avastar, then you will not use the mesh clone from the Workbench, but a different model. We will get to this when we actually talk about the differences between the standard (low level) mesh clone and the Avastar character.
Advanced: Details about Collada
Second Life uses the Collada Format as transfer format. So all you need is a tool that allows to export your character in that format. But although the Collada Format is pretty well defined, it has a weak point:
Here are some of the important specifications for Second Life SL Importer:
Polygon types:
UV-Maps:
Material count:
Tris per material:
Rig:
Rig orientation:
Tris and Quads(*)
1 UV Map at max
up to 8
up to 21844 Tris
21 bones (+5 optional)
forward X
(*): The Importer accepts Quads, but it will automatically convert all Quads to Triangles(Tris), because SL itself only supports Tris.
The Second Life constraints listed above need some more explanations. We will get back to this later in this course. For now all we need to ensure is that our modelling tool does export the Model such that it can be imported to SL.
SL specific pitfall: Rigged Mesh without Rig
There is one specialty with Second Life that is worth to be mentioned: The SL Character’s rig is already fully specified in the SL Viewer. Actually by default the SL Viewer uses the same (locally defined) Rig for all characters. And because of this there is no need at all to import the Rig itself to Second Life over and over again1. Furthermore the SL Importer by default ignores all Rig information (Bone sizes and bone locations) and it only takes care about the skinning information (the bone weights).
Pitfall alert: About names
If your exported file contains Collada data but does not have the file appendix .dae then the SL Model Importer might not be able to upload this file. Also avoid to use special characters for the file name as much as possible. Best is always to use ASCII characters (US keyboard characters). The same is true for your object names (so you best use ASCII wherever possible). The SL Model importer is very picky about that and at times it tends to not tell you about what exactly it complains.
Using Blender's default Collada Exporter
Blender specific details
Early versions of the Blender Collada exporter ( before 2.63 ) omitted the export of the Armature objects and they only exported what the SL Importer really needed. But this implementation created invalid Collada files. Because of that Blender’s Collada exporter has been improved. It now takes care to create valid Collada files depending on what objects are contained in the export selection:
When no Armature is selected:
Then Blender only exports the static part of the mesh, that is the mesh model itself. In this case Blender ignores the Bone weight maps and the exported Collada file now contains a statue instead of an animateable object.
When an Armature is selected together with a mesh:
Then Blender exports all armature data and all mesh data as before. But if the mesh is bound to the Armature, then also the mesh’s bone weight maps are exported (thus the mesh can later be rigged in SL).
When you have enabled the option Include Armatures then Blender detects on its own which armatures it should export along with the selected meshes even if the armatures have not been selected.
Note: You also can use the option Include Children. In that case you can simply select the Skeleton, and all its assigned meshes will be exported along with the selected Armature.
1 The SL Importer has a mode where it actually does import the rig, that is when you enable the SL Import option With Joint Offsets. We will get back to this when it becomes relevant.
Blender’s native Collada Exporter in action
If you do not use blender, skip the export part and proceed with the chapter about the SL Importer below.

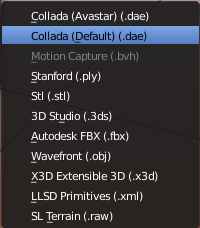
You find the Collada exporter in the Menu
File -> Export -> Collada (Default)
Please ensure that for the Avatar from the Workbench we must use the Default Collada exporter!
Blender’s Collada Export Panel
Hint: Hover the mouse over the magnifier to see an orientation map:
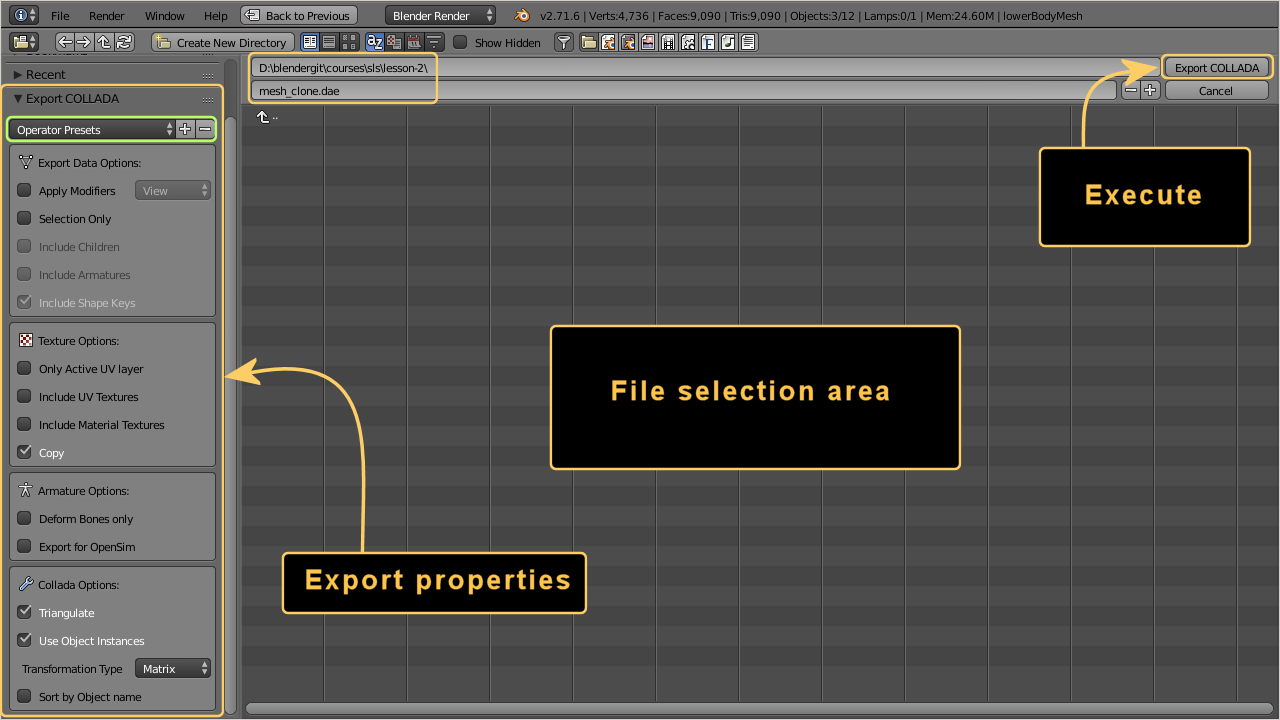
The Export Properties Panel
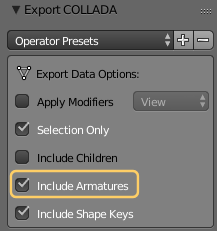
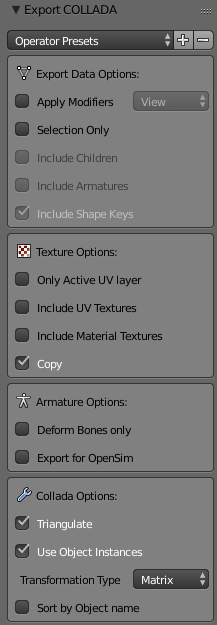
The export panel contains many options to allow to configure the exported data as needed. We will have to set the options as follows:
Enable:
- Selection Only (avoids exporting hidden objects)
- Include Armatures (to ensure the rig data is exported)
- Only Active UV Layer (SL only supports one layer)
- Export for OpenSim (very special settings)
- Triangulate (to avoid that the SL Importer does it)
- Sort by Object Name (for multi part objects)
Disable:
- Include shape keys (SL does not support this)
- Use Object Instances (SL Importer does not support this)
We have added 2 Operator presets (see first line in the panel) from where you can recall the SL specific settings with one mouse click:
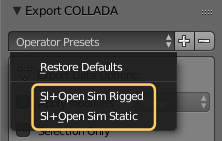
Presets for Second Life
Note: The operator Preset definitions and the Export for SL/OpenSim Option have been added to Blender’s official distribution. There is no extra Addon involved here. Also note that in Blender 2.73 the label of this option will change to Export to SL/OpenSim.
And… ready to export.
Once you have set the export options, and the name and location of the export file, you can click on the [Export Collada] button (see the orientation map above) to finally generate your export file.
Ensure to use the extension .dae
Importing to Second Life
If you did all right in your exported model, then importing it to Second Life is not such a big deal. However Linden Lab has established a few more pitfalls here which can make your life a bit more complicated as it needs to be. But we will get this sorted out quickly. In the following i will use the Stabndard SL Viewer unless otherwise noted.
Open the Model Importer
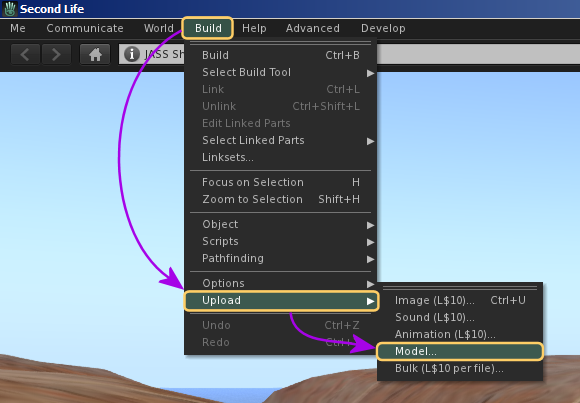
Open the SL Model Importer
Now a file selector box opens from where you can navigate to your collada file and select it. And if all went well, then you end up on the SL Model Importer screen. This screen is separated into 4 regions as follows:
But wait. If you are new to all of this, then you might step into a caveat here. That is, you might get informed (in the Cost Calculator section) that you don’t have the right to import mesh…
How to become a registered Mesh creator
You might see a notice like this when you try to import a Collada file:
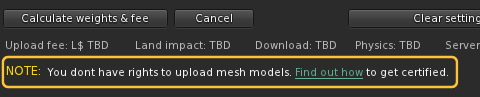
If you want to import Mesh of any kind, then you have to do 2 additional steps before the model Importer will work for you:
- You need to provide payment information to avoid illegal activities (i.e. importing of proprietary mesh work).
- You have to take a small survey (10 questions) about rights and license policies.
Please step to the related Webpage on the Secondlife website to Find out how to get certified. From there you will be guided further. And once you have fulfilled all requirements (don’t worry, its actually not much that you need to do), then you can proceed with your Mesh Upload.
Lets turn back to the Panel sections now.
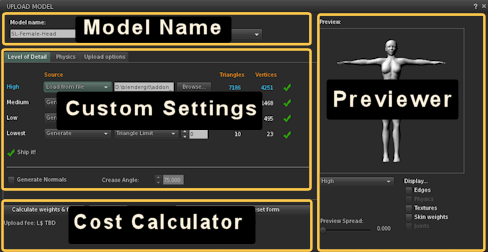
The Model Importer panels
I will only explain the parts which we really need for now. I will get to more details when we need them. So, on the SL Model Importer Screen we have 3 regions of importance which are provided on all importer panels:
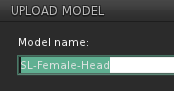
1: The Model Name Area
2: The Preview Area
In the previewer you can check your mesh before you actually do the upload. You can check your mesh look in the different levels of detail (by default you see the Medium LOD) and you can visualize other elements of your mesh:
- Edges: Paints the mesh edges on the mesh
- Physics: Displays the physics hulls
- Textures: Shows the textures to be imported1
- Skin Weights: Puts the character into a stand pose2
- Joints: Displays the characters bone joints3
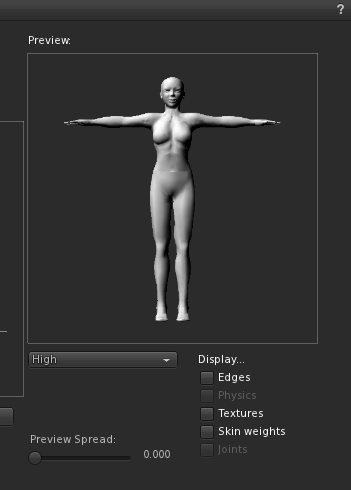
1: The SL Importer can not import textures when the mesh contains Rig information. This is a long standing Bug in the importer.
2: Unfortunately the previewer only provides a stand pose for a human character. If you make non humans then this preview is not of big use.
3: This is only of importance when you make non human characters and when you have knowingly modified your character’s skeleton!
3: The Cost Calculator Area
The Calculate weights&fee Button
The complexity of your imported mesh and the related costs are calculated on the server side. And since the cost calculation is rather complex, it can not be provided in realtime.
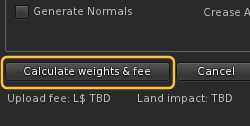
Therefore the SL Model Importer provides the Calculate Weights&fee button. When hitting this button, then all data of the currently imported mesh objects is sent to the server side, then evaluated, and finally the calculated upload costs are returned back.
The Costs Display
When the cost calculation is finished, then you will eventually see a couple of changes in the panel:

- The Calculate Button is replaced by an Upload button. You need to click this Upload Button to get your mesh sent to your Second Life inventory.
- On the Bottom Line of the Importer Panel you see 5 numbers, of which the most important number is the Land Impact. That number specifies the number of Prims that is taken from your land’s prim capacity when you rezz the imported Mesh(es) on your Land.
Note: As soon as you make any change in the SL Model Importer panel, the Upload button disappears and gets replaced again by the Calculate weights&fee Button.
What is Land Impact ?
Linden Lab has tried to evaluate the overall delivery costs for meshes. they ended up with a complex calculation that involves the number of objects (Server), their number of vertices, faces, normals, UV Faces, UV Island count (Download), and the complexity of the mesh physics shape (Physics).
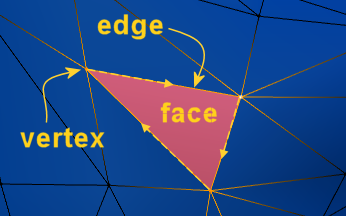
The atomic face (1 Tri)
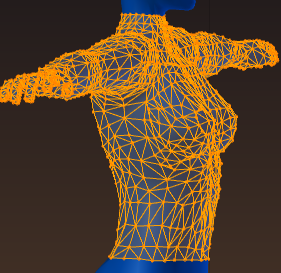
Upper Body (3700 Tris)
Land Impact and Prim Count
Physics
Server
21.96
1.5
Note: When you want to optimize your meshes Land impact, then you will always aim to reduce the highest valued costs component, which in our example is the Physics costs.
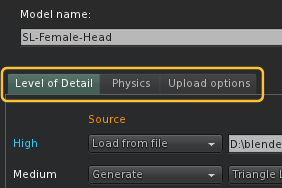
4: The Custom Settings Area
The SL Model Importer provides 3 tabs for custom settings:
- Level Of detail (here we are currently)
- Physics
- Upload options
We always begin in the Level of Detail Tab. I will describe the Custom setting panels in more detail below.
The Importer’s tabulators (active tab in green)
More about the Custom Setting Panels…
The custom settings panels are the most important part of the SL Model Importer. Here i will only give you some brief information that is necessary to get your meshes imported. If you want to gain a deep understanding, then the best approach is most probably to just take the time and experiment with the settings.
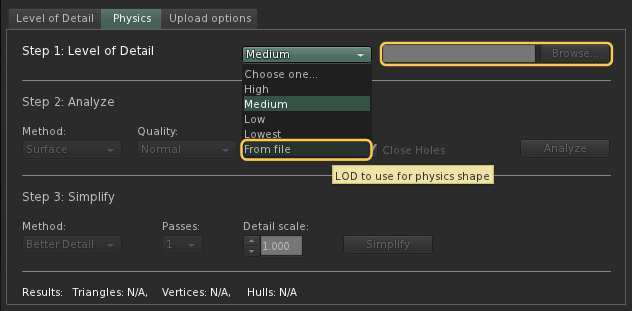
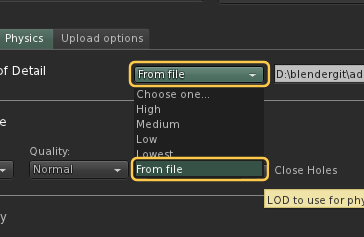
The Level of Detail Panel
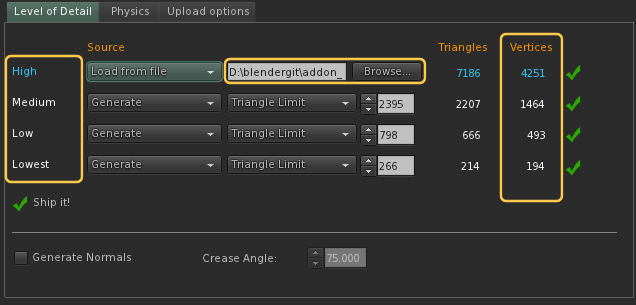
The supported LOD levels are:
- High (loaded from specified file)
- Medium (visible most of the time)
- Low
- Lowest
The Importer is capable to generate the lower LOD levels for you. But in most cases you will get much better results when you create your LOD levels manually in your 3D Editor.However, for worn meshes the LOD’s seem to take effect much later compared to when the same meshes are rezzed in world. So in most cases the generated LOD will be sufficient while you wear your mesh creations. Further down i will show you how you can do a quick optimization for testing your meshes.
More about Vertices and Triangles
You may have noticed that you only see the Triangle count even if your mesh contains Quads. This is so, because the SL Model Importer always does a face triangulation. So if your original mesh was made only with Quads, then the triangle count will be twice as large as the Quad count was in your 3D editor (simply because due to the triangulation each Quad has been converted into 2 Tris).
So while we can understand the triangle count pretty well, we need to take a close look at the Vertex count. Actually you will see more vertices in the SL Model importer than you can see in your model editor. but this is not a bug. The reason why this happens has to do with 2 topics:
- Whenever you have a seam in your model, then the model’s UV Map will contain UV Islands, where one and the same Mesh vertex can have 2 or even more UV Vertices. Those extra vertices in the UV Map are added to the displayed vertex count.
- Whenever you use flat faces (no smooth shading) then each vertex that belongs to one or more flat faces, will create extra vertex normals. Each such extra normals adds to the count of Vertices in the SL Model importer.
Hence you will see many more vertices when your mesh uses flat shading, compared to meshes which use smooth shading. And furthermore you see more vertices if your mesh has more seams.
The Physics Panel
If you just import a mesh and rezz it in world, then the Second Life server actually has to take care about 2 topics:
- The Object needs to be visualized (rendered at the right place in the environment)
- The object might need to interact in some way with the environment. The easiest type of interaction is when an Avatar runs into an object. Then the character should bump (think of a wall for example), or the object should move away (like a ball for example that is kicked). This is called the object’s physical behavior.
Now you might think that determining when 2 objects bump into each other is just a matter of finding the touch points between the objects. So the idea could be to just use the object’s meshes them self for this and we are done. But unfortunately the calculation of the touch points become very expensive when the mesh shapes of the interacting objects get more and more detailed. So while it is possible to just use the meshes for the physics behavior, very often you can determine the physical behavior by using a dramatically simplified low polygon model of your objects. This is the physics model of your object.
The SL Model Importer always wants to assign a physics mesh to any of the imported Objects. But it gives you some control over the physics shape, which is good. In more detail: you can either select one of your LOD meshes (the medium LOD is chosen by default), or you can put in your very own physics shape (from file) which is in almost all cases the better alternative.
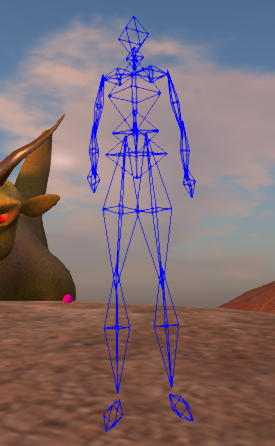
Special case: Rigged Mesh
The Collision Volumes are simple (normally invisible) octahedron objects (see image). The size (actually the scale) of the Collision Volumes is controlled by a specific set of bones, the Collision Volume Bones (not visible in the image). Thus the Collision Volume Bones are a very simplistic representation of the character which is optimized for calculating the physics behavior of the Avatar.
So we can forget about physics for worn meshes (for now). But unfortunately (as mentioned further up) the SL Model Importer insists to assign a physics mesh to each object. However, since our mesh is rigged and it is mainly made to be worn, we can attach any physic mesh that we want. So we also can use very simple meshes for this.
Create your own physic mesh
You have seen above (when we talked about the Land Impact) that our mesh has physics costs of about 21. This is because the default choice (the medium LOD) for the physics mesh is still a very complex mesh which raises the physics costs unnecessarily.
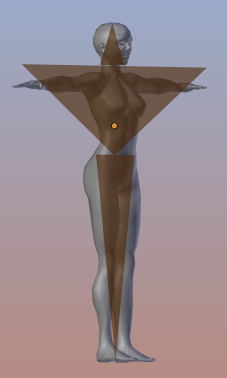
Caveat: When you provide your physics mesh for an Object that has been combined from several parts (3 in our case), then you need to provide one physics mesh per part. Actually (since the physic mesh is not used at all) you can just provide 3 triangles, one for the head, one for the upper body, and one for the lower body.
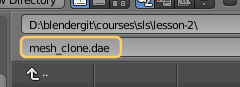
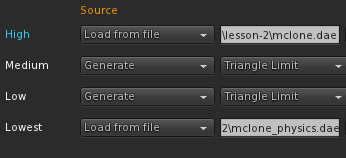
Note: I have prepared such simple physics meshes in the mesh_clone.blend (see above) but you also can get the ready made Collada file if you prefer:
Hint: Please read the next paragraph before you export your physic mesh.
Export order of multi part meshes
head
lower_body
upper_body
head_phys
lower_body_phys
upper_body_phys
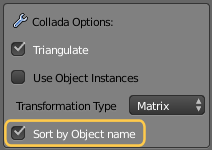
For Blender Users: Blender allows to export meshes sorted by Object name (see the Blender export options panel) so we only need to ensure that the objects name are sorted in the same order for the meshes and their physic representations.
Important: You have to create a separate Collada file for your physic meshes. Exporting all meshes in one Collada file does not work!

But you also see that the Land Impact is now determined by the Download costs (the Mesh complexity). So when you want to reduce the Land Impact further you now have to look at the Mesh and its LOD’s again.
But beware, your character will then collapse into 3 triangles when seen from far away.
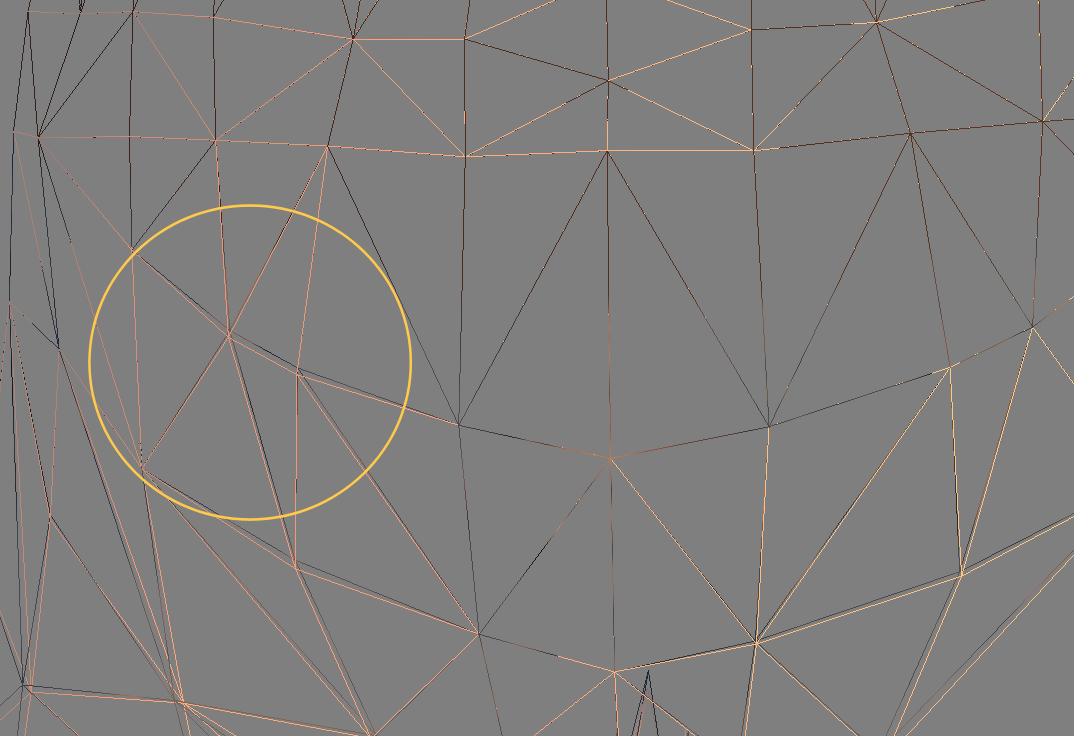
You can use the physics model also for the lowest LOD (in the Level of Detail panel)
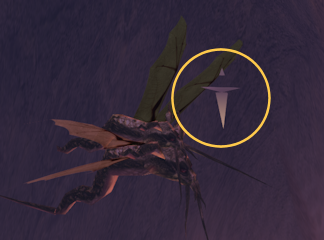
Mesh with very simple lowest LOD (seen from far far away with zoom in at max)
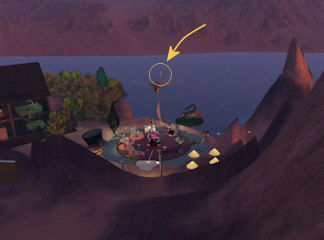
Same mesh with default camera setting. (The avatar is in the center of the yellow circle)
The Upload Options Panel
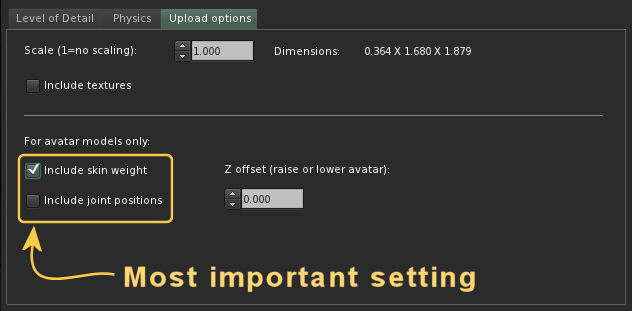
This panel can be overlooked easily, especially because its naming implies that it is just for variations of the default settings. But this is a major pitfall (and i can tell you that i stumble into this pitfall more often than you might expect). The SL Model Importer does not automatically import the skin weights for a mesh! Hence you need to check the option…
Include Skin weight
So we are talking about rigged meshes. And rigged meshes always contain weight maps (see lesson 1). And you always want to import these weight maps! Unfortunately you must set the Include Skin weight option on your own. And you have to remember to do this for every new mesh that you want to upload.
In most cases this is actually all that you need to do on this panel, however there are some more options here…
Include joint positions
As long as you make attachments for the default SL Avatar or for human meshes which use the same rig as the default SL Avatar, then you never want to enable this option! Because when you enable this option then the SL Model importer assumes that you have defined your own rig variant (you have edited the bone locations) and thus it imports this rig as a replacement for the default Avatar Rig. And this can become a serious issue, especially if you wear this attachment together with a mesh character that also provides its own rig variant… Too complicated ? yes, i know. For now just remind:
Z-Offset
Did you ever see that your avatar starts hovering above ground as soon as you wear a mesh attachment ? This happens mostly with child avatars. Or your avatar sinks into ground ? this is a disease that infects mostly giant avatars…
well, in the early days of mesh this issue could be corrected by adding a z-offset here. However, Linden Lab was not able to tell how the z-offset needs to be calculated. So setting this value was a lot of try and error. So since a while we have an option added to the in world shape editor. there you can adjust the hover value of your Avatar interactively which is a great improvement over try and error.
So you rarely need to set the z-offset nowadays. Just keep it at 0.000 and adjust the setting later by using the shape editor.
Include Textures
This is yet another annoyance. This option only works when your mesh does not contain weights. We know where the problem is, and it is actually easy to fix in the SL Viewer. Actually it has been fixed twice in the past, but the fix broke again always shortly after it was released.
So in short: You can not import textures together with your rigged mesh.
The workaround is to import the textures separately (with the image importer) and apply the textures later in world.
Scale
I am not sure gor what reason we have this option. I just keep it at 1.0 all the time.
Compare Mesh with Avatar
It is important that you create a new Shape for the comparison, or at least ensure that you wear a Default Avatar shape like in the image aside. Here i only added my own skin with texture based clothes.
So there is not a single mesh object on my character at this moment. Now i will wear the just imported Mesh character.
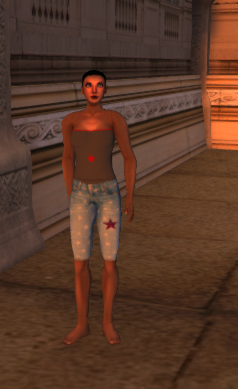
Note: The mesh object has not gotten any texture yet. Hence it looks pure white. So what we see here is a mixture that shows the original Avatar at some places, and the new mesh at other places.
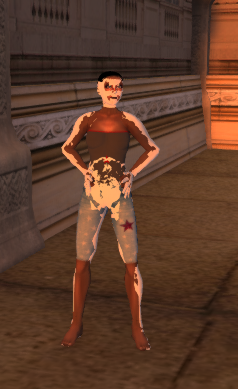
But you also see another issue: Everywhere where the meshes match the surfaces begines to flicker. Here the renderer can not decide which of the edges it should draw on top of which. You can see this best when you do the comparison on your own. Or watch the related part of the accompanying video for Lesson 1 (look at minute 5:55)
Actually we need to understand what causes the differences. But before we get into even more detail, we first will take care of understanding Bone sliders and Morph sliders. This will be part of our next Lesson.
Where is the actual link to SLS-2? All I see on this page are links to SLS-1 and SLS-3.
Never mind, I found it. We have to click Complete before it shows up…
Thank you very much for this… all of the explanations are really helpful and are improving my understanding of “things”. Much appreciated.
What parts do I need to select in the export collada panel. All of this is very confusing.
The detailed instructions about what to do and when to do and why to do is collected in the toggle field “Using Blender’s default Collada Exporter” near the top of this page. There you also will find a hint about the “operator presets” which have been provided for convenience. You only need to select one of the presets to get your export for Second Life.
But remind: This is only necessary for exporting with the default Collada exporter. When you have Avastar, then you can follow the much simpler guide in the Avastar reference pages, see:
Today a referenced .dae file is not found: The requested URL /wp-content/uploads/2013/11/mesh_clone.dae/ was not found on this server.
fixed. thanks for the hint.