This is the Update documentation for Avastar-1.1 Avastar 1.1 is currently available as beta version. Please check the testversions subfolder of your Avastar download page and look for
avastar-1-1-962_blender-2-65.zip
Avastar is a tool-set made for Blender, it is designed to support the creation and animation of characters and attachments. It is optimized for Second life, but it also supports other similar products.
Avastar works for any Blender version starting from Blender 2.65, up to the most recent release.
Avastar is available from the JASS-Shop in second life or via Paypal (See right sidebar of this page).
Product Highlights
- Easy creation of characters based on Second Life Shapes
- Shape-sliders for easy shape adjustments (now also applicable to Attachments)
- Fitted Mesh support (Collision Volume Bone weighting)
- Rigging of non human characters
- A mesh calculator for estimating your mesh costs.
- An embedded Collada exporter, optimized for use with second Life.
- Welding of boundary seams for seamless texturing of multi part creations.
- An advanced rig for animation with blender tools,
- Animation of eye movements,
- Facial expression sliders (upload to Second Life not supported)
- Animation of collision volumes and attachment points.
- A Retarget tool optimized for transferring second Life animations.
- Export as BVH and as .anim format.
Where is the Download ?
- I already purchased Avastar-1-0:
You find the new update in your Product Download folder. - I lost my download link:
Please check in the FAQ. - I want to buy Avastar-1-1:
You can buy directly from Paypal (right side of this page), or go to the Jass-Shop in Second Life and purchase from the Avastar vendor.
More Questions ?
Ask Gaia Clary in Second Life, or send email to gaia.clary@machinimatrix.org
Have Fun
Gaia
New Features in Avastar-1.1:
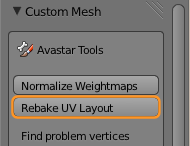
Rebake UV Layout
Automatic UV Rebake in SL
Second Life uses an automated Rewrap to improve the Character look after its shape has been modified. Unfortunately this automation does not apply to Custom Mesh characters as well.
Avastar UV Rebake
We have added a feature into Avastar for rebaking the UV Layout. This feature works similar to what Second Life does automatically for the SL Avatar. You find the tool in the Tool Shelf (in the “Avastar Tools” Panel):
Demo
Avastar can apply the rebake to any rigged mesh.
https://www.youtube.com/watch?v=id
The video describes the problem, how it is solved in SL, how it can be solved with pure blender and finally it shows an example how the automated procedure can be used in Avastar.
Rig presets
We now provide 3 Display Presets for the Armature:
- Weight
For all weighting tasks. This presets sets the Armature into Pose mode, the Mesh into weight Paint mode, and it enables visibility of all Deforming Bones. - Animate
For all Animation Tasks. This presets sets the armature into Pose Mode, the Mesh into Object Mode adn it enables visibility of the (green) Animation control bones. This is the default setting when you open a new Avastar - Retarget (new)
This preset is almost like the Animate preset, but it enables x-ray and disables custom shapes for better comparison to the Source rig.
You find the Display presets in the Tool Shelf (Show Bones Panel)
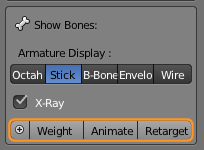
new: We have made the Show Bones Display partially collapsible to save space on the Tool shelf. You can expand the panel by clicking on the plus sign on the left side of the preset button array.
Bone groups reorganized
We have reworked the Bone groups a bit in order to better support Fitted Mesh. The changes are:
- Renamed the “SL” bones to “SL Base”
First reason is: The term “SL Bones” does not describe the bone set exactly. Actually we have about 130 SL Bones defined in the Default SL Avatar. The 26 bones which have been ambiguously named “SL Bones” just happen to be the bones used for animation in SL.
Secnd Reason is: We now can also use the Collision Volumes during Weighting. Thus the Term “SL” Bones has become totally confusing. - Added a Bone Group “Deform” (new)
This bone group contains all bones that have the “Deforming” flag set and thus take part in animating the mesh. The Deforming Flag can be set manually set for each bone in the Bone properties window
Hint: By default the “Deform” Group contains the same bones as the “SL Base” group. But this changes dynamically whenever you enable/disable the Deforming Flag for any bone of the Avastar Rig either directly in the Properties window, or by using the Rig Presets (see above).
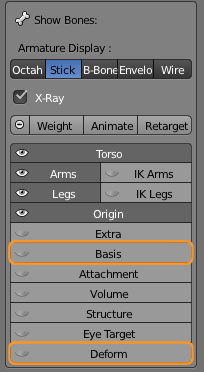
Hint: The panel may be partially collapsed on first view. Then click on the plus sign in the Presets Array (the one with the 3 buttons weight, Animate and Retarget)
Improved Rigging Panel
Blender allows to rig a mesh with automatic weighting from bones. This method can sometimes create much nicer results than a simple copy weights from SL meshes. Especially when the custom mesh looks very different from the SL Default character.Avastar now allows 4 different Weighting tpyes:
- Keep As Is:
This option just parents the mesh to the selected Armature and creates an armature modifier. Weights are not at all affected. You will use this option when your mesh is already weighted, or when you want to do all weighting manually. - Create Empty Groups:
This option also keeps the existing weight groups untouched. But it adds empty Weight groups. - From Bones:
This option enables automatic Weighting from Bones, the mostly used Weighting tool on Blender. In general the automatic weighting from Bones works very well. - From meshes:
This option copies the weights from all visible meshes which are also rigged to the same Avastar Armature. This function allows you to use a template mesh with ready made weights, or simply use the weights from the Avastar character for your mesh.
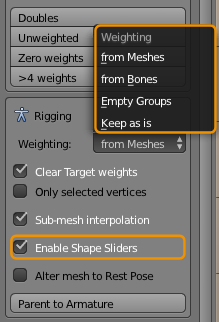
Hint: The panel opens up when you have selected a mesh AND an Avastar armature, both in Object mode.Hint: The feature “Alter mesh to rest pose” does not yet work together with Weighting from Bones. This will be added later.Hint: Blender also allows automatic weight from Envelopes. We have not added this feature because there seems to be a bug in Blender related to that feature.
Shape Slider Support (very exciting stuff)
Abstract:
You can now use the Avastar Shape sliders to affect your custom mesh. Please be aware that this feature simulates the Second Life Shape Editor. However Avastar simulates the slider influence for classic bone weighting (as SL provided until november 2013) as well as Fitted Mesh Weighting (which is now officially supported by SL as well).
Shape slider Support
Custom Shape sliders now are fully functional:
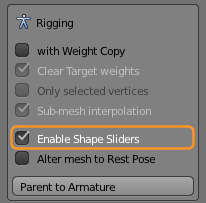
- You can enable shape sliders during “Parent to Armature”
- You can later attach/detach the sliders by one mouse click
- The sliders work well in parallel with Avastar (xml-) Shape import
- The Freeze tool can be used to apply a shape slider configuration permanently to a mesh (see also below)
- new: Shape sliders are now animatable (and renderable) in Blender. This has no impact on Second Life.
Note: Enabling the shape sliders does not actually change the Mesh itself, but adds Shape keys to your meshes which can later be removed or applied permanently.
The Demo Video
https://www.youtube.com/watch?v=id
The Shape keys
When you Enable Shape Sliders, then Avastar automatically adds up to 3 Shape Keys into the shape key section of your mesh:
- Basis:
This is the original mesh as it was when you attached the sliders. - neutral_shape:
This is a mesh based on all sliders set to the neutral shape (this is an artificial shape that can never be configured with the shape sliders!, technically this is probably the Ruth shape configuration) - bone_morph:
This is a mesh based on the current slider configuration.
How does it work ?
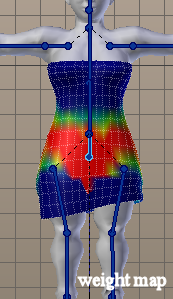
Avastar calculates the shape keys for a slider configuration by combining the sliders values with the Mesh Weights. Thus if the weighting is optimal, then the mesh will also morph nicely. On the other side small ‘issues’ in the weights may sum up to visible problems when the sliders are pushed towards extreme values (see images below)
You can fix such deviations right away by adjusting the weights and frequently press the “Refresh Shape” Button (see next chapter for how to do that)
Sidenote: You do not need to set the Avastar to default shape when you attach the Shape sliders to your mesh. In theory you can start from any Avastar shape that can be created with the Shape Sliders.
Where can i attach the Sliders ?
The Buttons for attaching/detaching the Shape Sliders can be found in the Tool shelf (Rigging Panel). You can enable the Shape sliders when you “parent to Armature”:
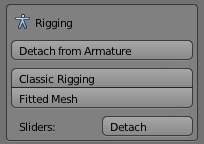
However you can attach/detach the sliders from your custom mesh(es) at any time later as well:
This is where Fitted Mesh comes into play (see next section).
Where are the Shape keys ?
You find them in the Mesh Data Properties window (Shape Keys panel):
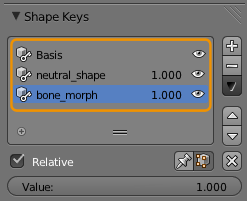
Caution: Keep hands off these Shape keys, unless you know what you do!
How to Refresh Shape keys ?
You need to refresh your shape keys mostly when you are doing weight painting. Thus we have added a Button for quick refresh into the Tool shelf (Weight Tools Panel):
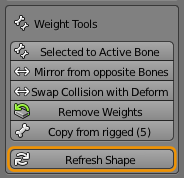
So whenever you want to test how your weight changes propagate to the mesh shape, you can press the “Refresh shape” Button and see the results immediately on the mesh.
Why does Avastar not Recalculate the shape automatically for my meshes ?
The reason is: the recalculation of the mesh shape keys due to changed weight values is extremely slow (about 2 calculations per second on my computer) and if i would make this automatically, then you would see serious lag when moving the sliders and your computer would turn into an electric heating device.
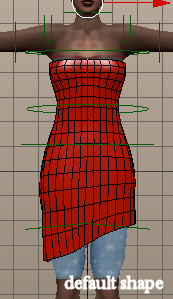
This mesh fits perfectly to the default Avastar.
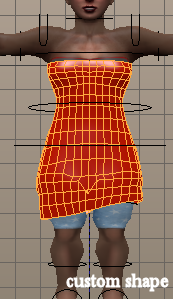
When you load a shape with extreme settings, the mesh can end up with unexpected distortions (see the stomach area)
The distortions are caused by bad mesh weighting! thus by improving the weights your fitted mesh can be improved as well!
- Store your custom Avastar Shape (if you not already have it on disk)
- Reset the Avastar to its defaults
- Attach your mesh(es) to the Sliders as described above
- Reload your custom shape.
Fitted Mesh Support (exciting as well)
Fitted mesh
Since Linden Lab has announced that Collision Volume rigging is officially supported (under the name “Fitted mesh”), we have started to rework our already available tools to improve usability:
- The Avatar definition files have been updated to the newest available files from Linden Lab (as of December-2013)
- new: 7 Collision Volume Bones have been added according to Linden Lab Jira entries FITMESH4 and FITMESH2. (This is still work in progress)
- 2 Mesh weighting Presets for “Classic weighting” and “Fitted mesh weighting” have been added
- new: A new copy weight function for swapping SL Base Bone weights to corresponding Collision Volume Bones weights has been added to the Avastar Tools (in the Tool Shelf)
Weighting Presets (new)
- Classic Rigging
This Preset reset all Weight Groups to copies of the default Second Life weighting. That is it enables the SL Base Bones (see above) as deforming, cleans up by removing all weight groups related to the other bones, and does a bone weight copy from the default Avastar to the custom mesh(es) - Fitted Mesh weighting
This preset first does a reset to Classic Weighting, then it moves the content of the SL Base Bones weightgroups to the corresponding Collision Volume Bones, and finally adds automatic weights to the PEC, HANDLE, BACK and BUTT Bones.
Fitted mesh in practice
Fitted Mesh (formerly named “Liquid Mesh” or “Collision Volume Bone Weighting”) has been available in Avastar since a long time. The newest Changes to this feature will not be very apparent on first look. The most apparent change that you can see on the user interface is the availability of the 2 new “Weighting Presets” as described above.
Where are the Presets ?
You find the Weighting Presets in the Tool Shelf (Rigging Panel):
Note: You also can attach/detach the shape sliders from this panel at any time!
Freeze tool improved
We found that freezing a mesh often creates unwanted “polution” by keeping original meshes laying around. While you always can hide the original, it often is not needed and just consumes memory and disk space. Therefore we have added a new option:
Delete Original after freeze
This option makes it easy to freeze the influence of the shape sliders for a rigged mesh. When you select “Delete original” then the applied mesh will de facto replace the original mesh (which is what you want anyways in many cases.)
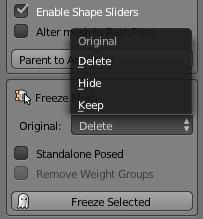
The Freeze Tool can now also remove the original mesh and replace it by its frozen variant.
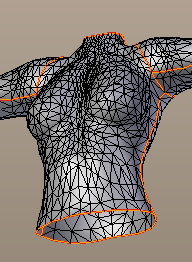
Improved Seams
The meshes of the default SL Avatar have texture seams defined.
- We added seams at the mesh borders (between head and upper body and between upper body and lower body). This allows you to join the meshes and still see where the parts have been joined.
- We added a few missing seams on the head and hair meshes.
- And we removed a few unnecessary seams at the upper arms, hands, in the head (mouth and ears) and on the hair mesh.
Retarget
Improved Mesh precision
- Added correction for scaling the eye meshes. They now better fit to SL Avatar eyes
- fixed small deviation from the expected mesh wireframes. This became mostly apparent near the lower arms.
There is no new feature connected to this change. Only the exported meshes much even better to the SL Avatar when the same Shape is worn in SL as was used for the character in Blender.
You can compare the SL Default and the imported Avastar defaul best in wireframe mode. Please take a look on the image to the right. This is a wireframe compare of the default Avastar imported to SL and worn on the default SL Avatar (please click on image to zoom out to the details):
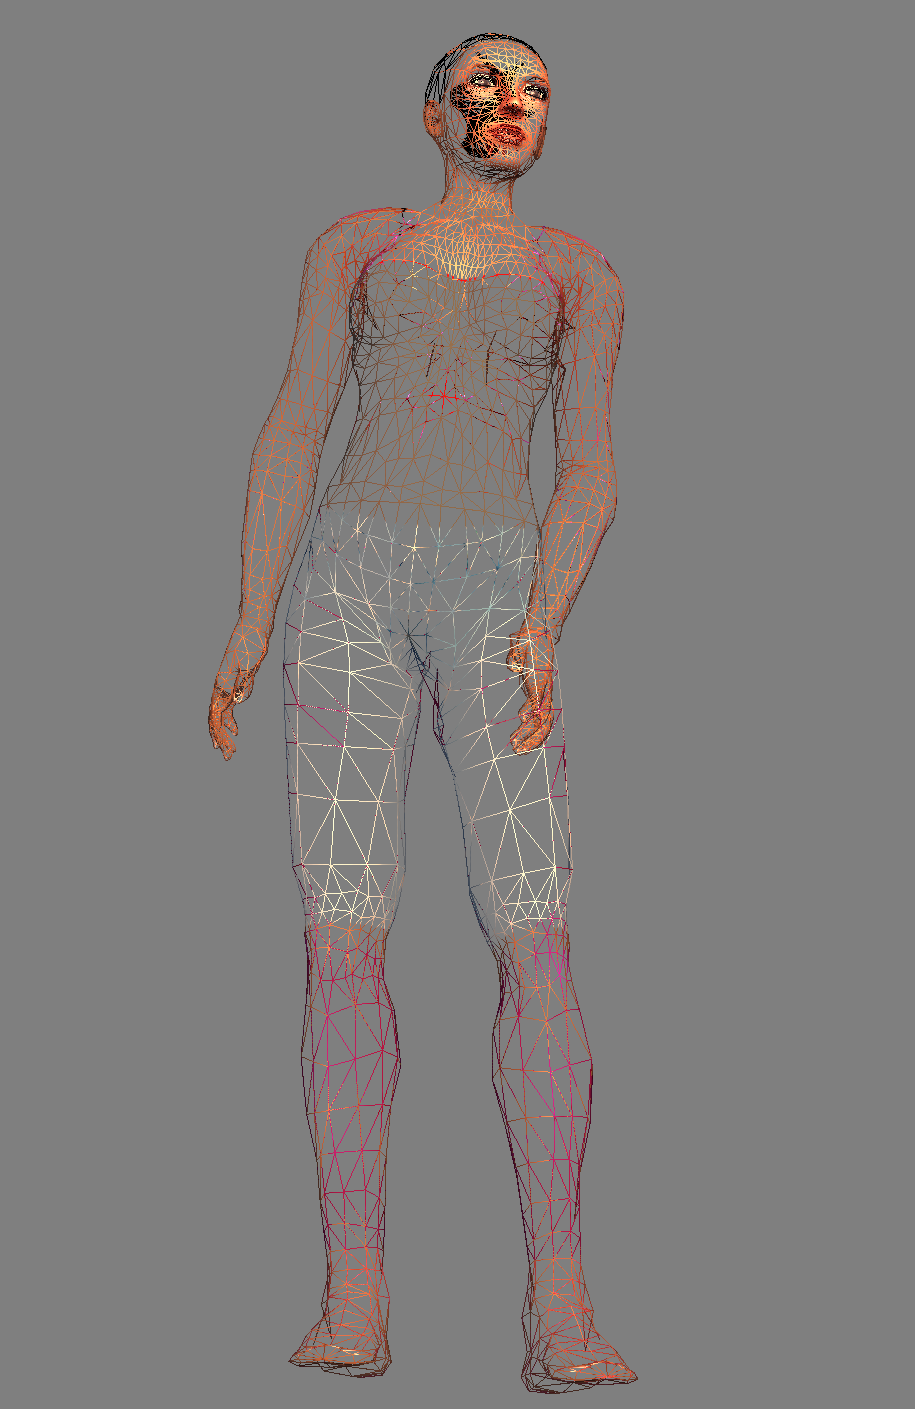
You can see that both meshes wireframes are almost identical, except at the mouth region where the Avastar character uses a slightly different Pose.
More Changes & Improvements since Avastar-1.0
- Imp: Clarified the tool tips.
- Imp: Better wording in Tooltip for clamping number of weights per vert
- Imp: Changed UVLayer naming to use ‘SLMap’ instead of individual names (Blender compatibility)
- Fix: Addon deinstall no longer keeps traces of Avastar in Blender
- Fix: Fixed detection of double verts and > 4 weights per vert
- Fix: Added Support for Blender 2.70 (git version numbering issues)
- Fix: Remove Avastar properties from frozen objects.
- Fix: resolve exception when freezing to Standalone Pose
- Imp: Changed Collada subpanel label from ‘Others’ to ‘Advanced’
- Imp: Armature modifiers for Avastar characters now have ‘preserve volume’ enabled by default
Known Bugs

Gaia hello, I changed my email and failed to save my purchase details so that I can upgrade my Avastar, I sent you a notecard in Second Life with the details, if you could please send my order details again to my new email I would appreciate that, thank you.
Version I have now is avastar-1-0-873_blender-2-64
yeah from wikipedia: In Greek mythology, Gaia (/ˈɡeɪ.ə/ or /ˈɡaɪ.ə/; from Ancient Greek Γαῖα, a poetical form of Gē Γῆ, “land” or “earth”;[1] also Gaea, or Ge) was the personification of the Earth,[2] one of the Greek primordial deities. Gaia was the great mother of all.
I have a background in Rhino, Revit, & Max. Then because of SL i found Gaia, and that Blender she spoke of and her JassPub.. circa 4.59. I checked things out. I watched Gaia’s tuts. I saw that she had wisdom.
Never does Machinimatrix or Gaia ever say or mislead that one can NOT do everything they do in Blender without the brilliant Avastar. In fact a sense comes across of amazement in the tutorials at the discovery on how to make that stoopid Blender work for SL. So there is the gist…. Avastar helps you make Blender work for SL.. pure and simple. And, as weighted mesh & animation get more complicated.. i can only say I am so really happy I got to buy into Avastar before what should be the inevitable 200% price hike. YES GAIA.. your Blender Add On is too fricken dirt cheap.
Personally I can not thank you enough for monkeying around with all the cutting edge crap in the Blender & SL animation & mesh worlds so I can just jump in at a nice cozy starting place. Avastar makes and pulls to the front in Blender many big easy buttons for me. It does some serious heavy lifting. I spent many many hours/days/months trying to get right something Avastar does in a button or two. Plus one of my favorite things about Avastar is that I learn as I F up my mesh. But, I am the curious sort, and guess what.. it is ok if you are not.. cos Avastar will just plain help. Buy now before you pull your hair out.
This message brought to you by a DIY’r whose previous attempts at more complicated SL mesh/animation were always a disaster. I have not been paid by Machinimatrix or anyone associated with Avastar for my glowing review. I am just a happy customer. LONG LIVE AVASTAR!
Oh thank you so much for the Demo video !!! I see that I was doing things wrong and that might have been the cause of alot of weird problems I was seeing. I see also that every day there seams to be a new test version… and today I found out about the additional back bones.
Is there any way I can be put on a notification list .. email or whatever when things change.
Just as a side note .. I have noticed that the blender weights brush, Blur seams to be counter intuitive, as you have to drag from the weight (in color) that you do not want to the weight that you do want … I dont know if there is a setting that I dont know about to change this or not but it does make it a bit hard. As anyone that has done any painting with oils and canvas would want to drag the brush from the color to be added to the spot where you want the new color and not from a blank spot on the canvas to the color.
In other words … to reproduce pick a bone, start at a blue spot on the mesh with the blur weights brush and drag to a red spot … you will get the blue part weighted … pick a different bone and pick a red spot and drag to a blue spot and you will take away weights … this is counter intuitive.
Thank you so much for all your hard work Gaia, I would not be able to make clothing for the SL community with you.
You mention you use a slightly different pose around the mouth. It seemed to me that SL is always expressing express_closed_mouth_300 at 1.0 when not expressing anything else, is that what you meant? Once I set this to 1.0, my exported mesh avatar lined up exactly at all spots with my SL avatar.
yes, that’s what i meant. I think i will change the default settings to close the mouth as well.
Thank you so much for this, however is it possible to make the mesh as you are weighting to the Cbones auto refresh or update on the fly ? As it is hard to see what you are doing.. I am finding that it is necessary to refresh after every tiny change to the weighting.
Thank you
this is an extremely expensive operation. The entire shape key needs to be recalculated. I have no good idea how this can be optimized so that the time for auto refresh would become acceptable. Well, maybe we can add an option to enable auto refresh…