 Este tutorial te guiará a través de un método para crear un zapato usando Blender 2.5. Los únicos pre requisitos que necesitas son:
- Blender 2.58a (en realidad cualquier Blender 2.5 debiera funcionar)
- Por conveniencia he agregado mi propio avatar.blend modificado, desde el cual he empezado este tutorial. Si eres usuario de JASS, entonces ya tienes un avatar.blend en tu inventario. Pero por supuesto tambien puedes usar el avatar.blend original de Domino designs si lo prefieres.
Videos:
Paso I: Configurar, Paso II: Crear la caja modelo
https://www.youtube.com/watch?v=id
https://www.youtube.com/watch?v=id
Step I: Preparaciones
Queremos hacer un zapato femenino, por lo que necesitamos primero preparar la base del zapato. Un típico seteo de el editor de forma (shape editor) en SL es setear los dedos en punta, y los tacos (muy comunmente) al maximo. Pero no tenemos SL aquí, tenémos Blender. Pero en avatar.blend tenemos ajustes de forma igual que los que tenemos en Second Life. Solo debes saber donde encontrarlos:
Paro primero vamos a aislar las partes necesarias de el avatar, por ejemplo, solo necesitamos la parte baja del cuerpo (lower body). haré una copia de el en la capa 2 presionando la tecla “m”, luego seleccionamos con SHIFT presionado la capa 6:

The only reason why i did this is to get all other not needed objects out of sight. So you could work on layer 1 and nothing would realy change. But now we have the shape on layer 6 and we will use it:
- Switch to layer 6
- Then in the properties panel, locate the Object Data properties
- Locate the Shape keys and within the shape key locate the “Shoe Heel Height” key.
- Set the value of the key to your taste. I used 0.667 to get a medium height heel.
- You see that the avatar shape has changed in the 3D view.

Also locate the Shape keys:
- Shoe Heel Height
- Shoe Heel Point
- Shoe toe point
And set the shape keys to your needs. The values which you set here will later be used in the Shape editor in SL to create the corresponding Shoe base. I think it is not realy necessary to bend the feet so much because nowadays we have the Alpha mask layer. But it doesn’t harm to use the shape keys here.
Once we have shaped the avatar feet according to the shoe we want to make we are ready to start our shoe creation. I will use Box editing here.
Part II: Create the basic shoe shape
We will create the heel first. We create a simple cube object, and scale it down. Then we extrude the upper part, scale it up and rotate it according to the foot positioning. The result is a very rough heel:

Now we add the sole by extruding the upper part of the heel once and make a flat planar shape:

Now we add the verse by extruding the top most face again:

We extrude towards the shoe tip now twice:

And finally we finish the shoe tip by extruding again twice:

Now we add another layer of vertices by extruding the front part of the shoe upwards. this will later form the closure around the toes:

Now i close the front part of the shoe:
- Go to edge select mode,
- Selecting two opposite edges
- press the f-key.
Note that we have to add 2 faces here:

In my model i have unintentionally introduced some duplicate vertices. I am not sure where that happened, but i detected it when i added the previous 2 faces. So let us clean up the model now by selecting all vertices and then remove doubles:
- select all vertices
- press the w-key -> remove doubles
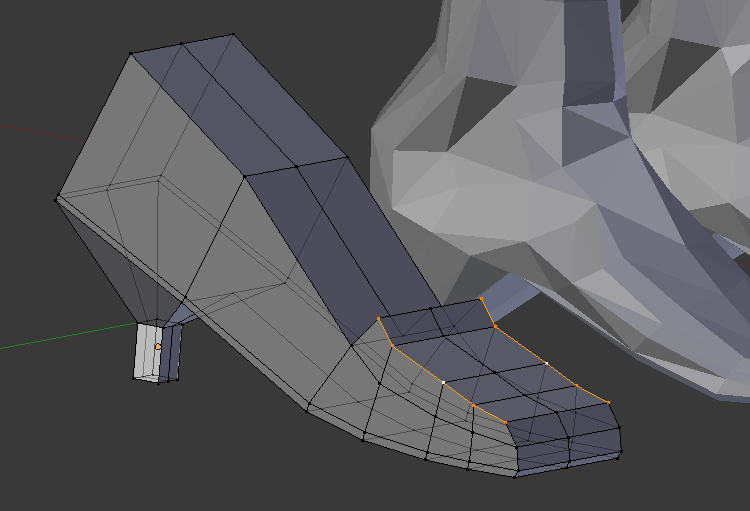
The model has not changed, but if you had duplicate vertices, they are gone now and you have again a clean model. You can verify that the model is perfectly clean when you can create perfect edge loops, as sketched in the following image:

Part III From Box Model to Shoe Model (coming soon)
We will now start smoothing the very rough first model. And for simplicity we will start with a symmetric model. I will add one edge loop and cut the shoe into 2 slices:

Then i remove one half of the shoe and add a mirror modifier instead.
- The mirror goes along the Y axis.
- I have enabled Merge to get a nice transition from the mirrored part to the non pirrored part.
- I have enabled clipping to avoid overlapping edges.

At the end the shape looks simila to what we already have, but now we only need to modify one half of the vertices. The other half will automatically be adjusted. We start modelling the shoe tip as follows:

Then we proceed on the verse. For the verse we add one extra edge loop first:

Then we push the vertices on the middle of the verse a bit backwards, and the upper corners a bit inwards to form a rounded shape:

To get a bit more freedom for modelling we add another edge loop:

then after a bit of shifting the vertices around, we end with this form:

Part IV: Getting smooth
The shoe does not yet look realy beautifull. It still very blocky, but you will later see, that what we have now is only our low level of detail. So let us get some more faceson the model. I use a subsurf modifier and add 2 levels of subdivision. Furthermore i set the entire shoe to smooth shading:

We have used the Catmull Clark subdivision algorythm. this makes very smooth edges. But at some parts we realy want to keep sharp edges. So we will crease some edge loops:

All edges marked in pink have been creased.
Now we face one problem: the shoe is closed. We could decide to keep it like this, because the foot will anyways fill out the entire shoe. But let us say we want this shoe to be exposed in our shoe shop. So we would need something that realy looks like a shoe and not like a brick. I will first remove the closure:

Now we see that of course there is no sole in the shoe. We will change that now by adding a few faces. Along the sole seams. I make this a bit easier by defining the seams first, then i can hide the upper part of the shoe and thus have free access to the sole:
Firstmark the highlighted edge loop as seam:

then hide the upper part of the shoe:

And finally fill the loop with new faces:
to be continued…