- Have your mesh and the Avastar figure and rig ready.
- Select both your mesh and the rig (use SHIFT RMB to add an object to your selection).
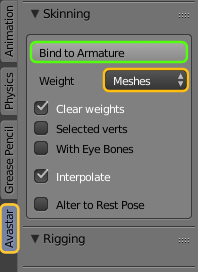
- In the Avastar Tab:
- go to the Skinning panel
- set the Weight option to Meshes
- Ensure that Clear Weights is Enabled
- Ensure that Selected Verts is Disabled
- Ensure that Alter to Rest Pose is disabled.
Now you are ready to press the Bind to Armature button. At this point both your mesh and rig are still selected and can stay selected for the next steps in the workflow.
Note: If you are doing Classic Rigging, the binding part is now finished.
The Pitfall
In this step you are copying initial weights from other meshes. This works only if the Avastar Rig to which you want to bind your new Custom mesh already is associated to at least one other bound and weighted and visible mesh. In detail you have these options:
- Either you must have at least one of the Avastar figure meshes visible (head, upper body, lower body, skirt, eyes) This is normally so by default, so you do not need to worry about this.
- Or you must have at least one other custom mesh with weights already bound to the Avastar figure and visible.