
This article describes the Avastar User Interface in more detail. Due to the nature of the product the interface is rather large. Therefore we have split the interface into several functional groups. These groups are found at various places in the Blender framework:
- Export Panel is in Render properties
- Shape controls Panel is in Object Properties
- Rig Display Panel is in Object Data Properties
- Expression Controllers are in Properties Sidebar
- Mesh Tools are in Tool Shelf
The Avatar (3D View)
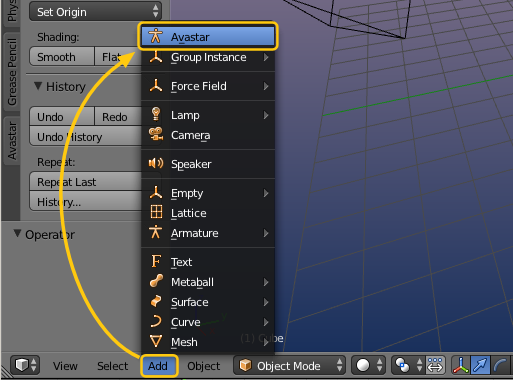
Adding an avatar to the current scene is easy. Just select “Avastar” from the Add menu. The avatar will be placed at the current cursor location on the current layer.

The entire Avastar object can be moved by selecting the rig (the orange circles) then move it just like every other Blender Object.
You can add as many Avastar characters to your scene as you like. This allows you to make multi character animations.
The Avatar Meshes
The avatar object is made up of eight meshes. The meshes are the standard SL meshes:
- headMesh
- upperBodymesh
- lowerBodyMesh
- eyeBallRightMesh, eyebalLeftMesh
- skirtMesh
- hairMesh
- eyelashMesh
We have added materials to the main meshes:
- avastar:mat:head
- avastar:mat:upperBody
- avastar:mat:lowerBody
- avastar:mat:eyeBalls
Hint: All Avastar meshes provide SL compatible UV maps for textures. Therefore you can use Avastar also for creating texture based clothes. A detailed description is provided in the supplemental document “The OpenSim Avatar Mesh“.
Hint: The materials will only be created by Avastar when they do not yet exist in the current blend file.
One easy way to predefine your Avastar skin is by simply providing predefined materials in your blend file and use the listed material names. When you then add an Avastar character, it will be already textured.
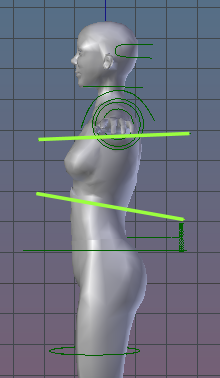
The Avastar BonesThe bones are divided into 5 groups: “Control” (green), “IK” (yellow), “Volume” (bright red), “Attachment” (dark red), and “SL” (blue). Not all bones are visible by default. The display would otherwise become close to useless (see image to the right). We have chosen the default to display only those bones which are most relevant for animation. A detailed description on what the Avastar rig is based can be found in the supplemental document “The OpenSim Skeleton“. |
 |
Animation Control Bones (green)These are control bones for the usual SL bones (see below). These bones are used for posing and animating. They are very similar to the SL Bones but come with a small tweak: the Pelvis bone has been flipped around and made a child of the COG bone so that it’s easier to animate hip movement. Otherwise the sizes and parenting hierachy is the same as in SL. By default we have enabled “Custom Shapes”. that is the bones are not displayed as bones, but as control handles (green rings around the Avastar Mesh Character). To see the bones in a more traditional form tick “X-Ray” and untick “Shapes” in the armature tab of the property editor. Note that there is a few more bones than you might expect as some of the bones are there to support the structure of the rig (some are hidden on a particular Armature layer – see the Armature tab of the Property Editor). Note that we have split these bones into further subgroups that can be individually shown and hidden so you can enable only what you need:
|
|
IK Control Bones (yellow)These bones belong to the IK (Inverse Kinematics) system. By default these bones are invisible and the influence of these bones is set to zero. To enable IK control select a bone on a limb and use the sliders in the “Rig Properties” section of the Properties Panel. When switched on the whole limb will try and align with the position of the IK control. Note that there are a bunch of bones that are there to provide a target for the IK system and to show you how a limb is orientated. The latter bones can be made visible with the “IK Rig” visibility switch below. |
|
SL Bones (blue)These are the “true” bones of the SL Character. These bones are used to do the weighting for your own mesh characters or mesh attachments. When it comes to export of your mesh, then (by default) this is the only set of bones which are taken into account. But see for more details in the export options. For animations these are the only bones that count (together with the Origin which provides the reference point for the entire entire avatar).
|
|
Root Bones (green)We provide 2 extra bones for making animation easier: The Origin for moving the entire rig regardless of animation and the COG Bone for animating entire character movements: |
 |
|
|
Attachment Points (Red spheres)The attachment points correspond to the attachment points of the Avatar. These points are primary used for animation. But we also support weighting of the attachment points. Unfortunately, SL doesn’t appear to support repositioning these bones. Note: Most suported online worlds do not officially support weighting of attachment points. And not all attachment points can (currently) be used for weighting. In particular all attachment points which contain a space in their name (e.g. “L UpperArm”) will not be recognized as”weighted bone” during import to OpenSim or a compatible online world. |
|
Collision Volumes (red)The Collision Volumes correspond to the collision volumes in the Avatar. Originally these bones provide a simple mesh frame that allows efficient (fast) calculations of physical interaction (collisions) of your avatar with the environment. However these bones can also be used for animation and weighting. The most important feature of the Collision Volumes is that they are coupled to the SL Shape sliders. And if correctly weighted, they allow your meshes to be customizable via the SL Slider system. Note: This feature is also fully independent(!) from the Mesh deformer project which is currently implemented by Karl Stiefvater in the “Mesh clothing parametric deformer” project. |
Note: This feature works on all online world viewers which support Mesh. Detailed information about weighting to the Collision volumes will be provided. |


Rotation Limits
Some of the (green) Rig Control Bones have been constrained with rotation limits. These limits ensure that your poses keep reasonable (avoid impossible poses). But sometimes -especially for non human rigging- you want to disable these limits.
The rotation Controls are part of the Rig Controls Panel. The buttons Disable and Enable apply to the set of selected bones by default.
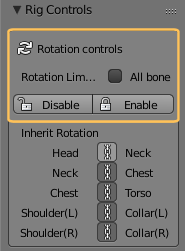
Note: When you have ticked All Bones, then the enable/disable buttons affect all bones.
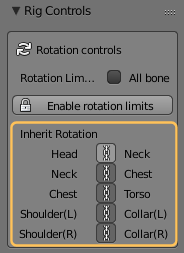
Inherit Rotation
Child rotations normally inherit the rotation of their parent bones. This inheritance can be easily enabled or disabled for following bones:
- Head inherits from Neck
- Neck inherits from Chest
- Chest inherits from Torso
- Shoulders inherit from Collar
An Example


When the rotation inheritance is disabled, the Head keeps in the upward position regardless of the rotation of the Chest. In the same way, keeping the orientation of the chest regardless of the lower body can be useful in some motions.
Note: The inherit rotation buttons can be key framed into the animation.
Breathing
You can press Breath In/Breath Out multiple times to get a “deeper breath”.

The following pictures demonstrate how the Torso and the Chest move against each other to simulate the breathing:
After a few Breath In Clicks
After a few Breath Out Clicks
Animation Export
Note: The Exporter is only available when you have selected the Avastar Armature as the active Object.
Anim Export
Basic Settings
The Anim export creates data files in the same animation format that is also used by SL, OpenSim etc. One advantage of this export type is that it supports the animation of the Eye Bones.
- fps: (Frames Per Sec).
- Start Frame: First frame to export.
- End Frame: Last frame to be export.
- Ease in: Time in seconds until the character will be reposed from the character’s current pose to the first pose in the Start Frame.
- Ease Out: Time in secs until the character will be reposed from the End Frame to the character’s previous pose.
- Priority: [-1, 0 … 6] Animation priorities (1)

(1): Priorities from 0 to 5 correspond to SL’s priority system. Priority 6 is like a master priority that “rules them all”. But it is not officially supported. Priority -1 probably means “ignore this joint”, but i could not find a description of what it does.
Loop Settings
- Loop Animation (checkmark): if checked, the animation will run in an infinite loop. If unchecked, the animation will run exactly once.
- In: First frame of loop (can be anywhere in the animation)
- Out: Last frame of loop (needs to be right from the In location) Note: Last Frame and First frame can be the same for a static animation!
- name:name of the animation. This is actually a name template. It can contain variables:
- $action: Name of current action
- $avatar: name of the Armature
Export Settings
- Apply Armature Scale: This is an advanced feature. Export non-Pelvis bone locations to the animation where they are keyframed. Note that if you move the bones (not just rotate them) then it’s easy to break your avatar in such a way that it will require logging out from SL and Relogin to fix.
- Use Transalations: …
- Export Animation: Clicking this button will open a file selection box and after you have specified the name of the export file (pre-filled out with the template), the data is exported to disk.
BVH Export:
The BVH export is compliant to standard BVH, but it takes care about some conventions which are needed by the SL animation Importer. What these conventions are needs to be documented still.
- fps: (Frames Per Sec)
- Start Frame: The first frame to be exported
- End Frame: the last frame to be exported
- name:name of the animation. This is actually a name template. It can contain variables:
- $action: Name of current action
- $avatar: name of the Armature

- Prepend reference: Automatically add the Reference Frame as initial frame (the reference frame is needed by the animation system of OpenSim and compatible worlds)
- Export Animation: Clicking this button will open a file selection box and after you have specified the name of the export file, the data is exported to disk.
Note: During upload to your online world you can specify animation loops. The in and Out locations need to be specified in %. We have added a loop % calculator. Just enter the in frame and the Out frame. Avastar will calculate the percentage values as you need them for the animation importer.
[if_not qs=rev:1.6]The Avastar Shape (Properties, Object Section)
Avastar can import and export shapes from OpenSim or any compatible online world. You find the import/export functions in the Object properties of the Avastar Armature:
- Go to object mode.
- Select the Rig (RMB on the yellow circles around the mesh).
- Open the Properties window.
- Navigate to the “Object” properties.
There you find a panel Avatar Shape IO. This panel displays a Preset selector and a subpanel with 4 main functions.
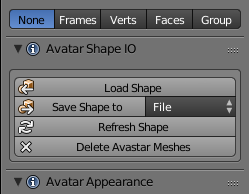
Load Shape
This function allows you to upload a Shape that you have previously exported from your online world: In most viewers there is a shape export option hidden in the advanced menu (“Advanced” -> “Character” -> “Charater Tests” -> “Appearance to XML”). This will silently create a file called:
[application_folder]/character/new archetype.xmlThis file contains your current shape and can be loaded into Avastar, where [application_folder] is the viewer’s application data folder. For Windows this folder is located at:
C:\Users\\AppData\Roaming\SecondLife\user_settings\new_archetype.xmlSave Shape to
As mentioned above the default option is to save to File. But you can also save to a Blender textblock. In that case the slider values can be found in the Blender text editor panel. The values correspond to the shape settings in the SL viewer.
Note: Some viewers support the upload of shape file to SL (e.g. Firestorm, Singularity). To see the file, switch to the Blender Text editor and locate Shape for: Avatar (Avatar stands for the name of the Armature). Useful when you need to update the shape in SL with the values from blender.
Refresh Shape:
This resets the Avastar meshes to the current Shape values. Useful together with the new custom shape key function (see below). Also if you messed up the Avastar meshes (by editing them) you can return the mesh back to the current shape slider values.
Delete Avastar Shapes
Remove all Shapes from the Avastar character. You will want this when you use the rig for non human characters where keeping the Avastar human meshes make no sense.
Load Shape Editor
Activating the button loads the shape setting controls. We added this for optimization purposes as it takes a few seconds to initialize the Avastar shape system.

The Avastar Shape (Properties, Object Section)
Avastar can import and export shapes from OpenSim or any compatible online world. You find the import/export functions in the Object properties of the Avastar Armature:
- Go to object mode.
- Select the Rig (RMB on the yellow circles around the mesh).
- Open the Properties window.
- Navigate to the “Object” properties.
There you find a panel Avatar Shape IO. This panel displays a Preset selector and a subpanel with 4 main functions:
Load Shape (Import a shape)
This function allows you to upload a Shape that you have previously exported from your online world: In most viewers there is a shape export option hidden in the advanced menu (“Advanced” -> “Character” -> “Charater Tests” -> “Appearance to XML”). This will silently create a file called:
[application_folder]/character/new archetype.xmlThis file contains your current shape and can be loaded into Avastar, where [application_folder] is the viewer’s application data folder. For Windows this folder is located at:
C:\Users\\AppData\Roaming\SecondLife\user_settings\new_archetype.xmlThe XML Shape Importer
The Load Shape tool is good for replacing the current shape of an existing Avastar model, But this is inconvenient when you do not yet have an Avastar in your scene. Here is the use case:
Suppose you start a fresh Project with an empty scene. You already have downloaded your personal Shape from SecondLife as described above. Now you want to create a new Avastar character with exactly this shape.
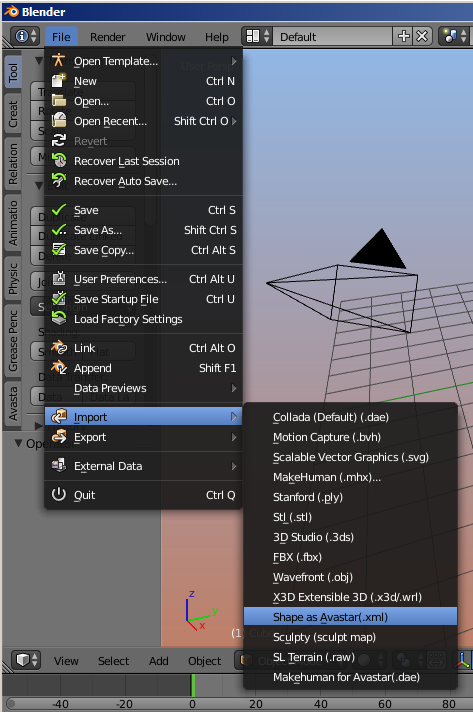
You find the XML Shape importer in the regular Blender Import menu under
File -> Import -> Shape as Avastar
The tool first opens a file selector where you select the XML shape. Then the tool creates a new Avastar character, and finally applies the imported shape.
Save Shape to
As mentioned above the default option is to save to File. But you can also save to a Blender textblock. In that case the slider values can be found in the Blender text editor panel. The values correspond to the shape settings in the SL viewer.
Note: Some viewers support the upload of shape file to SL (e.g. Firestorm, Singularity). To see the file, switch to the Blender Text editor and locate Shape for: Avatar (Avatar stands for the name of the Armature). Useful when you need to update the shape in SL with the values from blender.
Refresh Shape:
This resets the Avastar meshes to the current Shape values. Useful together with the new custom shape key function. Also if you messed up the Avastar meshes (by editing them) you can return the mesh back to the current shape slider values.
Delete Avastar Shapes
Remove all Shapes from the Avastar character. You will want this when you use the rig for non human characters where keeping the Avastar human meshes make no sense.
Load Appearance Sliders
Activating the button loads the appearance setting controls. We added this for optimization purposes as it takes a few seconds to initialize the Avastar shape system.

The Shape Sliders
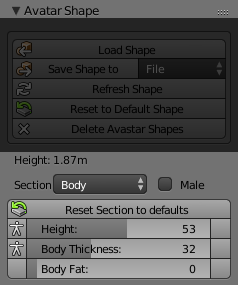
We support the same shape slider system as you can find in SL, OpenSim or other compatible worlds. You find the sliders in the Object properties of the Avastar Character:
- Go to object mode.
- Select the Rig (RMB on the yellow circles around the mesh).
- Open the Properties window and navigate to the “Object” properties.
- There you find a panel “Avatar Shape”.
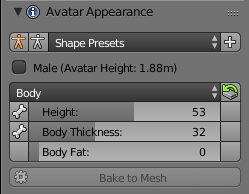
Avastar-1.6: Avatar Appearance Panel has been redesigned and is also available in the Toolshelf.
- Height: The current height of the character in online world units (1.87 meters in this example, note that Avatars tend to be slightly bigger than real world people).
- Section: A popup Menu for the different Shape Sections. This is equal to the Shape Editor in SL or OpenSim.
- Male: A Gender selector. By default the gender is female. If you check the selector, the Avastar character changes to male. You can switch the gender at any time.
up to Avastar-1.5: Avatar Shape Panel
The Section Sliders
The section subpanel of the Avatar shapes panel contains the Sliders for the section specific shape keys. The values assigned in SL match exactly with the slider values in Blender.
- Some sliders have a small stickman icon on their left side. This indicates the slider affects the bones (bone sliders).
- Since Avastar-1.5: Some sliders have a small magnet icon on their left side. This indicates the sliders affects a fitted Mesh bone (Collision Volume bone)
- All other sliders affect only the mesh (morph sliders).
- The icons on the right side indicate that the slider value has been changed. Click on these icons to reset the corresponding Slider Value to its default.
- Note: The Reset icon on the Top Left resets the entire Bone Section to its Default Values.
Before Avastar-1.5: click on the Reset default icons to get back the slider’s default value.
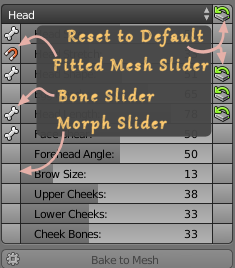
Avastar-1.5: Fitted Mesh Sliders indicated with a magnet
The Special Sections
- We have added 2 extra sections Changed, and Skeleton which do not appear in the Second Life Shape editor. The Changed section is empty by default and will be populated by the list of changed Shape sliders of your Avastar. The Skeleton section (see image) contains all sliders which will change the bone length of the Avastar character.
- On top of the list (in the Section Header) you see a Reset button. This button will reset all shape sliders of the current Section to its factory defaults.
- Each slider can be dragged, or you can click on it and then type in a number.
- If a slider has been changed then you will see a reset icon right to the slider. Clicking on that icon will reset the slider to its default value.
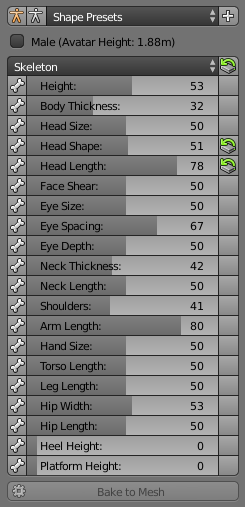
Avastar-1.6 Slider Section (slightly modified compared to previous Versions)
The Appearance Sliders (1.6)
We support the same appearance slider system as you can find in SL, OpenSim or other compatible worlds. You find the sliders in the Object properties of the Avastar Character:
- Go to object mode.
- Select the Rig (RMB on the yellow circles around the mesh).
- Open the Tool Shelf – Avastar Tab
- Here you find the Appearance Panel (see image).
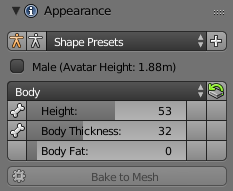
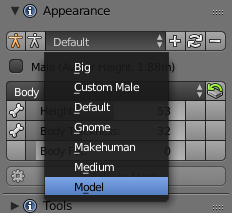
- Shape Presets: Here you can add your own Slider configurations. When you click the white + sign the current shape slider values get stored as new Preset (see also below).
- Orange Stickman: Reset the Shape to the SL Default Shape (like create new Appearance)
- White Stickman: Reset the Shape to the SL technical Rest pose (may be useful when you bind to a mesh that used the default SL Skeleton (like workbench or avatar.blend)
- Male: When enabled, the Shape switches to Male gender. The current absolute Avatar Height is displayed in parantheses)
- Sections: A popup Menu for the different Shape Sections (In the Image the Body Section is displayed). This is equal to the Appearance Editor in SL or OpenSim.
- Section Reset: The icon on the right side of the Section Selector allows to reset the entire Section to its Default values.
The Shape Presets Selector
The Preset Selector can be used to store your custom Shapes. For example when you attempt to work with a fixed set of Standard Shapes, you can add these shapes as Presets: All you need to do is:
- Define your shape (by moving the Shape Sliders, see below)
- Create a new Preset
Presets are stored globally (outside of the current Blend file), thus all presets are available at any time in any project.
The Section Sliders
The section subpanel of the Avatar shapes panel contains the Sliders for the section specific shape keys. The values assigned in SL match exactly with the slider values in Blender.
- Some sliders have a small Bone icon on their left side. This indicates the slider affects the bones (bone sliders).
- Some sliders have a small magnet icon on their left side. This indicates the sliders affects a fitted Mesh bone (Collision Volume bone)
- All other sliders affect only the mesh (morph sliders).
- The icons on the right side indicate that the slider value has been changed. Click on these icons to reset the corresponding Slider Value to its default.
- Note: The Reset icon on the Top Right of the section panel resets the entire Bone Section to its Default Values.
Fitted Mesh Sliders indicated with a magnet
The Special Sections
- We have added 3 extra sections (Changed, Fitted and Skeleton) which do not appear in the Second Life Shape editor.
- The Changed section is empty by default and will be populated by the list of changed Shape sliders of your Avastar.
- The Fitted Section contains all Sliders which affect Fitted Mesh Bones (Collision Volume Bones).
- The Skeleton section (see image) contains all sliders which affect the bone length of the Avastar character.
- On top of the list (in the Section Header) you see a Reset button. This button will reset all shape sliders of the current Section to its factory defaults.
- Each slider can be dragged, or you can click on it and then type in a number.
- If a slider has been changed then you see a reset icon right to the slider. Clicking on that icon resets the slider to its default value.
Bake to Mesh:
This function makes all slider changes permanent for the active (and selected) Custom Mesh. Take care: This function deletes all Custom Shape keys and the Mesh gets changed!
Hint: This option is not available for the Avastar Meshes.
Face Expressions
Avastar supports hand expressions and face expressions.
- Hand Expressions: We support all 15 SL Hand expressions.
Note: An SL Animation can only contain one single Hand expression. And this hand expression will remain valid for the entire animation sequence. If you need to change the Hand expression you will have to split the animation into pieces and then merge the animations in the SL animation editor. - Face expressions: Unlike hand expressions face expressions are implemented as Shape keys. We support all 20 face expressions. In Blender the face expressions can even be animated (key framed). However this fine detail of animation is not (yet?) available in OpenSim or other compatible online worlds. But for Blender animations the expressions are fully implemented and can be combined and key framed.

Rig Display Properties
The Rig Display section gives you full control over which parts of the Mesh and the Rig can be seen at a given time. By default only the Control bones and the main parts of the Avastar mesh are visible. But sometimes it is desirable to hide or unhide parts of the Rig or parts of the Avastar meshes.
Furthermore the control bones (green) use custom shapes by default. That is, they are formed as rings which are placed around the Avastar body. The benefit of the custom shapes is that they can be selected easier. But sometimes it is desired to switch from Custom shapes back to Blender’s default shapes (Sticks or Octahedrons).
The Rig Display panel is subdivided into three major parts:

Control Style settings
The first 2 buttons in the Rig display settings panel are used for switching between custom shape and blender’s default shape:
- Custom Shapes: Set all control bones to use custom shapes (Default)
- Stick Shapes: Set all bones to use Blender’ default shapes.

You can switch between both display options at any time. But when you switch to Custom Shapes, then the bone X-Ray setting is automatically disabled, while when you switch to Stick Shapes, the X-Ray setting is automatically enabled.
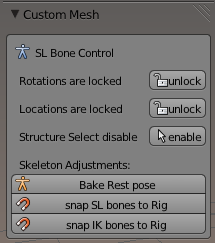
Armature toolsThe Armature tools are located in the Tool Shelf (left navigation bar in the 3D View) There you find a panel named “Custom mesh” and in that panel you see “SL Bone Control” and “Show Bones”.The sub panels only appear when the Armature is selected! |
|
SL Bone ControlThere are situations where it is desirable to move/rotate the SL bones. For example during weightpainting you may want to pose the SL bones while painting on the mesh. But the SL bones can by default only be moved/rotated indirectly by posing the control bones. This is where the Armature Editing functions step in.
|
|
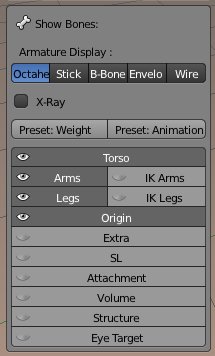
Show Bones |
|
The Show Bones panel is a convenience tool. Actually it provides functions which normally are only available when the Armature is selected. But especially when you are in weight paint mode, you might want to change the visibility and shape of the bones.
|
 |