Hello and welcome to my Weight Painting Course. I have started to rework this page from ground up. In the next couple of weeks this page will become my work area.
Actually i hope this will become more of a community effort than something that i make in the silence of my chamber. So…
Please teach me: Your opinions, remarks, tips, ideas, … all are so welcome! You actually decide what this page will show, and not just what i believe that you need.
Course Content & Audience
This course introduces the various weighting tools in Blender. It will show practical examples of how weighting can be made with good quality and with reasonable effort.
The course addresses users who have some basic experience with Blender’s modelling tools and who now want to take the next step:
Animate your model.
Prerequisites
- Blender 2.70 or newer
- Basic expertise in the usage of Blender
- The Avastar Addon (*)
(*) The course is mostly independent from Avastar, so it can be taken by non Avastar users as well. Hence Avastar is not necessarily needed.
The demo Models
I have created the initial working models.
 The above demo_models provided by Machinimatrix are licensed under a Creative Commons Attribution 4.0 International License.
For Second Life Users: We explicitly grant the permission to upload derived material to SL.
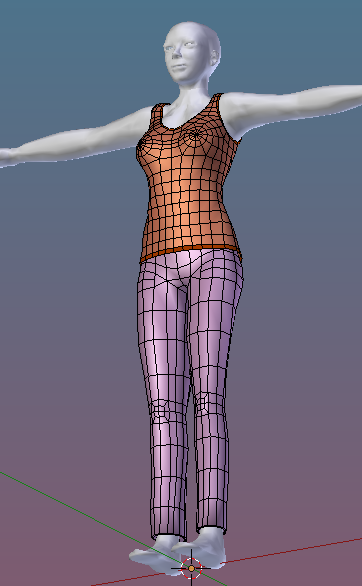
The Demo Models. Click to zoom in
File Content
The files contain 2 models:
The Pants
The Tank Top
- Edge flow around the breasts. I think this makes only sense when regarding the Collision bones (PECK)…
Actually i added the Shirt only to show how to weight the shoulder part.
I meanwhile believe that (for garments that shall work on the SL Avatar) the upper part of the straps should be weighted mostly to the neck and a bit to the collar bones, no more. (comments?)
Both models are very basic only, they are not rigged and not weighted yet. (We will do this in the course).
Notes
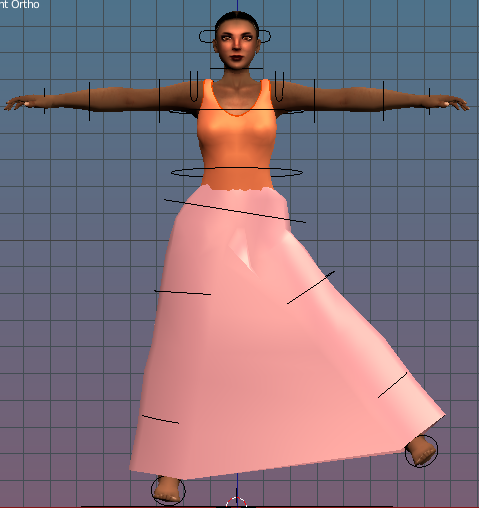
I have been asked to also add a robe mesh to demonstrate how a long dress should be weighted. I decided to make this an exercise instead. We will get to this topic during the course.
Feedback ?
Please comment about any aspect of this course in the comment section below. Thanks a lot!
All text above this message is considered as finished. All text below this message is just a collection of material that might be used in the course. Please feel free to comment on any part at any time. Your contributions are important to form this into a useful knowledge source.
Basic Principles of Weighting (optional reading)
The goal
First things first. Our goal is to have an easy way to animate our meshes with the least amount of distortion. It is most important to never forget that this is what we want to achieve!
Weighting explained
The straight forward approach to reach our goal would be to model each pose separately, and later use a sequence of mesh models to animate the character. However that is not a practical solution. we would end up with tens, even hundreds of separate meshes just to animate one single character. Indeed, very impracticable.
So, instead of defining many separate mesh models, we create an easy to handle abstract model of our mesh, the skeleton. The skeleton is a set of bones (26 for OpenSim and similar). Each of the bones can influence the entire mesh when it is moved around. The influence of each bone on the mesh is defined separately for each vertex. It can be expressed as a value in the range [0.0 … 1.0] where:
- A value of 0.0 means: whatever the bone does, it does not affect the vertex.
- A value of 1.0 means: the vertex moves in parallel to the bone.
- Any value in between 0 and 1 indicates the amount of influence on the corresponding vertex.
So actually we need to define a mapping between each bone of the skeleton and each vertex of the mesh, that is: we define one weight map for each bone of the character. Thus when the character’s skeleton moves, then the character’s mesh moves along with the skeleton according to the sum of all influences defined in the entire set of weight maps.
Bone Weight maps and vertex Groups
In Blender the weight maps are stored in vertex Groups, where the vertex Group and the corresponding bone have the exact same name. So when you create the weighting for a character, then (in theory) you will end up with exactly the same amount of vertex groups as you have bones. And each weight groups will contain exactly one weight for each vertex of the mesh…
Well, this is not exactly true. In practice it is possible that a mesh is only influenced by a small subset of the skeleton bones. For example when you rig a pair of boots, then the entire set of upper body bones will not have any influence on the shoe, and the weight groups for the remaining bones can be omitted, because they are empty anyways. So in practice your mesh will only need weight groups for the bones which are used for its animation (for example “ankle” and “knee” bones for a boot made for OpenSim and similar)
Actually it also turns out that a bone weight map typically is populated mostly with 0.0 entries, because of the same reason as mentioned above: An arm bone will not take control over a part of the mesh near the foot, etc… A bone will typically only need weights for nearby vertices. Hence bone weight groups are in most cases populated only with a small fraction of all vertices of the animated mesh and all weights with value zero are not necessarily stored in any weight group.
The weighting Color Code
Weight maps can be visualized by using a cold/hot color system, such that areas of non influence are drawn in blue (cold) and areas of high influence are drawn in red (hot) in between influences are drawn in rainbow colors, depending on their value (blue, green, yellow, orange, red) Blender (and Maya as well) has added a special visualization for unreferenced vertices to be drawn in black. Thus you can see all referenced areas and all unreferenced areas ( in black) at the same time. This is practical when you look for weighting errors (we will get back to this later).
Note: Currently Blender does not distinguish between vertices with Zero weights and unreferenced vertices. Both are rendered in Black.
Blender rules for weight maps
Blender comes with a practical shortcut: a weight of 0.0 is not needed to be stored in a weight map. Instead of that Blender assumes:
“if vertex is not contained in bone’s weight map, then bone’s weight on the vertex is assumed to be 0.0″.
This rule saves a lot of unnecessary entries in the weight maps and still it is exact.
And there is another practical rule: If the weight map of a bone is completely empty, it can be removed as well. So for example when we have rigged a pair of boots, then we only need the ankle bones and the knee bones weight maps for it. All other weight maps can be removed because they contain no entries. Blender assumes:
“if bone has no weight map, then all vertices of the mesh are assumed to have a weight of 0.0 for this particular bone”
The special rules of OpenSim and similar
While the special rules for Blender make a lot of sense, the OpenSim animation system has different rules. However they are very similar, except 3 important details:
- OpenSim only accepts a rigg when the weight maps for at least 21 main bones are defined. However the weight maps may be empty. Thus while in Blender you can remove empty weight maps, you have to provide weight maps for all bones (even if they are empty) when you upload your mesh to OpenSim and similar worlds.
Avastar hint: This is automatically adjusted for you during export. - If a vertex is not contained in any of the weight maps, it will be removed from the mesh when worn and you get unexpected “holes” in your Object surface. Hence you have to ensure that each vertex of your mesh has a weight in at least one of the Bone weight maps.
Avastar hint: The exporter will reject meshes with unreferenced vertices and create a report - While in Blender each vertex can appear in all weight maps, for OpenSim there is an upper limit of 4. Thus you must ensure that for each vertex of your mesh there is at least one containing weight map, but no more than 4 weight maps.
Avastar hint: This is automatically adjusted for you during export.
Weights are not absolute!
The principles of weighting are in principle not very complicated. However there are a few details which sometimes make modifying a weight map become a true challenge. And the most overlooked but also most important detail here is: the weights on a weight map do NOT specify absolute influence but relative influence.
As an example: Assume you have 2 bones, both of them have a weight of 1.0 on the same area of the mesh. since a weight of 1.0 means full influence, the mesh gets maximum influence from both(!) bones. But it can not follow 2 masters at the same time. Thus both bone influences get normalized, that is in our case: since both bones want the exact same influence on the mesh part, they actually get 50% influence (0.5)
The relative weighting may sound an easy thing. But take care, sometimes the system can fool on you. Look at this example: let’s say we have one vertex which is only weighted to one single bone. The weight is 0.0001. Now what happens ? we might think its a small weight, so the bone influence is very close to zero… well, since the vertex is assigned only to one bone, that bone gets the full influence on the vertex. So it is irrelevant how big the weight is. if it is > 0.0 then it is 100% influence in this case.
Please keep this detail in your memory as it can be the cause of a lot of weighting issues you might have to solve in the future.
Weighting Tools I (The Pants)
Weighting tools I (Pants)
I plan to step through the “making of the weights” and wherever something has to be decided i would like to tell why that decision was taken. I have real trouble to just do it without at least telling why 🙁
So first assign weights…
- What the different weighting options do in the Assign Panel
- Why using weight Copy from the SL Avatar is bad
- Why it is good
- When does it work best (tights, examples: models in this video)
Now assign weights with copy from meshes because this
might work best for our purposes…
- Cleaning up after assign
- Examine weights in edit mode
- Examine weights in weight paint mode
- The Blender weight editor (in edit mode)
After cleaning, we have to go and test the weighting and fix it
where needed…
- fixing weights
- a “work” animation (for finding weight issues)
I introduce my “working animation” which contains 2 extreme
poses and a transition between these poses, so that you can
“scrub” over the timeline.
I am not showing how i made this animation, but i just
explain how it works…
- x mirror for weight editing (and its pitfalls)
- vertex mask selection
- Copy weights from other meshes (avastar copy)
Although you can get perfect results by editing weights per vertex,
i think it is more efficient to learn the usage of the various other
weight tools… Lets look at the knees and try out a bit …
- working with blender’s weight tools
- Clean
- Levels
- Blend
And now lets do some manual painting…
- Working with Brushes
- Add/Subtract
- Mix
- Blur
Now if there are still issues with weighting on small areas,
then its time to go into details of editing single vertex weights
- Editing weights by numbers
- Assigning weights to vertex groups
- Editing/removing existing weights
Exercide
- What is wrong with the SL Avatar’s default skirt ?
- How could it be improved.
Solution to be discussed on the comments section …
Weighting Tools 2 (The Tank Top)
Weighting tools 2 (shirt)
- Some thoughts about the shoulders
- How do head/neck/collar/upper arm influence the shoulders of the avatar ?
- What do we want for the straps ?
- Demonstrate usage of copied weights…
- See how this is BAD because the weights are just crappy
- try automatic weight from bones
- See that this is slightly better but the weights propagate too far into the mesh
- reduce the range of influence (use Levels Tool)
- Clean up …
Old content of this page
Old Content of this page
The video gives a short overview about the weighting tools in blender and Avastar. The video transcript is available at the bottom of this page….
Transcription
Video links:
- The Model
- Preparation
- Parenting
- Weighting
- Weight Painting
- Rig Presets
- Check weights
- Mirror Weights
- Clear Weights
- Copy from Rigged
- Bone to Bone Copy
- Deforming Bones
Intro
Hello and welcome to my not so
short introduction to the new Avastar weighting tools!
I will take the opportunity to tell you a few tips and tricks,
although this might occasionally become a bit boring
for the blender nerds.
However: i hope that you will find this video interesting enough
to watch it up to the end.
The Model
So, lets first introduce my working model,
this pair of boots.
Note that i used two modifiers for this model.
And we have to take special care here
because the used skeleton does not work well with the mirror-modifier,
So we will apply it now.
Preparation
Next we will create a new Avastar character,
and then adjust the boots to the Rig.
By the way, if your mesh is not perfectly symmetrical,
then many of Blender’s mirroring functions will fail.
I will get back to this later when i introduce the weight copy tools.
However, these boots are fine because they have been created
with a mirror modifier.
Actually i also apply an initial pose to the feet,
so that they better match with the boots.
This will give me slightly better initial weight-values,
However You may need to play a bit when you try this with your own attachment.
As a rule of thump i found: the better results are achieved when the meshes match up closer.
Parenting
Now we are ready to parent the shoes,
Please ensure that the Avastar armature and the object
are both set to Object mode.
Then select the shoes and the armature.
And just in case you have forgotten about that,
you can select multiple objects by holding down the shift-key
and use the right mouse button for selecting more objects.
By the way, the order in which you do this selection is not important.
Right after you have selected the mesh and the armature,
you will find the Rigging-options in the Custom mesh panel
within the tool shelf.
This panel is used for parenting attachments to the rig,
and When we enable the with-weight-copy option here,
then Avastar will also copy the weights from the Avastar character
to your boots,
This will provide a reasonable initial weighting.
But please be aware that any automatic weight-copy method
can only create an approximate solution,
So you most probably have to fix the weighting later by hand.
And i show you now how the new weighting tools can help you with this task.
Let us ignore the other available rigging options for now,
The default settings work well for our purposes.
But before we proceed, please take a closer look at the
parent-to-armature button.
Here you see a small number enclosed in parentheses.
This number indicates how many meshes will be parented.
In our case this number is 1,
because the boots are actually the only selected mesh object
which currently can be parented to the armature.
So you actually can parent multiple mesh objects in one single step.
ok, let us now call the parent-to-armature function.
If you take another look at the rigging panel,
then you see that it now contains a Detach-from-Armature button,
and you find another small number enclosed in parentheses.
Now, this means that one of the selected
objects can be detached from the Armature,
and you might have already guessed it, that’s still the boots.
And just for completeness, if you select multiple objects,
then of course they can be detached in one single step as well.
And this little number tells you how many objects will be affected.
Weighting
ok, so for now we are happy with the parenting,
and we turn our attention to the next step,
that is: improving the mesh-weighting.
Well, actually the boots have already been weighted
automatically in the previous parenting step.
And we can find the corresponding weight maps
in the object-data properties of the boots-model.
In blender these maps are actually stored in vertex-groups.
Here, you see that Avastar has created 4 vertex groups,
one for each of the involved bones.
Please note that the mesh importer insists to
get vertex groups for all deforming skeleton bones.
These extra-groups will be added silently when Avastar exports your work.
So you do not need to worry about that.
Avastar will take care and do this job for you.
Weight Painting
Now finally, lets head over to weight painting.
So, first select the armature and set it to Pose mode.
I will also reset the skeleton to the rest pose,
to ensure that we start in a well-defined position.
Now select the boots and set them to weight-paint-mode.
You may have noticed that selecting the mesh-object can sometimes become a challenge,
But you always have the Outliner as an alternative option for selecting.
You will find the boots as a child of the Avastar rig, and you can
select them by left click on the corresponding outliner entry.
As soon as we have entered weight paint mode,
the boots turn entirely blue.
This indicates they are not weighted to the currently selected bone.
But note, we currently see only the green control bones
which are mainly used as controllers for the animation,
they are not weighted, thus they appear in blue.
So, where can we find the weights then?
Well, the weights are normally associated to the used skeleton,
but this part of the rig is currently hidden,
and we need to uncover them now.
Rig Presets
However, since weighting is a major task in your project,
We have added preset buttons to the bones display panel.
one preset for weighting,
and one for animating.
So instead of adjusting the rig manually
we just select the weight-preset,
and we are immediately ready to go.
Let us do a quick check what the preset has changed.
Apparently it has unhidden the deform bones, and it has hidden the control bones.
It also has unlocked rotation constraints,
which otherwise would
have protected the skeleton from manual modifications,
and finally: it has enabled the x-ray mode for the bones.
Bye the way:
If you do not like the default look of the bones
then you can as well change the bone-display type
from the default Octahedron-shapes to stick shapes.
Furthermore you can switch back to the default settings
by clicking on the Animation Preset button
at any time.
But let us keep the weight preset for now.
Let’s switch to the local-view
by pressing the percent-key on the keyboard.
And here is another side-note:
If you select at least one bone before you go to local view
then the skeleton will keep visible as well.
Now our display looks clean and organized,
and we can proceed with our main task,
that is: checking the weights.
Check weights
Basically we do that by posing the skeleton and then examine
how the mesh reacts.
And, very important,
please do not forget to switch back to the animation-preset
after you have finished your weighting task.
Otherwise the green control-bones won’t work anymore as expected.
You also must be aware that the deform bones will snap back
to the green control-bones as soon as the animation-preset is enabled again.
well, then lets examine now how Avastar has initialized the weights
during parenting the boots.
Select the right ankle,
and rotate it towards its extreme positions.
You see that it is not all-that-bad.
However we could improve the weighting a bit.
But lets turn to the other boot and check if it behaves in the same way.
Here you see the distortions are bigger. And in fact a close inspection shows
that the weights of both boots are different.
This is not caused by Avastar, in fact this asymmetric weighting
is one of the weird features of the default Avatar.
Mirror Weights
For this sort of problems we have added another function into the tool-shelf: “Mirror from opposite bones”.
This function works reliably on all of the Avastar bones, And it is used as follows:
Select the bones which contain the wrong data.
In our case, this are the left ankle and knee-bone.
Then locate the Mirror from opposite bones function in the tool-shelf.
Now the weights are mirrored from the opposite-bone,
as you can verify by direct comparison.
But please take care, If your mesh is not symmetrical along the X-Axis,
then the mirror copy will not work on your attachment.
Note that it is not sufficient when the mesh just looks symmetrical!
It really must maintain precise mirror symmetry.
You can fix that by first deleting half of your mesh,
then add a mirror modifier,
and finally apply the modifier.
Clear Weights
Well, sometimes we want to restart our weighting from the beginning,
thus we might want to completely unweight one or more bones.
You can do this by deleting the corresponding vertex groups
in the object-data properties.
But removing vertex groups is not at all recommended.
so we added another option for cleaning-up vertex groups.
The remove-weights tool.
This function removes all vertices
from the selected groups
but keeps the groups them self available for later use.
Select the bones which you want to reset.
And remember that you can hold down the shift-key
and use the right mouse button to select multiple bones.
Then locate the “remove weights” function.
You see that it has worked when the mesh-color turns to blue.
Copy from Rigged
So, we have added yet another copy tool:
copy-from rigged.
This function copies the weights from all other meshes
which have been parented to the armature,
Like for example the Avastar base-shapes.
We use this function by first selecting all the bones
to which we want to copy the foreign weights.
Then we call copy-from-rigged.
Please note that this copy option uses all visible
meshes as weight sources, provided they are also attached to
the same armature.
That is indicated by the number in parentheses.
In our case that is the number of currently visible Avastar-meshes
on the rig. Please remind that we currently do not
see the other meshes because we have enabled local-view.
So, lets get back to global-view for a moment.
For our boots it is convenient to take only weights
from the lower body part of the character,
because we probably want to avoid to get
any weight information from other parts like the eyes or the head.
However Avastar’s weight copy is clever,
and it normally gets its task done
even when all of the Avastar meshes are visible.
But let us become very picky for a moment,
and hide all meshes except the lower body.
We can now call the weight copy function right away,
but we also can first switch back to local view.
The weight-copy will work in either case.
But hold on, this is interesting,
Take another look at the weights.
That looks familiar, doesn’t it ?
So, we have seen these weights before,
And indeed, the very same copy function
was called when we did the mesh parenting.
That is: when you enabled the parenting option with-weights!
do you remember ?
So, during the mesh parenting with weight-copy
the entire set of target-bones received weights.
but now you can tell exactly
which bones shall be affected by the copy.
So you can decide for example to copy only to one single bone,
or you can select all of the bones
and get the exact same results as you
got previously from the mesh parenting with weight-copy.
Bone to Bone Copy
ok, so there is one more copy option available,
the selected-to-active copy.
This is actually a bone-to-bone copy,
which can be used for example when
we get into weighting of collision volumes.
And here is an example for doing that.
First we want to enable the visibility of the collision-volumes,
and we do that in the show-bones panel.
Now we must know that each bone has a deforming flag.
When this flag is set, then the bone weights are
used to move the mesh along with the bone. And when the
flag is not set, then any weights on the bone have
no effect at all.
By default only the deform bones
are flagged as deforming bones.
But lets ignore this for a moment and proceed.
We will come back to this topic in a minute.
Well, now we can start weight painting the collision volumes by hand,
But there is another option which may have certain value for your project as well.
There is a bone-to-bone copy option that can be used to copy the weights from
any bone to any other bone.
And we can make use of this function as follows:
First select the source bone,
Then hold down the shift key
and use the right mouse button
to select the corresponding Collision-Volume.
Now, locate the “selected-to-active” function.
You find it in the tool shelf.
Note that this function always operates on exactly 2 bones.
Hence we have to do a separate bone-to-bone copy for each bone-pair.
After we have copied the weights over to the collision volumes,
we can safely remove the weights from the other Bones.
However, when we now test our weighting,
then we see that the boots no longer
react on the bone movements.
This is so because we have just removed all weights
from these bones.
And the collision volumes which indeed have weights:
are by default not marked as deforming bones.
Thus right now not a single bone of the entire bone set can influence the boots.
And this is where the deforming option comes into play.
Deforming Bones
That is, we need to enable the collision volumes for deforming.
We do that by first selecting all collision volumes
then we locate the Bone Deform panel
and there we enable Bone Deform.
And when you now try to pose the boots,
then you see that they react again on the bone movements.
Note that this happens although the main skeleton deforming bones are now completely unweighted.
And the good news is: The Avastar exporter knows how to turn this into a valid
export file for OpenSim and compatible worlds.
Hence when you now export the boots to your world,
then they not only move along with the mesh as expected
but they also react on the avatar shape-sliders in the viewer.
The End
I am now at the end of my little introduction and i hope you enjoyed the presentation.
and, thank you for watching.