Bone Weight Maps
A Bone Weight Map defines how much influence a specific bone has on each vertex of a specific mesh. The influence is typically defined in a range from 0.0 (no influence) to 1.0 (maximum possible influence). So if a vertex shows up in a Bone Weight Map, then it will be controlled by that bone. The amount of weight defines if the vertex only slightly follows the bone (weight ~0.0) or moves as if it where glued to the bone (weight ~1.0)
Note: Bone weight Maps are defined per Mesh (as a set of vertex groups, see next chapter)
Visualizing Weight Maps
Weight maps are often visualized directly on their associated mesh by using a color code (where each weight value between 0 and 1 is mapped to a color in a color band. Blender uses by default a color band that maps a weight of 0.0 to the color blue, and a weight of 1.0 to the color red. In between weight values are mapped to the rainbow colors:
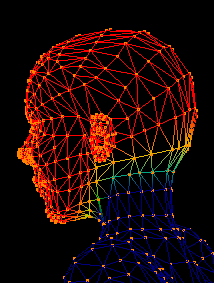
Here is an example for the visualization of the Weight Map of the SL Avatar’s mHead bone:
Note: a vertex can be animated by more than one bone in parallel. So it is possible that a vertex can be referenced in more than one Bone Weight Map (thus providing the potential for very complex movements) This happens typically where 2 bones touch each other. In that case the influence is split between the 2 adjacent bones.
SL Avatar Weight maps
Since a Bone Weight Map is always related to a specific bone, that means for the SL Avatar: We have to provide 26 weight maps (one Map per bone) in each mesh that we want to rig.
So a weight map is always related to one bone. And it contains one weight value for each vertex. Well, this is not 100% correct. Actually there is a rule:
The Rule of Zero weights
If a vertex is NOT mentioned in a specific weight map, then it is assumed to have a weight of 0.0 for the related bone. This rule helps to keep the bone weight maps reasonably small because now the map only needs to contain those vertices which are actually controlled by the bone.
You can see in the next image, that indeed most areas of the SL Avatar are assigned to only one bone, thus the above rule helps to avoid unnecessary clutter in the Weight Maps. The image shows areas with different numbers of “weights per vertex” for the SL Avatar.
So you can see that most vertices of the Mesh are actually controlled only by one Bone. And you can see that typically near the bone joints we find 2 weights on the vertices.

Note: The rule of Zero weights only applies to Blender. It especially does not apply to SL. In fact the SL graphic engine marks vertices without any weight assignment as weightmap error and rejects the import of the rigged mesh. Hence you must ensure that in Blender each vertex is assigned to at least one weightmap to later avoid import errors in SL.