Freeze mesh moved to Avastar Tools
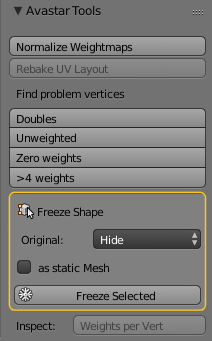
Normalize Weightmaps removed
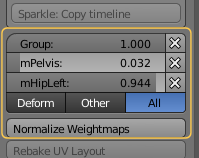
we have ported Avastar’s weight editor to Blender a while back. So it is time to say good bye to the Avastar Editor. You can find the Blender Weight group editor in the Properties sidebar of the 3D Viewport.
The “old” Avastar Weight editor was in the Toolshelf
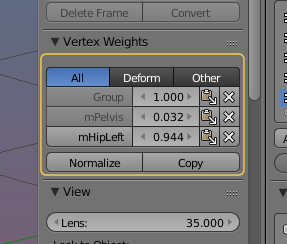
The “new” Blender Weight Editor is in the Properties sidebar of the 3D viewport
Rigging&Skinning panel splitted
The single Rigging & Skinning panel has become way too complicated to use. So we decided to split this up into 2 separate panels:
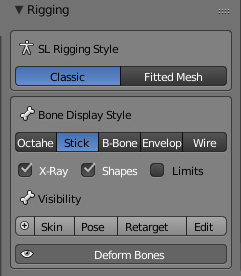
New features in the Rigging Panel
We have reorganized the Rigging Panel into 2 main sections:
SL Rigging Style
Here you will setup the Avastar Armature either for Classic Rigging (default) or for Fitted Mesh rigging.
Note: This setting affects only which bones of the Rig will be used as Deform Bones. The Bone Weight Maps can be configured with the weight generator in the Skinning Panel (see below).
Bone Display Style
Here we have added 2 new settings:
- Shapes: enables/disables custom shapes of the bones.
- Limits: enables/disables the limit indicators for bone rotation limits.
We added these settings to avoid unnecessary mouse moves and searches for these settings in their original panels (properties sidebar and bone data properties window)
The Deform Bones displays whichever bones have their deform flag set. This set is determined dynamically.
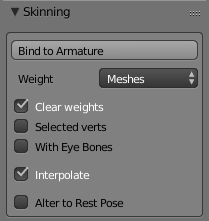
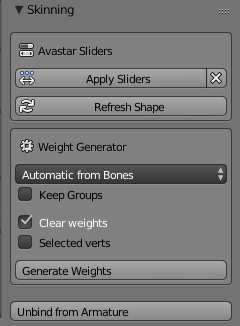
Skinning Panel details
It is sufficient to have an Armature Modifier. Also the correct name for the process is Binding and not Parenting.

Note: This panel does NOT affect the rig, but only the weight maps of the selected Mesh Objects (see also above)
Detach is now Unbind
Detach Armature has been renamed to Unbind from Armature. This seems to be an accepted standard term for this process.
Armature Info
Note: The Armature Info Panel shows the version difference between your Armature (in the example My Rig and the Avastar Version (1.1.20 in the example).
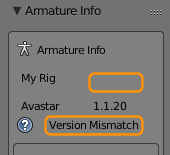
You can check if the Armature is outdated(1) (in the Tool shelf).
(1) Some very old Blend files will not show an Armature version, because this feature has been added in Avastar-1.1. Because of that it may be possible that you do not see any Rig version info. However Avastar treats Rigs without version info also as outdated.
- Armature name
- Avastar Version number
- Rig version Number (may be empty)
- Version Mismatch Info (if applicable)
- List of assigned Custom Meshes
- Number of animated Bones
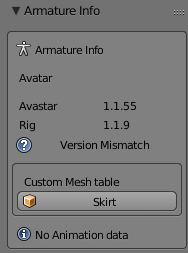
Whenever Avastar detects a Version Mismatch, then it offers an Update Button in the Avastar Tools Panel:
Inplace Armature Update
- Select your old mesh or your old Armature.
- Then – in the Tool Shelf – look for Armature Info. If Avastar indicates a Version Mismatch, then…
- Look for the Avastar Tools Panel and click on Update Avastar.

Select the Armature and click on “update”
Motion Transfer
“Animation” Tab. This panel has been reorganized slightly:
Separate Pose section
The Pose section has been separated into one sub section. Here you now specify the Animation reference Frame and here you find the Match Scales operator. Transfer Pose transfers the pose in the current tie frame to the target armature.
make Seamless (Experimental)
this section has always been experimental. You normally do not want to use it, unless you import motion capture files. In that case this section helps you to reduce the complexity of the animations.
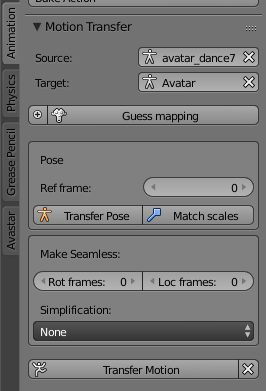
Transfer Motion
Is now a separate Button at the bottom of the panel. The Operator for cleaning u the timeline of the target object has been redesigned as a small white “X” icon (This icon stands for delete Motion)