Show Bones (Armature Properties)
Sometimes you do not want to see all bones at once to reduce clutter on your screen. The Bone display settings directly correspond to the Avastar Bones.
You can enable/disable the visibility of each bone set by enabling the corresponding view button (see image).
You can enable/disable the visibility of each bone set by enabling the corresponding view button (see image).
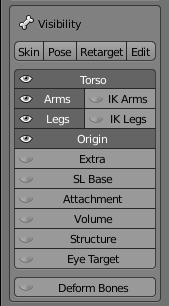
Bone Sets
- Torso, Arms, Legs, Origin: These buttons control which of the Control Bones (green) are visible
- IK Arms, IK Legs: These buttons control which of the IK Bones (yellow) are visible
- Extra: There are a few Extra bones which normaly are not used for Animation in SL. These bones are either not weighted to the default Avatar (Skull, Foot Bones and Toe Bones) or are automatically animated (Eye Bones). However you can use these Bones in your animations for custom meshes.
- SL Base: to display the SL Bones (Blue)
- Attachment: to display the Attachment Bones (red)
- Volume: to display the Volume Bones
- Structure: to display the Structure bones
- Eye Target: to display the Eye target (needed for animating the eyes)
- Deform Bones: to display all bones which have the Deform Option enabled. The content of this set can change dynamically (see fitted Mesh)
Presets
At the top of the panel we have added 4 Presets for different usage scenarios:
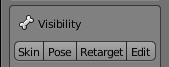
- Skin is used when you want to do weight painting on your Mesh. This preset will enable the SL Bones and also unblocks their rotation setting so that you can rotate the bones for testing your weights.
- Pose is used for all your animation work. This preset enables the green control bones which are optimized for your Animation tasks. This is also the default preset forAvastar.
- Retarget is used when yuo want to import another Animation from a BVH file.
- Edit is used when you want to edit the Bone’s Rest poses, for example when you create a non human character.
Note: Selecting a part will display the bone group. You can not disable visibility of ALL bone groups. Hence at least one of the bone groups is always visible.
Note: Selected elements (dark background) are made visible, while unselected elements get hidden.
Show Bones (Tool Shelf)
The Show Bones panel also shows up in the Tool Shelf. There it provides some additional entries for convenience:
- Bone Display style: To change the bone shape.
- X-ray: To display bones even when they are occluded (hidden) by the mesh
- Shapes: To enable the usage of Custom shapes
- Limits: To display the bone movement ranges.
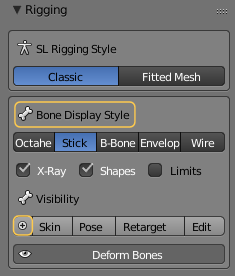
The + icon on the left of the preset buttons expands the Bone Panel
Note: The additional entries in this panel are “borrowed” from Blender and made available on the tool shelf to have all functions at one place and thus avoid frequent switching of the focus.
Note: In the tool shelf the Bone Visibility Panel can be collapsed and expanded by clicking on the small plus sign to the left of the Bone Presets.