SL Bone Control
There are situations where it is desirable to move/rotate the SL bones. For example during weightpainting you may want to pose the SL bones while painting on the mesh. But the SL bones can by default only be moved/rotated indirectly by posing the control bones. This is where the Armature Editing functions step in.
- SL Bone rotations:
Unlock to allow rotation of the SL bones during posing.
Lock after you are done with weight painting.
Note: When some bone rotations are locked, other bones are unlocked, then you will see 2 buttons (for “Lock” and “Unlock”) side by side.
Note: Locking snaps the SL bones back to the Control bones. This is intended behaviour!
- SL Bone location:
Unlock to allow location changes of the SL bones during posing.
Lock after you are done with weight painting.
Note: When some bone locations are locked, other bones are unlocked, then you will see 2 buttons (for “Lock” and “Unlock”) side by side.
Note: Locking snaps the SL bones back to the Control bones. This is intended behaviour!
- Structure Select:
The Avastar Bone set also contains a few structure bones. These bone are normally not selectable.
enable: make the structure bones selectable (for move and rotation)
disable: make the structure bones unselectable (default)
Note: When some structure bones are enabled for select, and others not enabled for select, then you will see 2 buttons (for “enable” and “disable”) side by side.
|
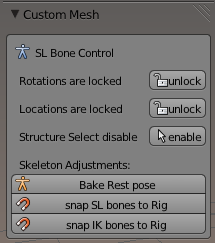
- Bake Rest Pose:
Use this function if you want to make the current bone setup a new rest Pose. This is mostly useful when you are creating non human rigs.
- Snap SL Bones to Rig:
Most useful function to automatically move SL Bones to the same location/rotation as the related Avastar control bones. You use this function after you edited the skeleton to match your very special (non human) mesh character.
- Snap IK Bones to Rig:
Same as for SL Bones, but for IK Bones.
|