The Facts of (2nd) Life:
Regardless with which 3D tool you work, as soon as it comes to rigged characters or attachments, there is one important fact which should be always remembered when you are working with character meshes:
Now the problem is: there is no neutral shape which keeps the worn mesh exactly in the same scale as how it was imported to your world.
That is: “rezzed on ground” and “worn” look different.
But there is a technical “Restpose” shape which when worn with the default mesh will recreate the shape of the default avatar.
The Restpose Shape:
This Restpose Shape is provided with the skeleton from avatar.blend (and from the Avatar-Workbench) There are rumours that this shape is Ruth, but i could not yet find a proof for this.
As soon as a mesh that has been bound to the Restpose Shape in Blender is imported to SL and worn with the SL default shape, the mesh matches up almost perfectly with the SL Default Avatar.
The Avastar Shape:
For Avastar however the default mesh already looks exactly the same in Blender AND when worn in SL. The magic happens in the Avastar-Collada exporter: The exporter calculates the “Reverse bind matrix of the current used shape”. Then it exports the mesh together with the bind matrices to Collada. Finally when the mesh is worn with the same shape in SL as was used in Blender with Avastar, then it will match up perfectly. And when it is rezzed on Ground the shape stays exactly the same as when worn.
What you see is what you get
So Avastar follows the “What you see is what you get” principle. Here is a comparison of the Avastar default shape (left) and the “Restpose shape” from avatar.blend (right):
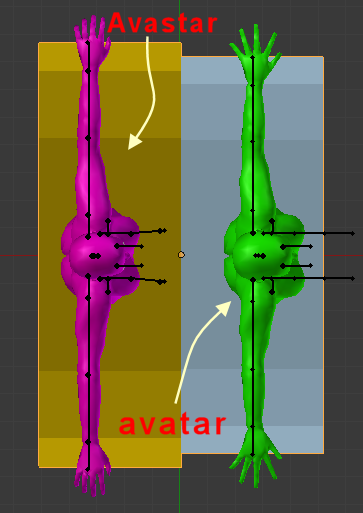
An enlighting experiment
This is the WYSIWYG proof that the shape of the Avastar character matches to the arm length of the default SL Avatar.
Using the Avastar skeleton:
In SL:
- Make a new default Shape in SL and wear it.
- get a pose stand which moves your avatar into T-Pose
- move your camera far away from your Avatar
- press CONTROL 0 (zero) a few times to zoom in
- Make a foto from front view
In Blender:
- Create a new Avastar character
- go to Orthographic view
- make a photo in Front View
Now compare the 2 photos. You will have to rescale them of course, but you will see that the silhouette of both characters is almost identical modulo some imprecision due to the fact that SL has no orthographic camera.
Using the default SL Skeleton
Here is a Video proof (an extract from a detailed video about the SL skeleton) which shows how the default SL Skeleton is displayed differently in SL and in Blender.
Making the Rigs “Compatible”
So now the big question is: How do we convert a mesh based on the Workbench skeleton to a mesh based on the Avastar skeleton ?The main problem is that Avastar makes some assumptions as described further above. Even when you make a non Avastar skeleton look the same as an Avastar skeleton in Blender then you still will get different results in SL. But here is a method how you possibly can get this solved:
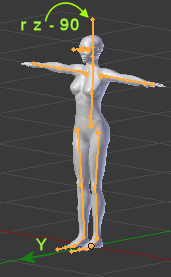
- Import your dae file and rotate the entire mesh by -90 degrees in z such that it now looks into negative Y direction.
- optionally move the mesh and skeleton to a separate layer.
- And take care that the mesh and skeleton are located at the viewport center (location <0,0,0> )
 Important: do not use layer 9 (the right most upper layer in the layer selector. This layer is currently strictly reserved for Avastar. When you import from the Workbench, then please move the skeleton on layer 9 to another layer!
Now add a new Avastar character, enable SL bone display and use stick shapes. If you do not remember how to do that, here is a quick method:
- Select one of the Avastar meshes
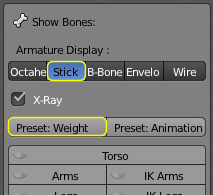
- in the tool shelf, locate the Show Bones panel, and switch to Preset: Weight
- Let the SL Bones display as stick shapes

- go to Object mode
- select all Avastar meshes
- hide them (press “h” on the keyboard) and please do NOT delete them!
- enable layer visibility of the layer where the user skeleton is located.
Now both skeletons are seen in comparison and you can examine the differences:
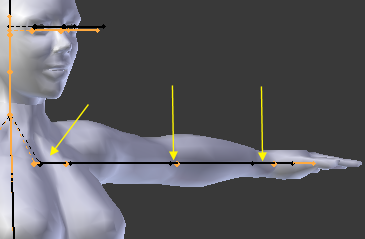

I found that the Avastar skeleton can be made equal to the workbench skeleton if you change the following Avastar sliders:
- Still with the Avastar armature selected, switch to the Object Properties Tab
- In the Avastar shape panel, select the “Skeleton section”
- Modify the Shape sliders according to the list aside.
- Head size = 72
- Eye spacing = 50
- Shoulders = 57
- Arm Length = 50
These slider values make the Avastar skeleton visually almost identical to the Workbench skeleton. You can store this “semi default” Avastar shape for later usage if you like.
- Remove the skeleton that came with your custom mesh character
- Your mesh will now snap back to the original rotation, so you have to rotate it again by -90 degrees
- Remove all armature modifiers from your custom mesh(es)
- Apply the rotation (Object -> Apply -> Rotation)
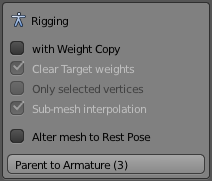
- parent your mesh(es) to the Avastar armature. If your shape already has weight maps, then just disable the “with weights” option
Now you can go ahead with your mesh work. But beware, this only works precisely within Blender. I am not sure what happens when you export your attachment to SL. The attachment might possibly show slight deviations from what you expect.