I will use the avatar_workbench within this tutorial.
Note: Of course you can use your own favorite character, or you can use avatar.blend from Domino Designs. If you have Jass, then avatar.blend is already on your computer. Or you can download my avatar_workbench.blend which is a modified version of the avatar.blend file and also contains a character made with MakeHuman. (Note you are free to use the MH characters for commercial reuse, see the MH License !)
 Step I
Prepare the view.
After you opened the file with Blender
- Switch to Layer 2
- Then SHIFT select layer 10, so that you can see the MH character AND the armature at the same time. You will now see the character as shown on the image to the right.
As i wrote before, you can of course use whichever character you prefer and you certainly do not need to use my blend file at all.
 Step II
Adjust the avatar foot to the heel hight you want to use.
- Right click on the Armatature.
- If you are not already there, switch to Pose mode
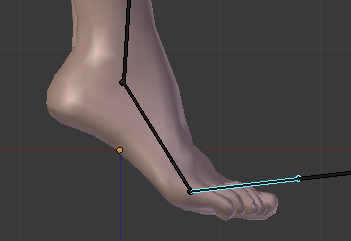
- Right click on the right ankle bone as indicated in the image to the right
- Then rotate the bone to your needs:
press “r” then move the mouse - Now right click on the right Foot bone,
press “r” again and adjust the toes - Optionally you can redo the same adjustments for the left foot.
- optionally you can change the material color from white to a light skin tone just for your pleasure.
The final shape should now look similar to the image below:

Step III (optional)
Store your pose into the Pose Library
 You may want to create several shoes with different heel sizes. For convenience you can store your current foot settings and recall them at any time later.
- In the Properties panel switch to Object Data
- Then scroll down to the Pose Library
- I have already added a foot position for a medium heel size.
- You can either use that setting by clicking on the magnifier icon (see image)
- Or you can create a new pose and store your current settings for later recall
Hint: When you recall settings from the pose library, then only the selected bones get updated! When you want to set the entire pose (all bones), then proceed as follows:
- Ensure, you have your armature selected.
- Ensure that you are in pose mode, or Object mode
- Select all bones (press “a”) once or twice until all bones are colored in light glowing blue
- Select the desired pose from the pose library
Hint: You always can reset to the default pose by selecting all bones, then pressing ALT+r
Hint: When you want to rename a pose, you would need to make a copy of it, name it to your needs, and finally remove the “old” pose from the library. I could not figure out a more ellegant way to do it.
Step IV
Sketch the Shoe.
 Blender comes with a tool named “Grease pencil”. Think of it as a quick tool for sketching your ideas directly on the screen.
Hint: The sketches are bound to selected items. So in order to get the tool do anything you first have to select the item on which or for which you want to sketch:
- I select the lower body part of the charatcer
- In the properties panel i can change the pencil properties. I only changed the color from Black to something better visible on a dark background.
- I kept the default Drawing settings to Cursor. So the Sketch will be drawn on a plane which is parallel to the current view and fixed at the 3D cursor position (see below).
- In the tool shelf i can enable “Use Sketching session”:

That allows me to make many strokes one at a time until i hit the ESCAPE key.
Hint: Instead of enabling a sketching session, you also can press the “d” key and while holding it down draw with your mouse (left button for draw, right button for erase)
- I also snapped the cursor to the current selection. In our case the sketch will be located inbetween the legs.
- Finally i made a quick sketch of my intended shoe shape (left image below). (do not forget to terminate the sketching session by pressing the Escape key!)
- When you change the view a bit, you see that you have indeed created a flat image onto an invisible plane which lies between the legs (right image below):


Now we are ready to start our modelling session. Please store your work into a new Blend file, so that the Avatar Workbench will not get modified and can be reused for your other projects:
for example: File -> Save as -> shoeQuest.blend